Connect to CyberArk Instance
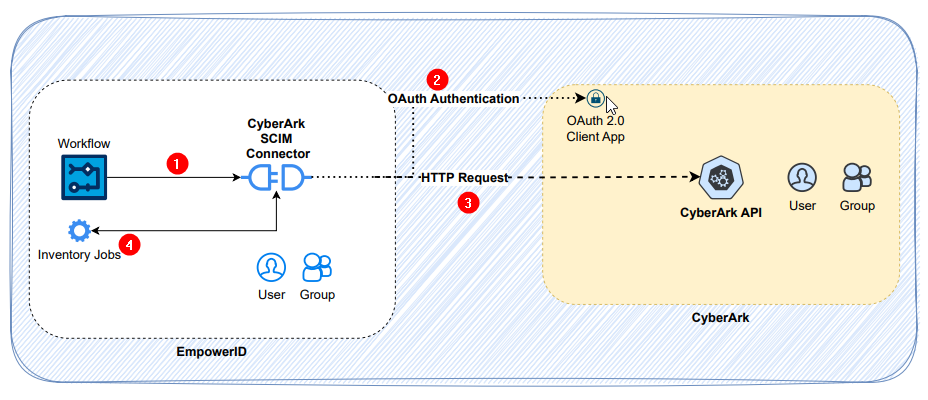
The CyberArk SCIM Connector allows organizations to integrate their CyberArk privileged access management system with EmpowerID's identity and access management platform. This integration enables centralized management of CyberArk users, groups, and their access permissions, along with streamlined identity synchronization between systems. This guide provides step-by-step instructions for configuring the necessary components in both CyberArk and EmpowerID
Prerequisites
Please complete the following configurations in your CyberArk instance and gather the necessary configuration values before starting the setup.
Configure CyberArk Instance
To integrate with the SCIM server, configure an OAuth2 client app in your CyberArk instance with the appropriate administrative rights and scopes. Please ensure that you have completed the following steps.
-
Configure an OAuth2 client application in your CyberArk instance following their official and latest documentation. The current document is available here Custom OAuth2 Client
-
If necessary, configure an appropriate SCIM-related scope. If you have configured a scope in your CyberArk instance, it must be added to the resource system config settings in the EmpowerID account store. Setting up a scope is optional and only required if your CyberArk OAuth configuration specifically uses scopes for access control.
-
Note down the Client ID and Client Secret of the OAuth2 client application for later use when creating the account store in EmpowerID.
Configure Account Store
Step 1: Create a CyberArk Account Store
To connect your CyberArk instance with EmpowerID, you need to use connectors and create an account store through Account Stores. This connection will enable the CyberArk identity information to be imported into EmpowerID, where it can be effortlessly managed and synchronized with data in any back-end user directories that are connected. Please follow the instructions below to create an account store for your organization's CyberArk instance in EmpowerID.
We first create a SCIM account store using the base SCIM connector workflow to integrate CyberArk. After the account store is created, we update the Security Boundary Type and Resource System Type to CyberArk SCIM Connector to ensure proper functionality. Refer to the Post-Creation Steps section for detailed instructions.
- Log in to the EmpowerID portal.
- Expand Admin → Applications and Directories on the navbar and click Account Stores and Systems.
- Select the Account Stores tab and click on the Create Account Store link.
- To proceed, please search for and select the SCIM Connector from the System Types menu. Once you have made the selection, click on the Submit button.
- Please provide the following information related to the account store and click on Submit to create the account store.
- Account Store Name: Provide a unique and descriptive name for the account store.
- App Service Base URL: The SCIM microservices have a specific URL, which should be provided as the app service base URL. The URL starts with the protocol HTTPS and ends with a leading slash (/).
- Client Secret: Enter the OAuth app's client secret configured in the CyberArk instance.
- Client ID: Also known as the audience in OAuth, this should be the client key from the CyberArk app configuration.
- You have successfully created an account store for the CyberArk instance.
Step 2: Confirm Resource System Settings
Ensure the following system settings are configured correctly and aligned with your environment values.
- Navigate to Admin > Applications and Directories > Account Stores and Systems and select the Account Stores tab.
- Search for the CyberArk SCIM account store you created and click the Account Store link for it.
- On the Account Store and Resource System page that appears, select the Resource System tab and expand the Configuration Parameters accordion.
- Verify the parameters given in the list below are correct,
- To edit the value of a parameter, click the Edit button for the parameter you want to edit.
- Enter the new value in the Value field and click Save.
List of Resource System Settings (Configuration Parameters)
| Name | Default Value | Description |
|---|---|---|
| AccessTokenScope | scim | Scope for access tokens. |
| AccessTokenUrl | {CyberArkSCIMBaseUrl}/Oauth2/token/SCIMClient | URL endpoint for obtaining access tokens. |
| ClientKey | {Value from Client} | Key provided by the client. |
| ClientSecret | {Encrypted value from Client} | Client secret, encrypted as a configuration setting. |
| CreateGroupUrl | {CyberArkSCIMBaseUrl}/scim/v2/groups | URL endpoint for creating groups. |
| CreateUserUrl | {CyberArkSCIMBaseUrl}/scim/v2/users | URL endpoint for creating users. |
| createOrUpdateGroupJsonTemplate | { "displayName": "", "members": [], "schemas": ["urn:ietf:params:scim:schemas:core:2.0:Group"] } | JSON template for creating or updating a group. |
| ExternalSystemSupportIncrementalMember | false | Specifies if incremental membership is supported by the external system. |
| GetDeleteOrUpdateGroupByIdUrl | {CyberArkSCIMBaseUrl}/scim/v2/groups/{0} | URL endpoint for retrieving, deleting, or updating a group by ID. |
| GetDeleteOrUpdateUserByIdUrl | {CyberArkSCIMBaseUrl}/scim/v2/users/{0} | URL endpoint for retrieving, deleting, or updating a user by ID. |
| IsIncrementalInventory | false | Indicates if incremental inventory is enabled. |
| IsPagedUsingToken | false | Indicates if pagination uses tokens. |
| LogonNameSuffix | {Value from Client} | Primary logon suffix for users during creation. |
| PageSize | 100 | Defines the page size for queries. |
| QueryGroupsUrl | {CyberArkSCIMBaseUrl}/scim/v2/Groups{0} | URL endpoint for querying groups. |
| QueryUsersUrl | {CyberArkSCIMBaseUrl}/scim/v2/Users{0} | URL endpoint for querying users. |
All URL endpoints use the base URL you provided in the account store configuration, represented as {CyberArkSCIMBaseUrl} in the settings.
Step 3: Post-Creation Steps
Since customizations are applied to CyberArk CRUD endpoints, the CyberArk connector has been extended to support these specific implementations. After creating the base SCIM account store, complete the following steps to update the security boundary and resource system types to align with the CyberArk SCIM Connector.
Please execute the following query to obtain the account store ID and retrieve the security boundary ID from the account store.
update ResourceSystem
set ResourceSystemTypeID=78
where ResourceSystemid={SCIMResourceSystemID}
Please execute the update provided below for the security boundary entry using the identifier you retrieved earlier.
update SecurityBoundary
set SecurityBoundaryTypeID=78
where SecurityBoundaryID={SCIMAccountStoreSecurityBoundaryID}