AD LDS (ADAM) Connector
AD Lightweight Directory Service (AD LDS) is a lighter version of Active Directory Domain Services that provides the means to maintain extranet directories separate from your Active Directory, create information consolidation stores, and authenticate web users with LDAP-based authentication. EmpowerID manages AD LDS in the same way that it manages an Active Directory account store.
Prerequisites
Before connecting EmpowerID to an external directory, please review the Getting Started with Directory Systems topic. The topic walks you through the prerequisites you need to complete before connecting to an external directory for the first time. These prerequisites include:
- Configuring the appropriate server roles for your EmpowerID servers
- Reviewing the Join and Provision Rules for your environment
- Reviewing the Join and Provision Filters for your environment
Procedure
Step 1 – Create an account store for AD LDS
-
Navigate to Admin > Applications and Directories on the EmpowerID navbar and select Account Stores and Systems.
-
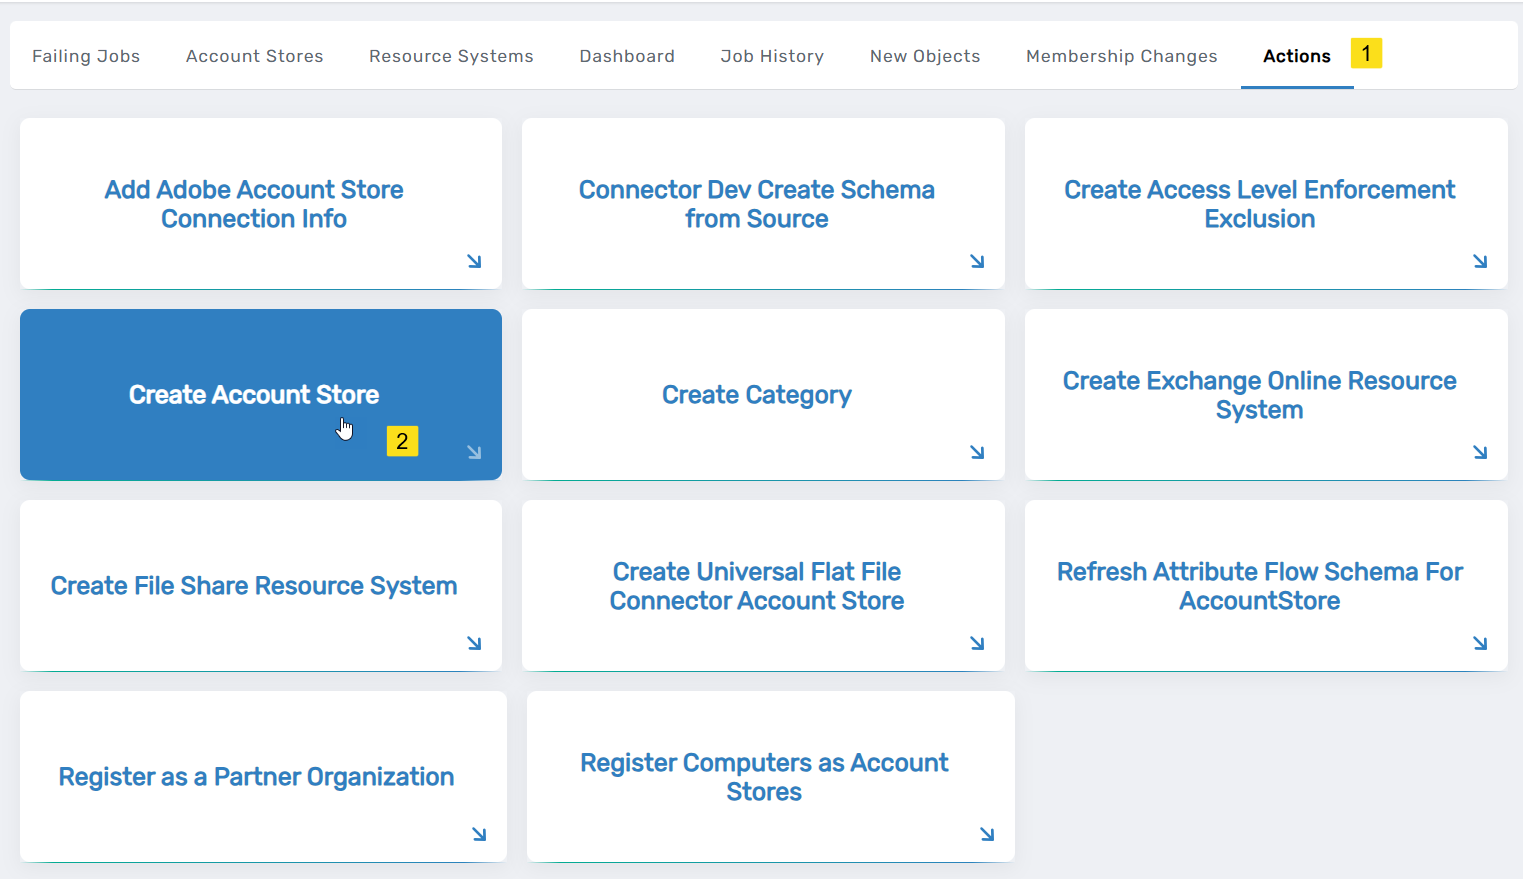
Click the Actions tab and select Create Account Store.
-
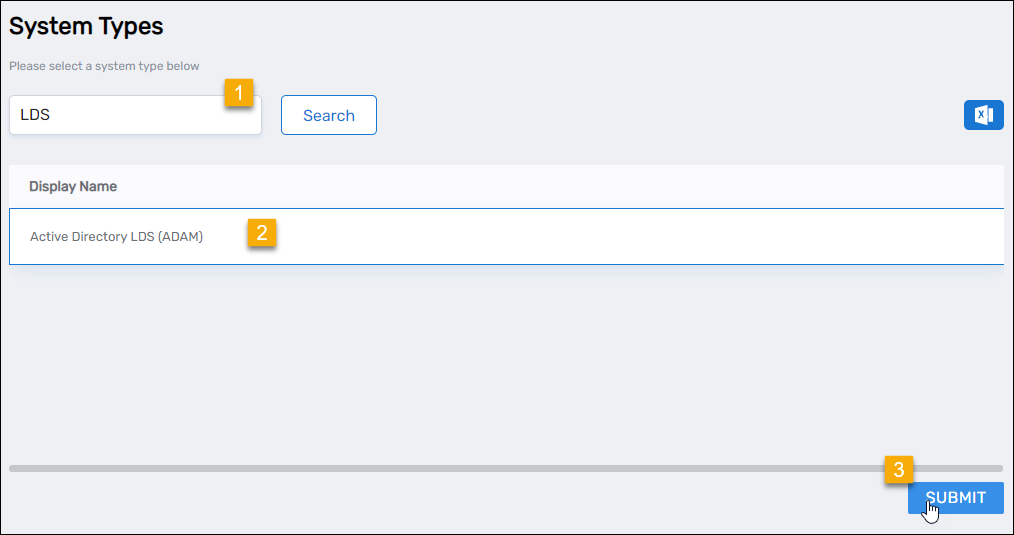
Under System Types, search for LDS.
-
Click Active Directory LDS (ADAM) to select the type and then click Submit.
-
On the ADAM Settings page that appears, fill in the following information:
-
Name and Display — Enter a name for the account store
-
AD LDS Server — Enter the name of the Active Directory LDS server and the port number if other than 389. The format is Server Name:Port Number.
If you are using LDAPS, type the Subject name of the certificate for the domain controller to which you are connecting followed by port 636 in the FQDN of Forest field. Thus, if the Subject name is "dc01.eiddoc.com," you enter dc01.eiddoc.com:636. -
Partition Suffix — Enter the partition suffix, for example: CN=PROD,DC=TheDotNetFactory,DC=COM
-
Domain — Leave blank if using a native AD LDS user account or enter the name of the domain that the server hosting the AD LDS instance is a member of, e.g., PROD
-
User Name — Enter the AD Account or the distinguished name of the AD LDS account, such as CN=Directory Manager,CN=Roles,DC=MyCompanyLDS,Dc=Com
-
Password — Enter connection credentials that EmpowerID can use to manage AD LDS.
-
Is Remote (Requires Cloud Gateway) — This setting appears for account stores with local directories, such as Active Directory, LDAP, SAP, etc. When enabled, this tells EmpowerID to use the Cloud Gateway Connection for that account store. The Cloud Gateway Connection must be installed on an on-premise machine. For installation information, please see Installing the Cloud Gateway Client.
-
-
When ready click Submit to create the account store.
-
EmpowerID creates the account store and the associated resource system. The next step is to configure attribute flow between the account store and EmpowerID.
Step 2 – Configure attribute flow
EmpowerID allows configuring attribute synchronization rules between the Linux system and the EmpowerID Identity Warehouse. Attribute flow rules define how attributes are synchronized and can be weighted for prioritization across multiple sources.
Attribute Flow Options
- No Sync: No synchronization occurs between EmpowerID and the Linux system.
- Bidirectional Flow: Changes in either system are reflected in the other.
- Account Store Changes Only: Changes made in Linux sync to EmpowerID but not vice versa.
- EmpowerID Changes Only: Changes made in EmpowerID sync to Linux but not vice versa.
CRUD Operations
- Create: Creates an attribute if it does not exist.
- Update: Updates an existing attribute.
- Delete: Removes an attribute value.
Configuring Attribute Flow
- Navigate to Account Stores and Systems and locate the newly created Linux account store.
- Click on the Account Store link.
- Select the Attribute Flow Rules tab.
- Adjust the synchronization direction using the Attribute Flow dropdown.
- Modify CRUD operation scores as needed to prioritize attribute sources.
- Save your changes.
EmpowerID only considers scores for attribute CRUD operations when multiple account stores with the same user records are connected to EmpowerID, such as would be the case if an HR System and this account store were being inventoried by EmpowerID.
Now that the attribute flow has been set, the next steps include configuring the account store and enabling EmpowerID to inventory it.
Step 3 – Configure account store settings
-
On the Account Store and Resource System page for the account store, select the Account Store tab and then click the pencil icon to put the account store in edit mode.
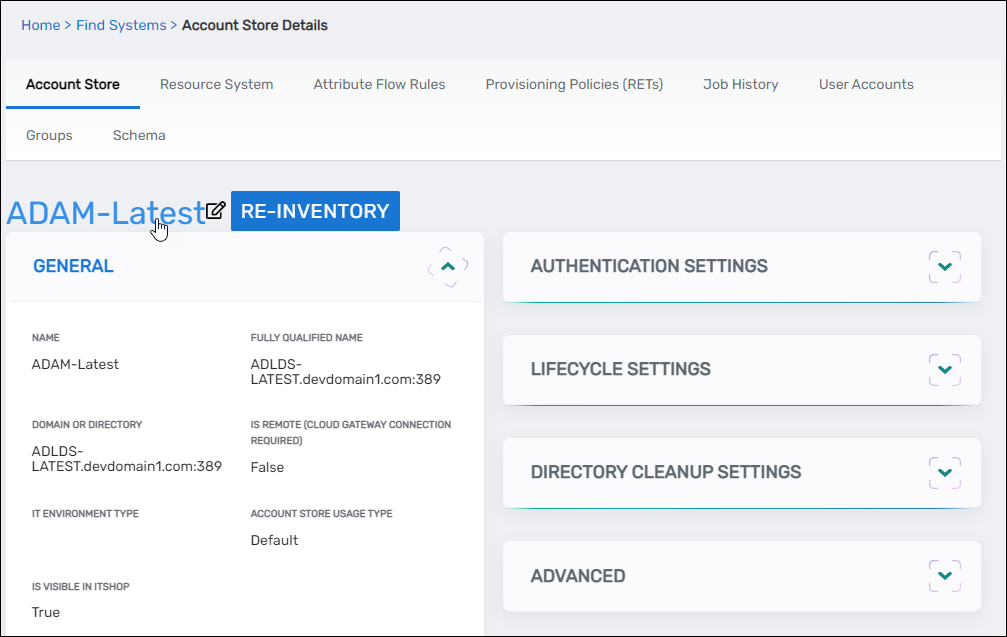
This opens the edit page for the account store. This page allows you to specify the account proxy used to connect EmpowerID to your AD LDS instance as well as how you want EmpowerID to handle the user information it discovers in AD LDS during inventory. Settings that can be edited are described in the table below the image.
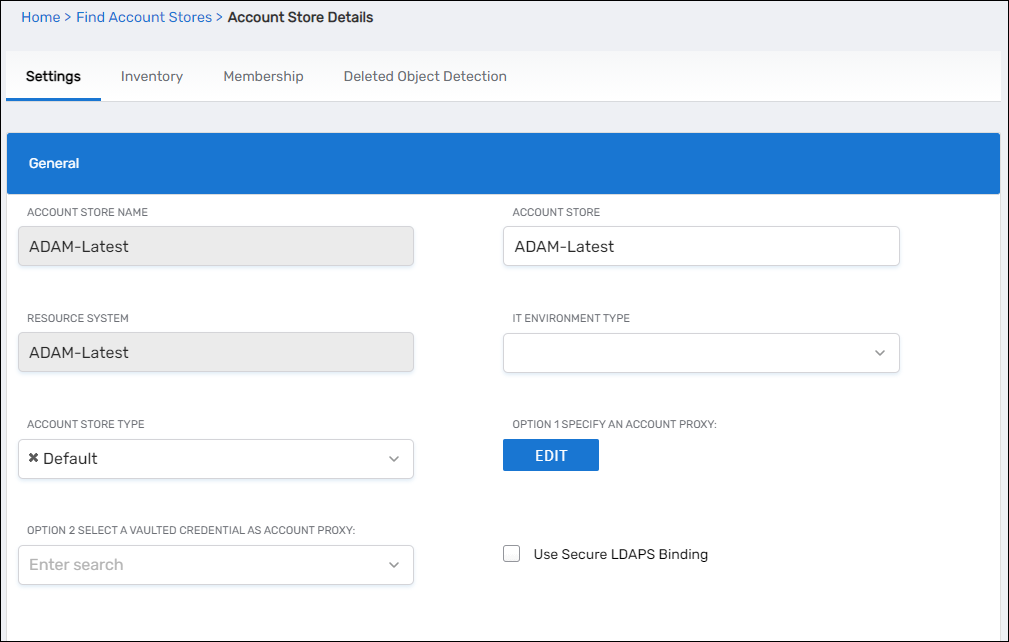
Account Store Settings Setting Description General Settings IT Environment Type Allows you to specify the type of environment in which you are creating the account store. Account Store Type Allows you to specify the type of account store you are creating. Option 1 Specify an Account Proxy Allows you to change the credentials for the account that EmpowerID uses to connect to and manage the account store. Option 2 Select a Vaulted Credential as Account Proxy Allows you to use a credential that you have vaulted in EmpowerID as the account that EmpowerID uses to connect to and manage the account store. Use Secure LDAPS Binding Specifies whether you are using Secure LDAP to encrypt LDAP data when establishing a directory bind. Inventoried Directory Server Allows you to select a connected server as the directory server for the account store. Is Remote (Cloud Gateway Connection Required) This setting appears for account stores with local directories, such as Active Directory, LDAP, SAP, etc. When enabled, this tells EmpowerID to use the Cloud Gateway Connection for that account store. The Cloud Gateway Connection must be installed on an on-premise machine. For installation information, please see Installing the EmpowerID Cloud Gateway Client. Is Visible in IAM Shop Specifies whether the account store can be used to filter objects relative to the account store, such as groups, to users searching for resources in the IAM Shop. Authentication and Password Settings Use for Authentication Specifies whether user credentials in the external system can be used to authenticate to EmpowerID. Allow Search for User Name in Authentication This setting works in conjunction with pass-through authentication to allow users to log in without specifying a domain name. When this is enabled, EmpowerID first checks to see if the user name entered exists within its Identity Warehouse and if so attempts to authenticate as that user. If a matching logon name exists but the login fails, EmpowerID then searches through all Accounts Stores where simple username search is enabled to find the correct user name and password combination. Allow Password Sync Enables or disables the synchronization of password changes to user accounts in the domain based on password changes for the owning person object or another account owned by the person. This setting does not prevent password changes by users running the reset user account password workflows. Queue Password Changes Specifies whether EmpowerID sends password changes to the Account Password Reset Inbox for batch processing. Password Manager Policy for Accounts without Person Specifies the Password Manager Policy to be used for user accounts not joined to an EmpowerID Person. Provisioning Settings Allow Person Provisioning (Joiner Source) Specifies whether EmpowerID Persons can be provisioned from user accounts in the account store. Allow Attribute Flow Specifies whether attribute changes should flow between EmpowerID and the account store. Allow Provisioning (By RET) Allows or disallows the Resource Entitlement (RET) Inbox process to auto-provision accounts for this domain for users who receive RET policy-assigned user accounts, but have not yet had them provisioned. Allow Deprovisioning (By RET) Allows or disallows the Resource Entitlement Inbox process to auto de-provision accounts for this domain for users who still have RET policy-assigned user accounts, but no longer receive a policy that grants them a user account in the domain. De-provisioning only occurs if the de-provision action on the Resource Entitlement policy is set to De-Provision. Default User Creation Path This specifies the default path in which to create user accounts if no location is selected when creating new users in EmpowerID. Max Accounts per Person This specifies the maximum number of user accounts from this domain that an EmpowerID Person can have linked to them. This prevents the possibility of a runaway error caused by a wrongly configured Join rule. It is recommended that this value be set to 1 unless users will have more than 1 account and you wish them to be joined to the same person. Business Role Settings Allow Business Role and Location Re-Evaluation Specifies whether Business Role and Location re-evaluation should occur for the account store Business Role and Location Re-Evaluation Order Specifies the order of the account store for re-evaluating Business Roles and locations Inventory Auto Provision OUs as IT System Locations Specifies whether EmpowerID should automatically provision external OUs as IT System locations Inventory Auto Provision External Roles as Business Roles Specifies whether EmpowerID should provision Business roles for external account store roles Default Person Business Role Specifies the default EmpowerID Business Role to be assigned to each EmpowerID Person provisioned from the user accounts in the account store. Default Person Location (leave blank to use account container) Specifies the default EmpowerID Location to be assigned to each EmpowerID Person provisioned from the user accounts in the account store. Group Settings Allow Account Creation on Membership Request Specifies whether EmpowerID creates user accounts in the account store when an EmpowerID Person without one requests membership within a group belonging to the account store. Recertify External Group Changes as Detected Specifies whether detected group changes should trigger recertification. SetGroup of Groups to Monitor for Real-Time Recertification Specifies the SetGroup or Query-Based Collection with groups that need to be recertified when changes to the membership of one or more of those groups occurs. The setting must be set to the GUID of the target SetGroup. If the GUID for a specific SetGroup is not set and Recertify External Group Changes as Detected is enabled for the account store, EmpowerID processes all security group memberships for recertification.
Group recertification is processed by the Continuous Group Membership Recertification permanent workflow. This workflow must be enabled for recertification to occur.Default Group Creation Path Specifies the default OU in which groups should be created if one is not specified. EmpowerID Group Creation Path Specifies the OU in which to create EmpowerID Resource Role groups Directory Clean Up Enabled Directory Clean Up Enabled Specifies whether the SubmitAccountTermination permanent workflow should claim the account store for processing account terminations. When enabled, accounts in the account store that meet the qualifications to be marked for deletion are moved into a special OU within the external directory, disabled and finally deleted after going through an automated approval process. This process involves setting a number of system settings in EmpowerID and requires multiple approvals by designated personnel before an account is finally removed from the account store. Report Only Mode (No Changes) When enabled, a report of what the Directory Clean Up process would do is written to the log. The process itself is ignored and all accounts are set to Termination Pending, OU to Move Stale Accounts Specifies the external directory in which to move accounts marked for termination. Special Use Settings RBAC Assign Group Members On First Inventory Converts each user account in an group to a Access Level assignment for the EmpowerID Person who owns the user account. Enabling this function is not recommended in most cases as it removes the ability to manage groups in the account store. A consequence of this is that if a user account is removed from a native system, EmpowerID puts the account back in the group. Automatically Join Account to a Person on Inventory (Skip Account Inbox) Specifies whether EmpowerID should attempt to join user accounts in the account store to an existing EmpowerID Person during the inventory process. When enabled, the Account Inbox is bypassed. Automatically Create a Person on Inventory (Skip Account Inbox) Specifies whether EmpowerID should create new EmpowerID Persons from the user accounts discovered in the account store during the inventory process. When enabled, the Account Inbox is bypassed. Show in Location Tree Specifies whether the account store shows in the Location Tree within the EmpowerID UI. Queue Password Changes on Failure Specifies whether EmpowerID should send password changes to the Account Password Reset Inbox only when the change fails. Inventory Settings Inventory Schedule Interval Specifies the time span that occurs before EmpowerID performs a complete inventory of the account store. The default value is 10 minutes. Inventory Enabled Allows EmpowerID to inventory the user information in the account store. Membership Settings Membership Schedule Interval Specifies the time span in minutes that occurs before EmpowerID runs the Group Membership Reconciliation job. The default value is 10 minutes. Enable Group Membership Reconciliation Allows EmpowerID to manage the membership of the account store’s groups, adding and removing user to and from groups based on policy-based assignment rules. Deleted Object Detection Settings Enabled Specifies whether EmpowerID inventories the deleted objects container of the external system. Interval Minutes Specifies the time span in minutes that occurs before EmpowerID inventories the deleted objects container of the external system. Threshold Max % of Deleted Objects Specifies the maximum number of deleted objects Threshold in Minutes Since Last Successful Inventory Specifies the acceptable threshold in minutes since the last successful inventory; -
Edit the account store as needed and then click Save to save your changes.
If you are using EmpowerID Cloud, you need to select the on-premise machine where you installed the EmpowerID Cloud Gateway. If you have yet to install the Cloud Gateway, please refer to Installing the Cloud Gateway and then return to this step.
Select the Cloud Gateway Server
-
From the Account Stores tab of the Find Account Stores page, search for the above account store and then click the Account Store link for it.
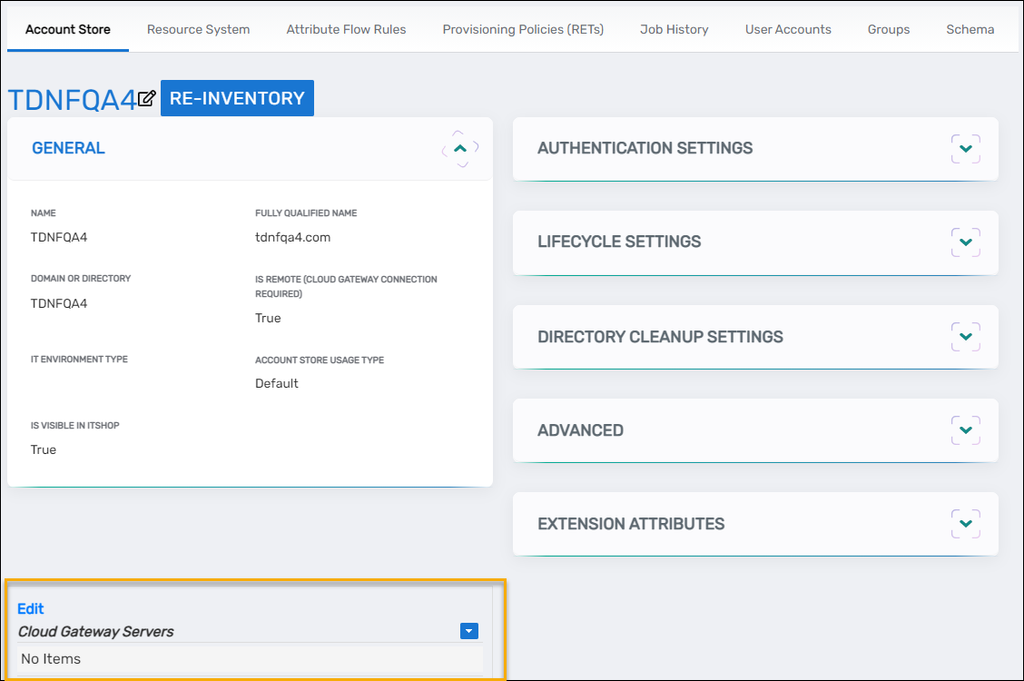
This directs you to the Account Store Details page for the account store, where you should see a Cloud Gateway Servers pane. If you do not see this pane, this means the Is Remote (Cloud Gateway Connection Required) setting was not enabled for the account store.
-
Click the Edit link for Cloud Gateway Servers.
-
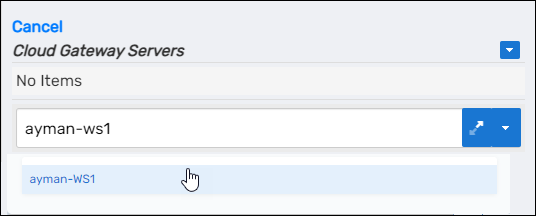
Enter the name of a server and then click the tile that appears for that server.
-
Repeat step 3 for any other Cloud Gateway servers in your environment.
-
When done adding servers, click Save.
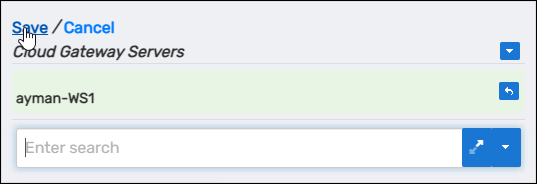
Next, enable the Account Inbox permanent workflow to allow the Account Inbox to provision or join the user accounts in AD LDS to EmpowerID Persons as demonstrated below.
EmpowerID recommends using the Account Inbox for provisioning and joining.
Step 4 – Enable the Account Inbox Permanent Workflow
The Account Inbox workflow is essential for processing user accounts discovered during inventory.
- Navigate to Infrastructure Admin > EmpowerID Server and Settings > Permanent Workflows.
- Locate Account Inbox and click its Display Name link.
- Click the pencil icon to enter edit mode.
- Check Enabled.
- Click Save to activate the workflow.
Step 5 – Monitor Inventory
EmpowerID continuously inventories the account store, identifying new, updated, or orphaned accounts.
- Navigate to Identity Lifecycle > Account Inbox.
- Use the tabbed views to monitor inventory:
- All – This tab displays a grid view of all user accounts and the status of those accounts in relation to the Account Inbox.
- Proposed – This tab displays a grid view of how the system would process user accounts if person provisioning is enabled for the account store containing the user accounts.
- Dashboard – This tab provides a quick summary of account inbox activity.
- Orphans – This tab displays a grid view of all user accounts without an EmpowerID Person.
Regular monitoring ensures that newly discovered accounts are processed correctly and remain synchronized with EmpowerID policies.