Page Designer Overview
The Page Designer in Workflow Studio enables you to create custom web pages for the EmpowerID interface without writing code. Using a visual design approach, you can build pages with the same components found in existing EmpowerID pages.
What You Can Build
The Page Designer allows you to create:
- Single-tab pages - Simple data grids with search functionality
- Multi-tab pages - Complex pages with multiple data views
- Filtered pages - Pages with organizational trees for data filtering
- Interactive pages - Pages with context-sensitive action panels
- Custom search - Advanced search panels with specific field criteria
Page Designer Components
Every page you create uses a combination of these components:
Grids
The grid is the foundation of every page. It displays data retrieved from the EmpowerID database through API endpoints. Each grid shows data from a method (stored procedure or search function) and can be customized with specific columns, formatting, and pagination.
Grid features:
- Add, edit, delete, and reorder columns
- Resize columns with drag-and-drop
- Enable pagination for large datasets
- Choose from predefined column sets or create custom combinations
Tabs
Tabs organize different views of data on a single page. Each tab contains its own grid, which can use different methods, trees, and search configurations.
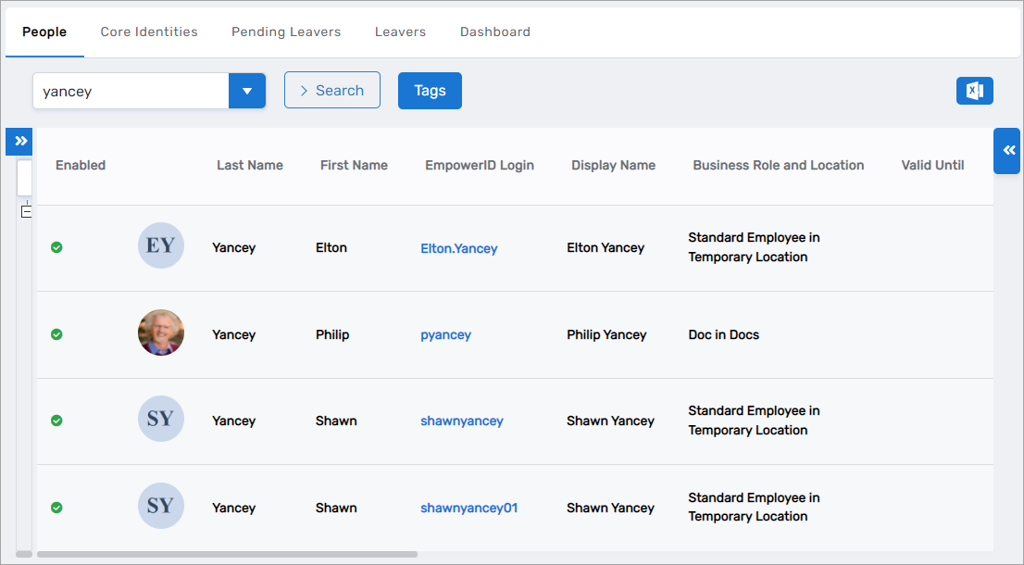
Single-tab example - White Pages (Identity Administration > Specialized Systems > White Pages):
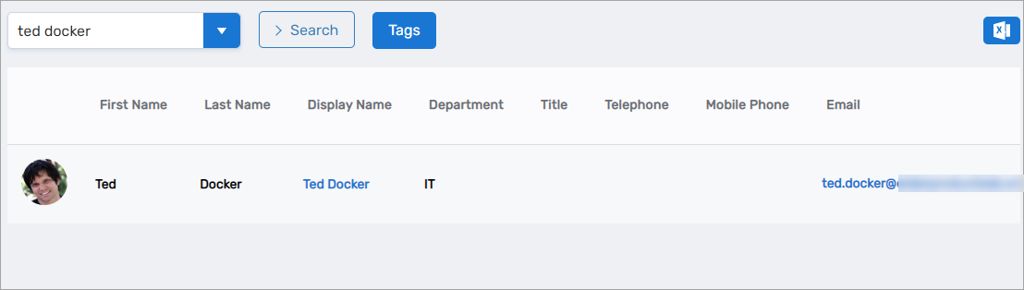
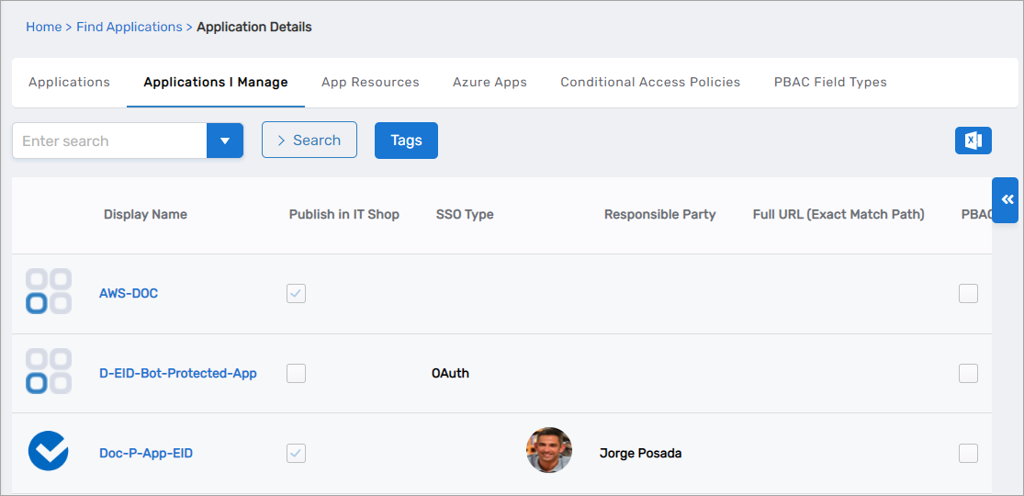
Multi-tab example - Find Applications (Apps and Authentication > Applications):
Each tab can be configured independently with:
- Custom display name
- Associated tree for filtering
- Data method and parameters
- Included properties
- Action panel
Methods
Methods correspond to stored procedures in the EmpowerID SQL database. Each method retrieves specific data for display in the grid.
Method types:
- GetAll - Retrieve all records of a type
- GetByOrgZoneID - Retrieve records filtered by location
- GetAllSearch - Retrieve records with search capability
- Get[Type]IManage - Retrieve records the current user manages
When selecting a method, ensure it's compatible with the tree you've chosen (if any). For example, a method that requires an OrgZoneID parameter works with a location tree.
Parameters
Many methods accept parameters to filter or customize the data returned. Common parameters include:
- OrgZoneID - Filter by organizational location
- OrgRoleID - Filter by business role
- TextToSearch - Search term for search methods
- ColumnsToSearch - Which columns to include in search
Some parameters can be hard-coded in the Page Designer to pre-filter data or set default values.
Trees
Trees provide hierarchical navigation in the left panel of a tab, allowing users to filter grid data by selecting nodes in the tree.
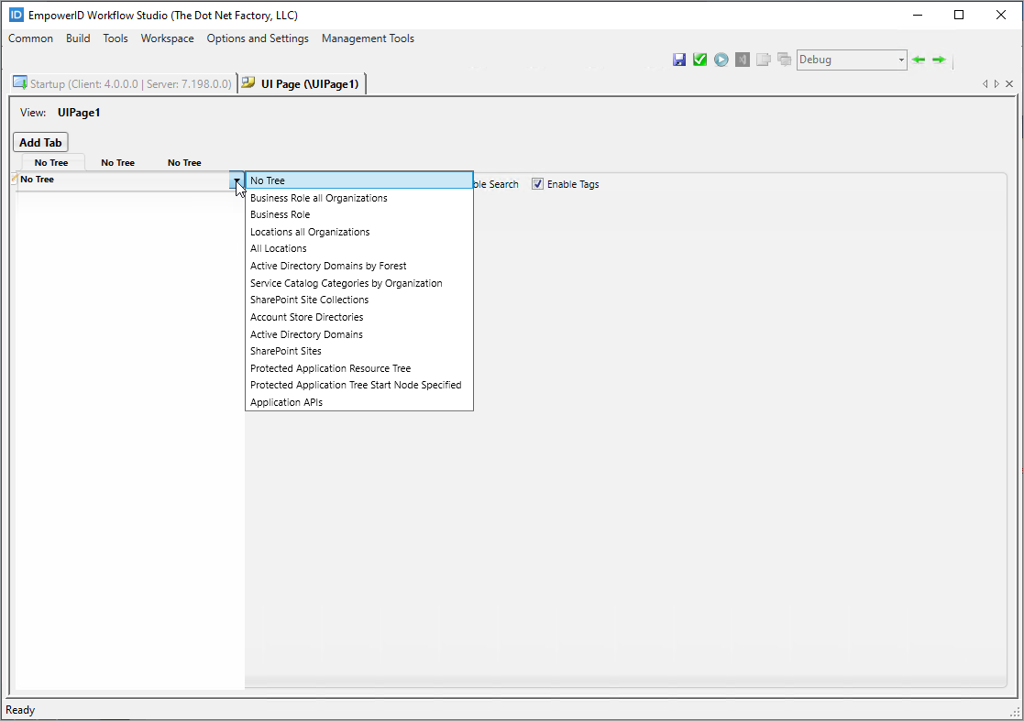
Available tree types:
| Tree Type | Description |
|---|---|
| No Tree | No filtering tree; use with GetAll or search methods |
| All Locations | Locations in the default organization |
| Locations all Organizations | Locations across all organizations |
| Business Role | Business Roles in the default organization |
| Business Role all Organizations | Business Roles across all organizations |
| Active Directory Domains | AD domains grouped by domain |
| Active Directory Domains by Forest | AD domains grouped by forest |
| Account Store Directories | Account Store directory structure |
| SharePoint Site Collections | SharePoint sites grouped by collection |
| SharePoint Sites | SharePoint site structure |
| Protected Application Resource Tree | Protected application resources |
| Service Catalog Directories by Organization | Service catalog structure |
| Application APIs | Azure system modules by resource system |
Select a tree based on how users need to filter data. Methods like GetByOrgZoneID require a location tree to function properly.
Columns
Columns display specific fields from the data returned by the method. When adding or editing columns, you configure:
- Field Name - The data field from the method result
- Label - The column header text shown to users
- Value Format - How the data displays (text, checkbox, hyperlink, etc.)
- Localization - Locale keys for multi-language support
The Field Selector dialog provides these options when adding columns:
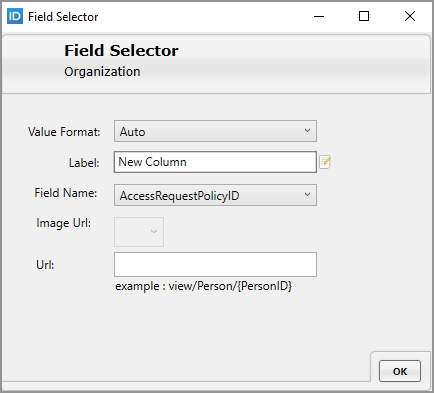
Value Format options:
- Auto - Automatic formatting based on data type
- String - Display as text
- BooleanCheckBox - Display as checked/unchecked box
- Hyperlink - Display as clickable link (requires URL pattern)
- DateTime - Formatted date and time
You can use predefined column sets by clicking Set to GridType or create completely custom column combinations.
Advanced Search
Advanced search panels allow users to search data by specific fields. This provides more targeted searching than the basic search box.
Search configuration settings:
| Setting | Description |
|---|---|
| Enable Search | Enables the basic search box at the top of the page |
| Is Search Panel Visible | Shows or hides the search interface |
| Edit Search Criteria | Opens dialog to configure advanced search fields |
| Is Advanced Search Enabled | Enables the dropdown advanced search panel |
When configuring advanced search:
- Click Edit Search Criteria
- Select Is Advanced Search Enabled
- Add individual search fields or select a predefined GridType
- Specify the field name, display label, and search type for each field
Important: Search fields must be included in the tab's properties to function properly. Right-click the tab and select Included Properties to add them.
Page Design Workflow
The typical process for creating a page:
- Plan - Identify the data you need and how users will interact with it
- Create - Add the page to a package in Workflow Studio
- Add tabs - Create one or more tabs for different data views
- Select method - Choose the data retrieval method for each tab
- Configure trees - Add organizational trees if needed for filtering
- Add columns - Select and configure the columns to display
- Configure search - Set up basic or advanced search functionality
- Add actions - Include action panels for user operations
- Publish - Deploy the page to your EmpowerID environment
- Test - Verify the page works as expected
Finding Your Page
After publishing, pages are stored in the EmpowerID database. To access your page:
- Query the
RBACViewtable to find your page's ID - Navigate to:
https://your-server.com/UI/#common/pages/view/RBACVIEWID
Alternatively, use the page name: https://your-server.com/UI/#Common/pages/viewbyname?name=PAGENAME
Next Steps
Now that you understand the Page Designer components, follow these tutorials to build your own pages:
- Create a Simple Page with Advanced Search - Build a basic single-tab page
- Create a Multi-Tab Page - Build a complex page with multiple tabs and features