Your First Workflow
This tutorial demonstrates how to create a simple EmpowerID workflow that updates the attributes of an EmpowerID Person. You'll build a fully functional workflow containing common workflow components and deploy it to your environment.
What You'll Learn
In this tutorial, you'll create a complete workflow that includes:
- Creating and organizing project folders
- Building a Lookup control for searching people
- Designing a form for editing person attributes
- Adding an Operation activity for secure data updates
- Binding workflow components together
- Publishing and testing your workflow
Prerequisites
Before starting this tutorial, you should:
- Have Workflow Studio installed
- Understand the basic IDE components
- Be familiar with workflow concepts
- Have access to an EmpowerID environment for testing
Workflow Components
This tutorial uses three common workflow components:
Lookup Control – User interface elements that enable users to search for EmpowerID objects. You'll create a Lookup to search for a person.
Form – User interface elements that allow users to input information. You'll create a form for users to enter details about the selected person.
Operation Activity – Secure workflow shapes that perform the actions of the workflow. You'll use a single Operation activity to update person attributes with proper authorization checks.
When you complete this tutorial, you'll have a foundational understanding of creating EmpowerID workflows that you can use as a basis for more complex workflows.
Tutorial Overview
To create the workflow, you will:
- Create a project folder for organizing workflow components
- Create and publish a Lookup Control for searching people
- Create and publish a form for editing person attributes
- Build the workflow and add activities
- Bind workflow properties to maintain data consistency
- Publish and test the workflow
Create Project Folders
Project folders in Workflow Studio provide a logical structure for managing workflow applications and their components.
- In Workflow Studio, select the Solution Explorer tab to the left of the IDE.
- Right-click the parent source control node and select New Folder from the context menu.
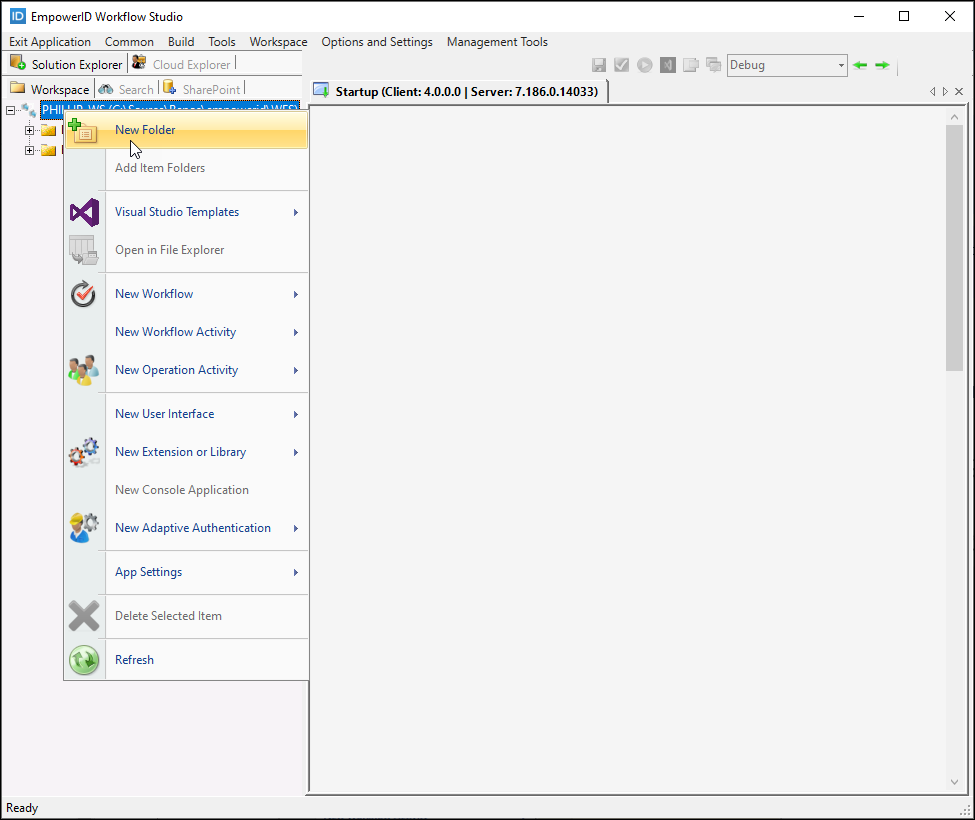
- Enter a name for the folder and click OK.
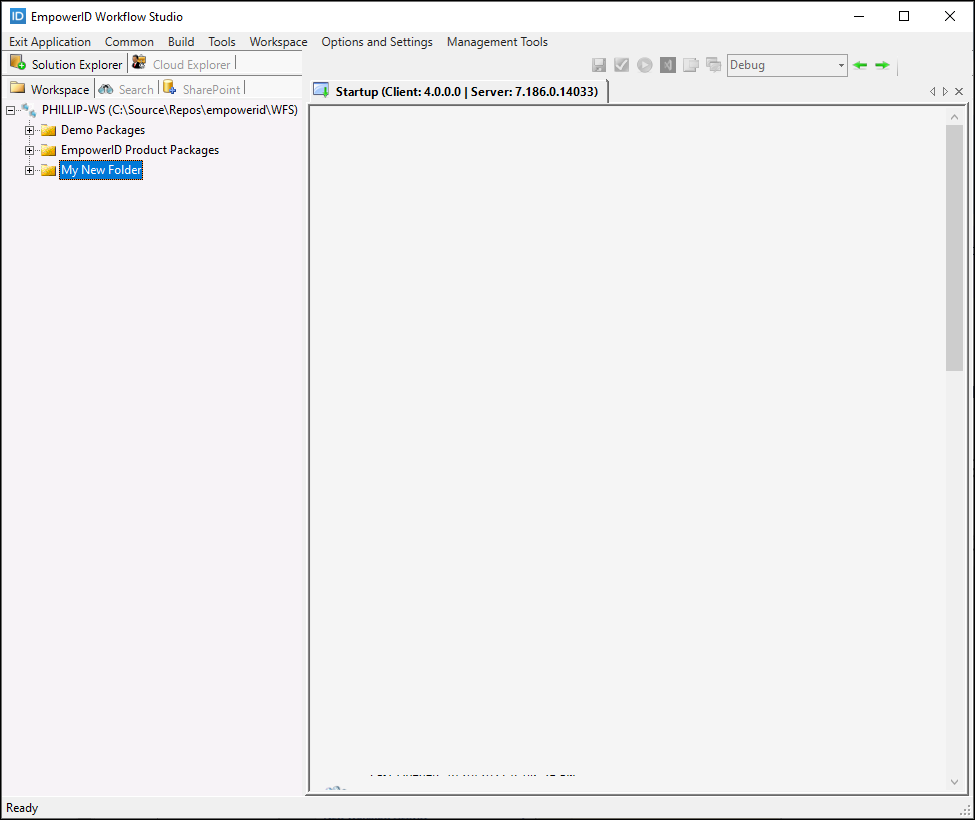
- In the Folders dialog that appears, select the following subfolders to organize the items you create in this tutorial:
- User Interface > Forms
- User Interface > Lookup Controls
- Workflows > Activities
- Workflows > Applications
- Click OK to add the subfolders and close the dialog.
The Workflow Studio Source Control updates to show the new folder in the Source Control tree.
Create and Publish a Lookup for the Workflow
- Expand the New folder > User Interface folders.
- Right-click the Lookup Controls folder and select New User Interface > Lookup.
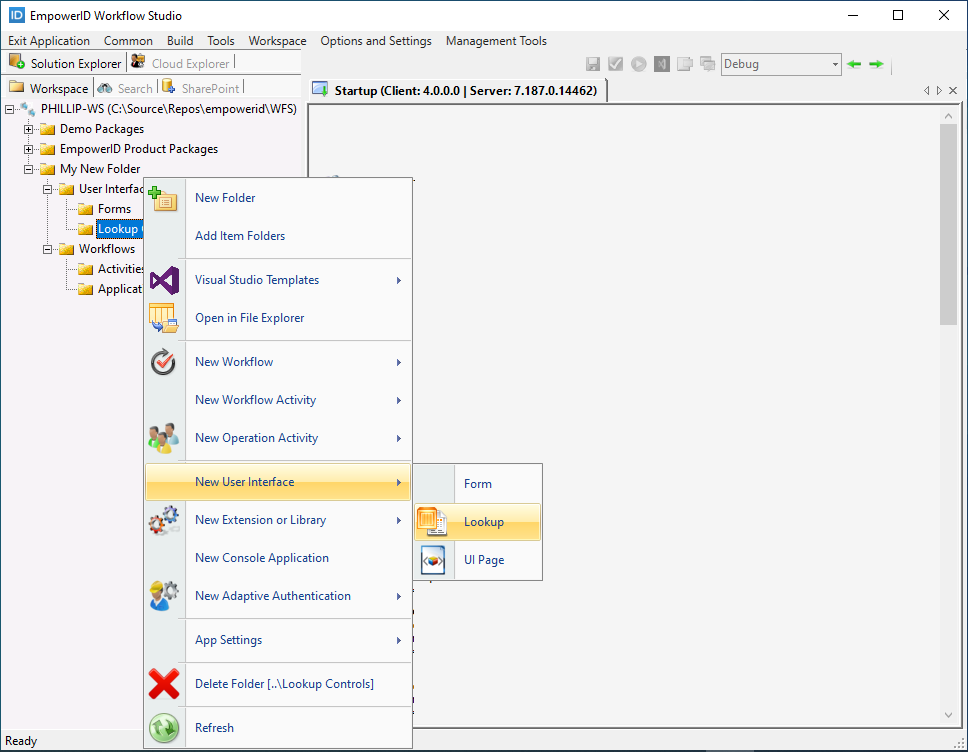 This opens the new Lookup Control in the Workflow Studio Lookup Designer.
- In the Properties grid, set the Title property to Hello World Person Lookup and the Description property to Search for a Person.
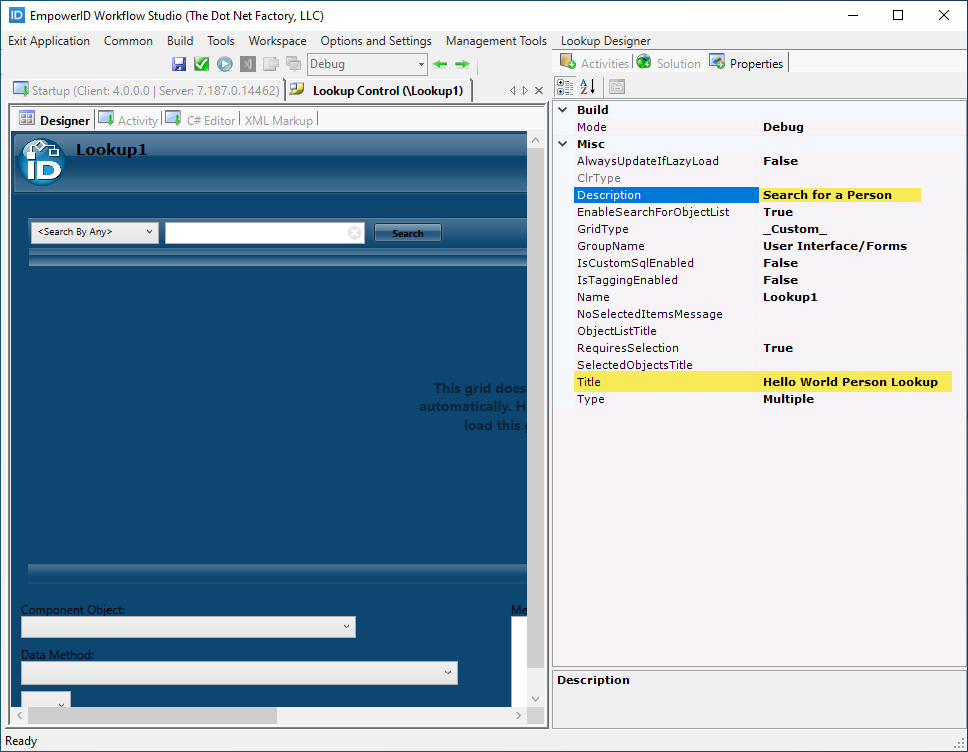
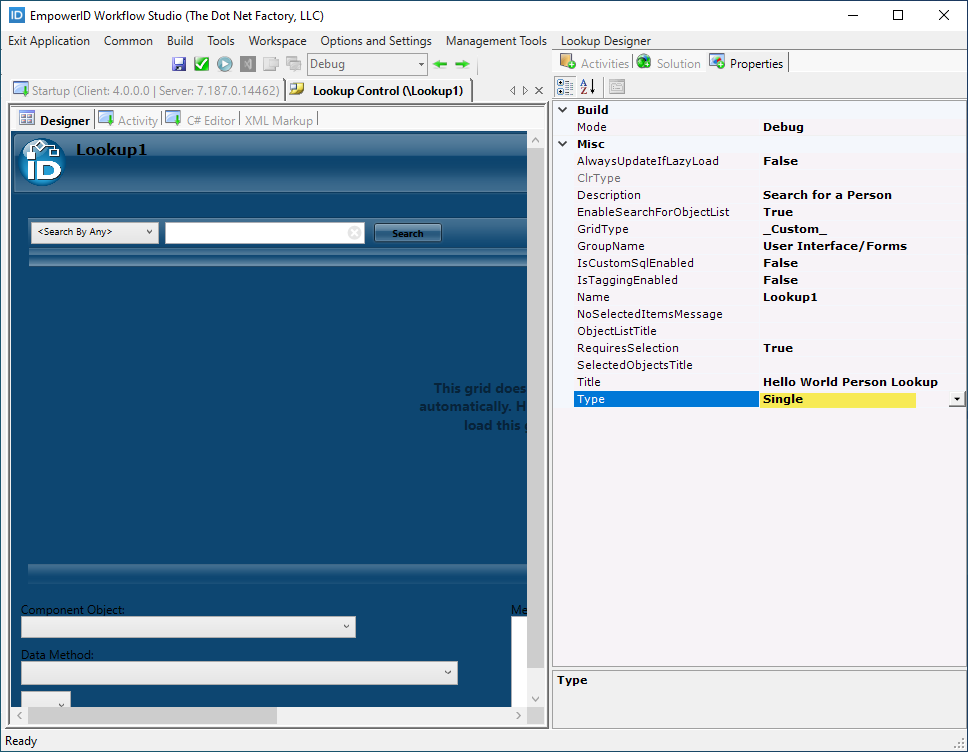
- In the Properties grid, set the Type property to Single. Setting the Type to Single allows users to select only one person.
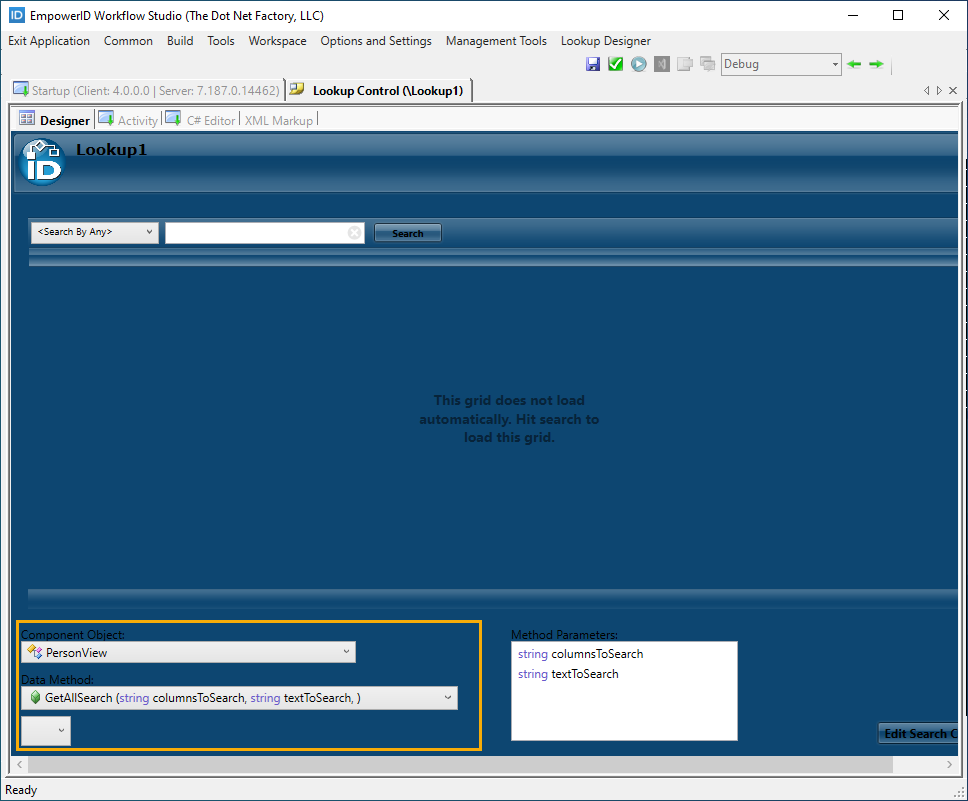
 Next, bind the Lookup Control to the PersonView component object to add grid columns related to that component.
 - In the Lookup Control Data Pane located at the bottom of the designer, do the following to set the Lookup Control to return a list of people:
- Click the Component Object drop-down list and select PersonView. The Component Object drop-down list contains class definitions that relate to the objects EmpowerID protects, and the PersonView object provides a consolidated view of all data fields associated with EmpowerID people.
- Click the Data Method drop-down list and select the GetAllSearch(string columnsToSearch, string textToSearch) method. This method returns all people in the EmpowerID Identity Warehouse to the Lookup Control.
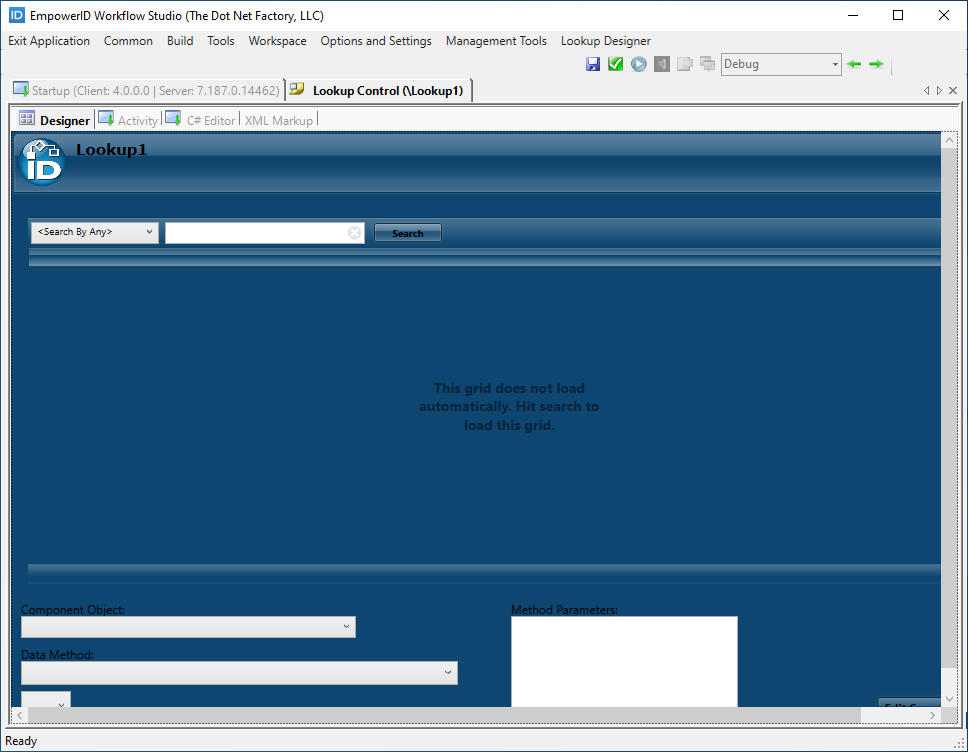
The following image shows what the Lookup Control Data Pane looks like with the above selections made.
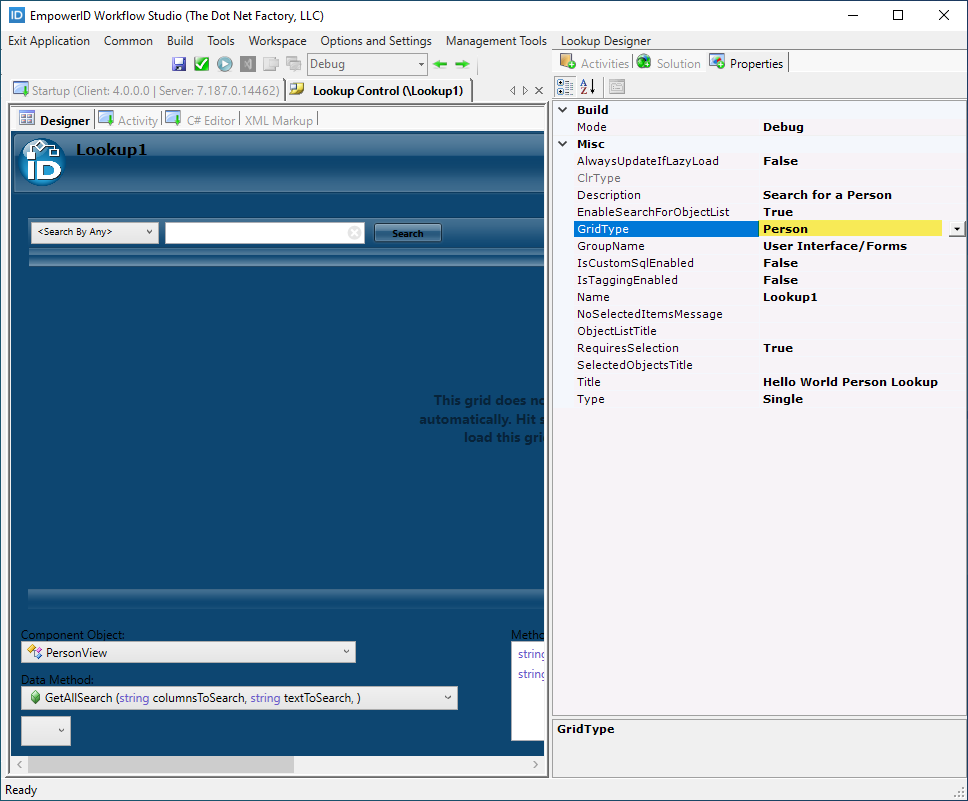
- In the Properties grid, set the GridType property to Person. Setting the grid type automatically adds columns associated with the component object, providing a consistent look to your Lookups and making localization easier.
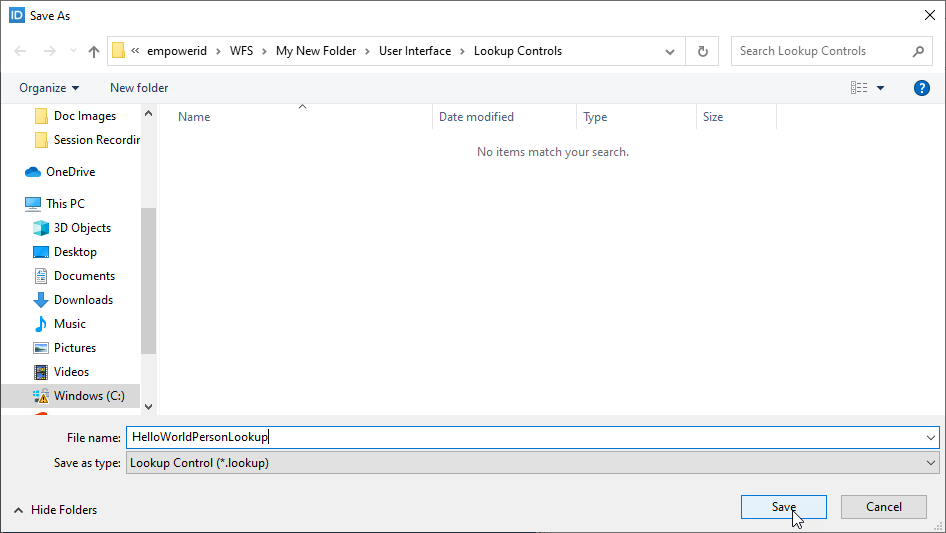
- Click the Save button above the designer and browse to the User Interface > Lookup Controls folder.
- Enter HelloWorldPersonLookup as the file name and then click Save.
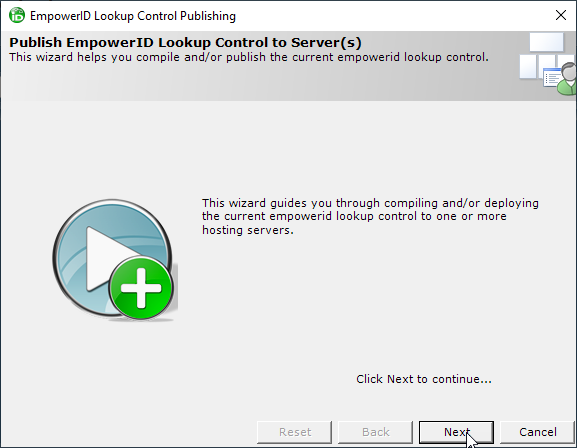
- Next, publish the Lookup to your local file system. When you publish the Lookup, Workflow Studio converts it to an activity that can be placed within the workflow:
- From the toolbar above the Workflow Studio Designer, click the Compile and Publish button.

- In the Lookup Publishing wizard that appears, click the Next button.
- Select the server to which you want to publish the Lookup and click Next.
- Click OK to close the Publishing action completed successfully! message box.
- Select Yes when prompted to restart Workflow Studio.
- Select Yes to save changes to any opened files.
- From the toolbar above the Workflow Studio Designer, click the Compile and Publish button.
Now that the Lookup has been created and published, the next step is to create and publish the workflow form.
Create and Publish a Form for the Workflow
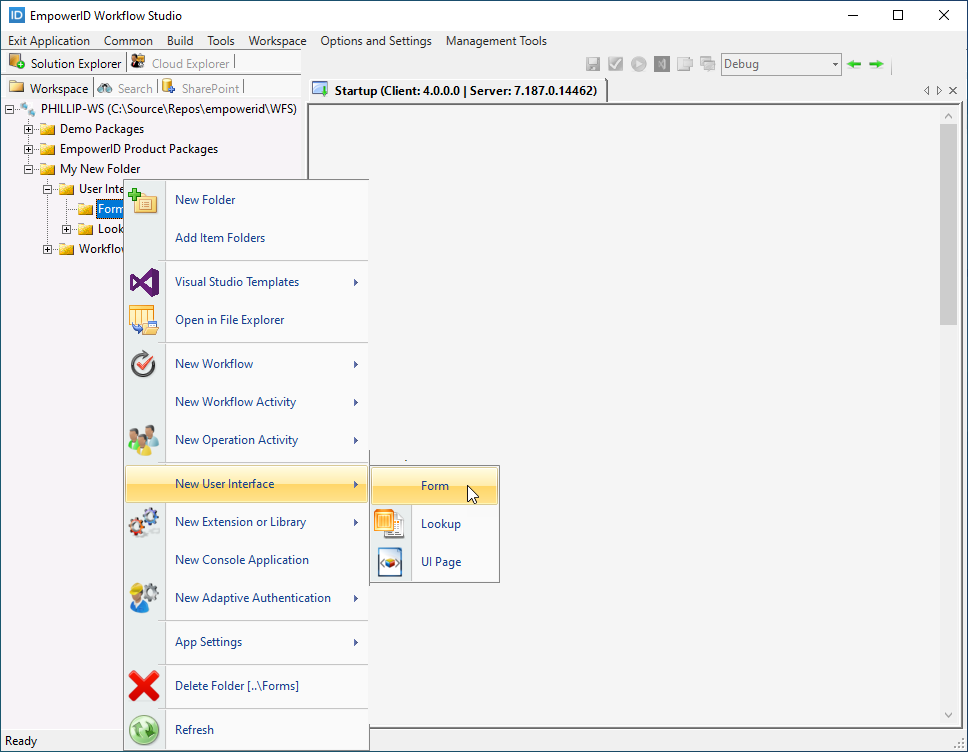
- Right-click the Forms folder you created earlier and select New User Interface > Form.
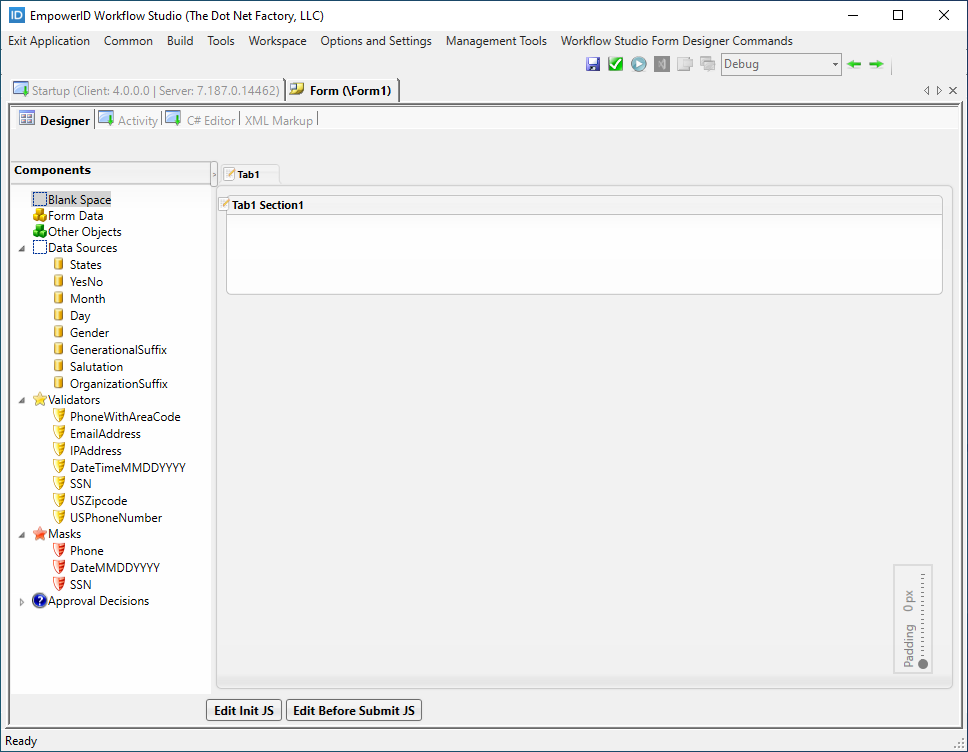
 This opens the form with the default tab in the Workflow Studio Form Designer.
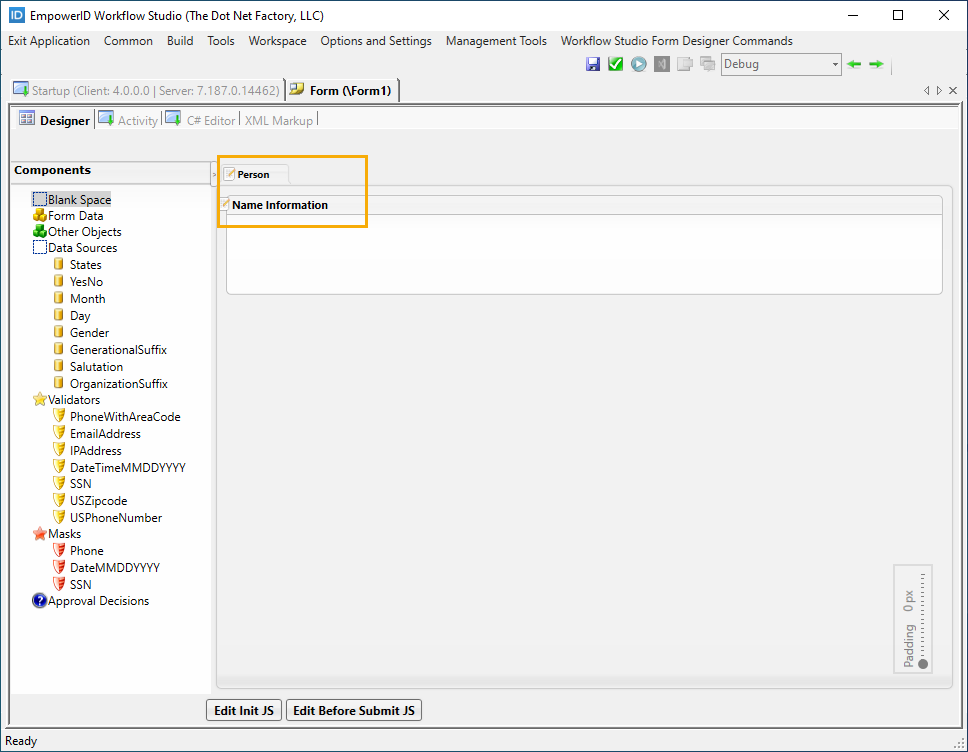
- Edit the caption in the form tab by double-clicking directly on the caption text.
- Change the caption from Tab1 to Person.
- Repeat the process for the form section text, changing it from Tab1 Section1 to Name Information.
The tab and section caption should look like those shown in the below image.
- When a user runs the Hello World workflow, the form should display specific fields pre-populated with attribute data, such as the target person's name information. To accomplish this, add Form Data components to the form. Click the Workflow Studio Form Designer Commands tab and select Add Object.
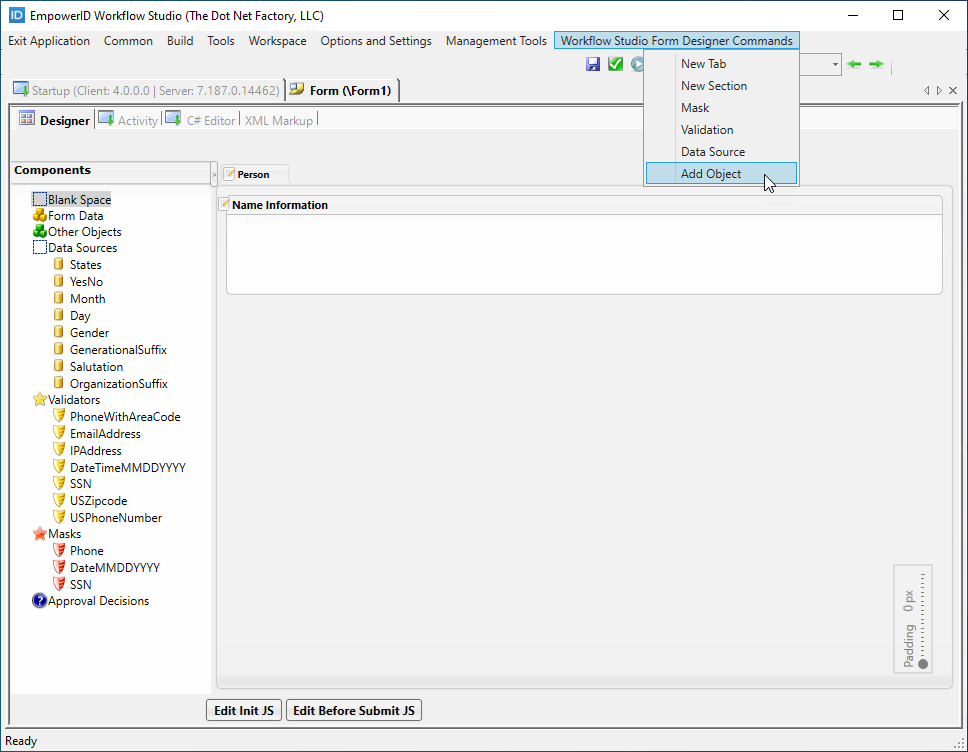
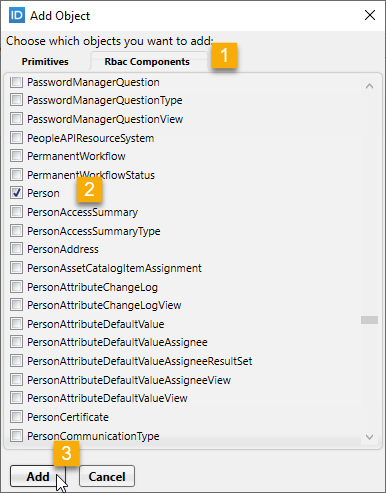
- In the Add Object window that appears, click the Rbac Components tab, select the Person component, and then click the Add button.
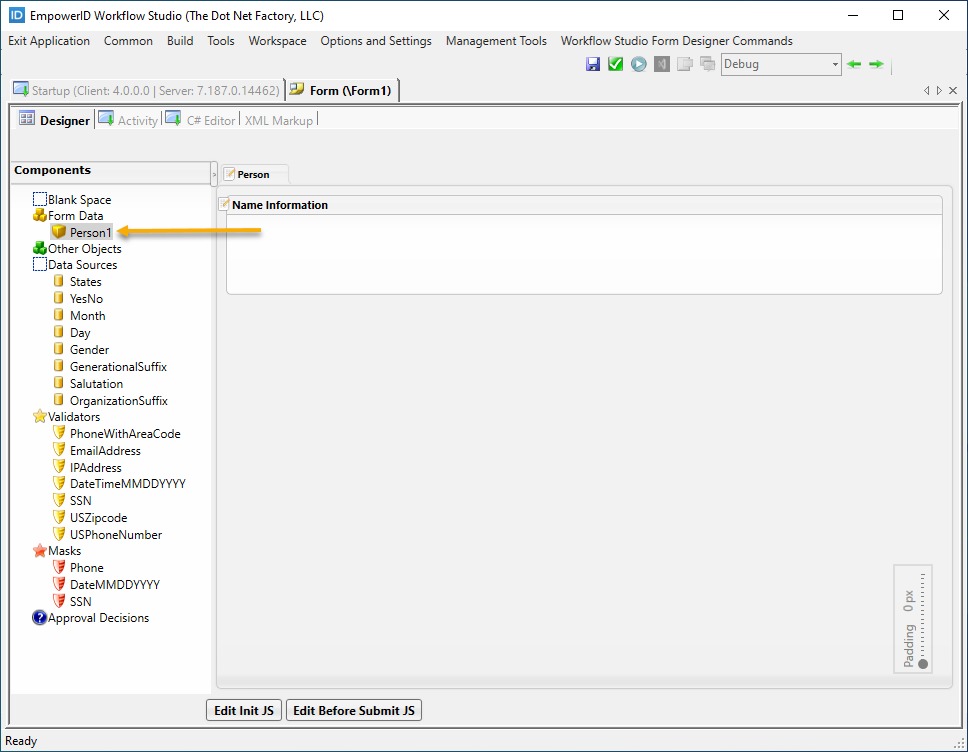
 This adds a component named Person1 to the Components tree located to the left of the form. The Components tree holds bound objects and other types that can be utilized while designing forms. The Person1 component comprises attributes and properties associated with EmpowerID people in your environment.
- Double-click the Person1 component text and change the name to TargetPerson.
- Expand the TargetPerson node to reveal the attributes available for the Person component.

- From the TargetPerson node in the Components tree, scroll to the FirstName object and drag it onto the form's design surface. As you drag the object, you'll notice that FirstName is outlined by a green rectangle, and the mouse cursor icon changes. The blue rectangle indicates where you are dropping the FirstName object.
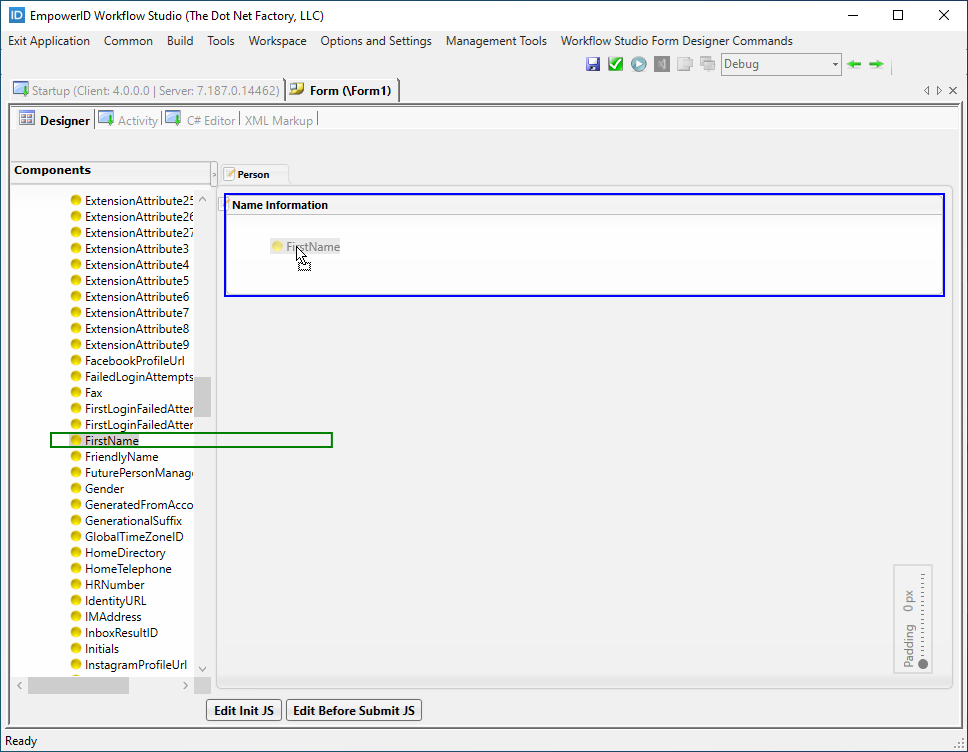
- From the TargetPerson node in the Components tree, drag the LastName attribute onto the form. You should see both fields on the form.
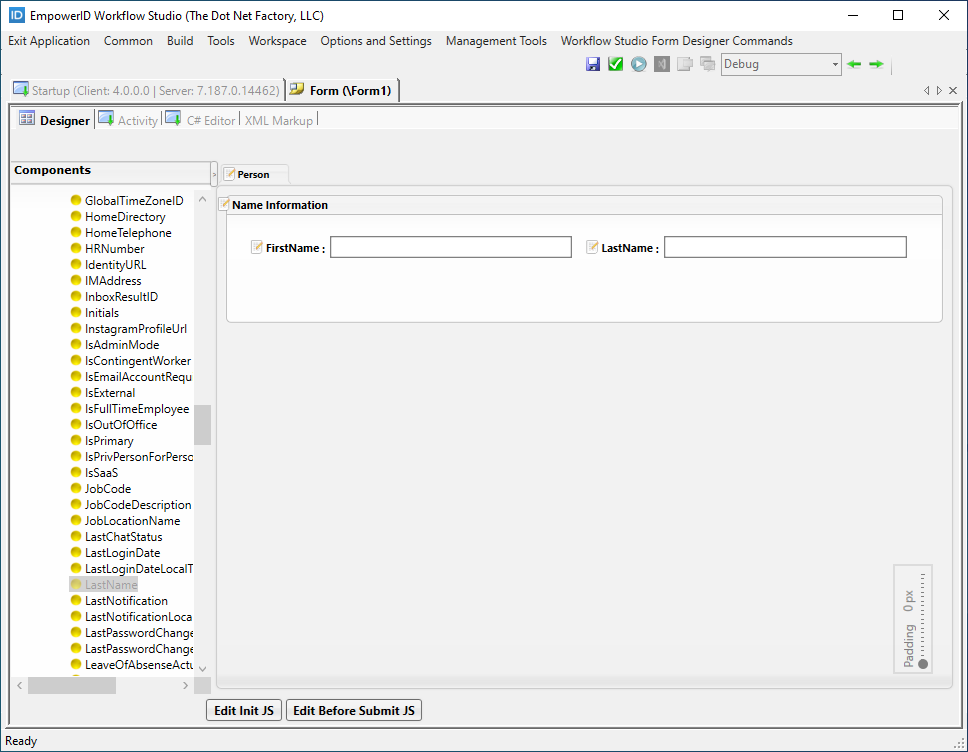
- On the form, double-click directly on the field names and edit them to read First Name and Last Name, respectively.
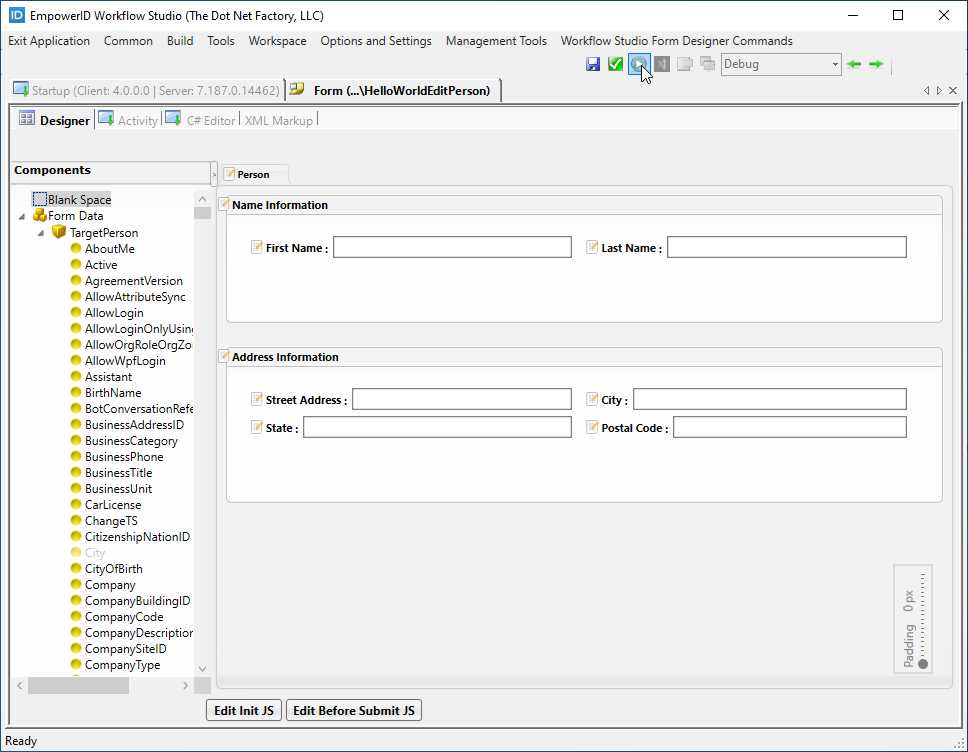
- Add a new section to the form by clicking the Workflow Studio Form Designer Commands button and selecting New Section.

- Double-click the new section caption and edit it so that it reads Address Information.
- From the TargetPerson node in the Components tree, drag the following components onto the Address Information section of the form:
- StreetAddress
- City
- State
- PostalCode
- Add spacing to the StreetAddress and PostalCode field names. Your form should look like the following image.

- Click the Save button above the designer and browse to the User Interface > Forms folder you created earlier.
- Enter HelloWorldEditPerson as the file name and then click Save.

- Next, publish the form. When you publish the form, Workflow Studio converts it to an activity that can be placed within the workflow:
- Click the Compile and Publish button above the Form Designer.
- In the Form Publishing wizard that appears, click the Next button.
- Select the server to which you want to publish the form and click Next.
- Click OK to close the Publishing action completed successfully! message box.
- Wait for the toolbox to load and then select Yes when prompted to restart Workflow Studio.
- Select Yes to save changes to any opened files.
- Click the Compile and Publish button above the Form Designer.
Now that the Lookup and form have been created and published, you can build the workflow.
Build the Workflow
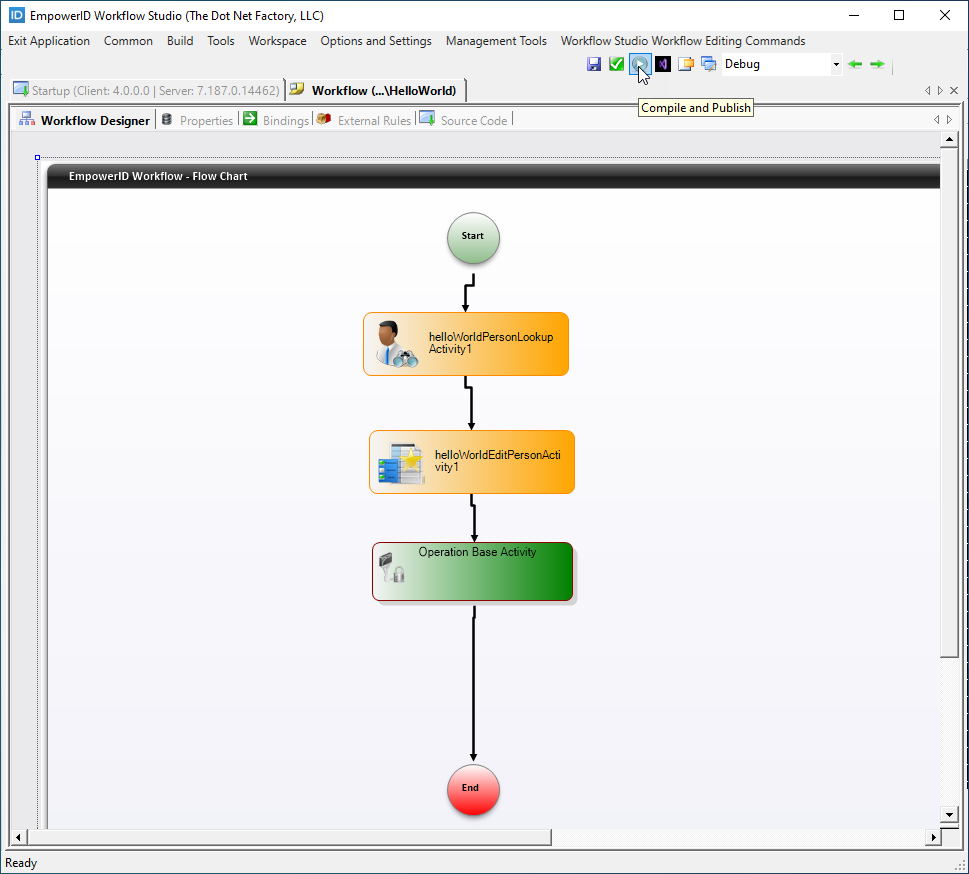
- In Workflow Studio, right-click the Workflows > Applications folder you created earlier and select New Workflow > Flow Chart Workflow.
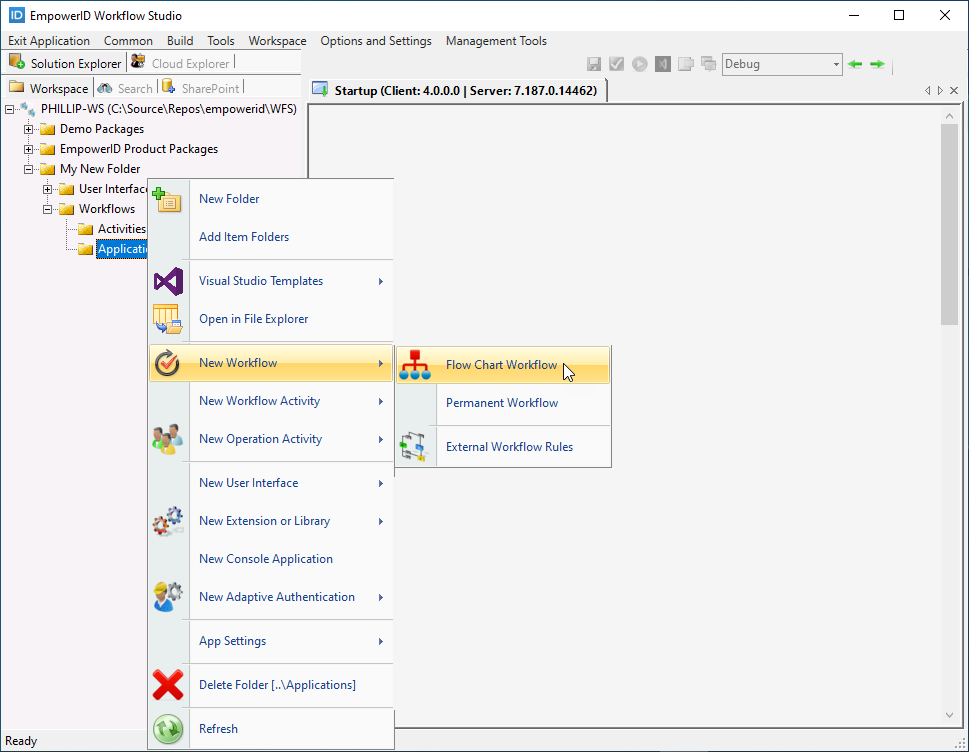 Workflow Studio creates the workflow and opens it in the Workflow Designer.
- On the Source Control tree, expand the User Interface > Lookup Controls folders you created earlier and locate the Person Lookup activity you just created.
- Drag the Person Lookup activity onto the Workflow Designer and drop it below the Start activity.
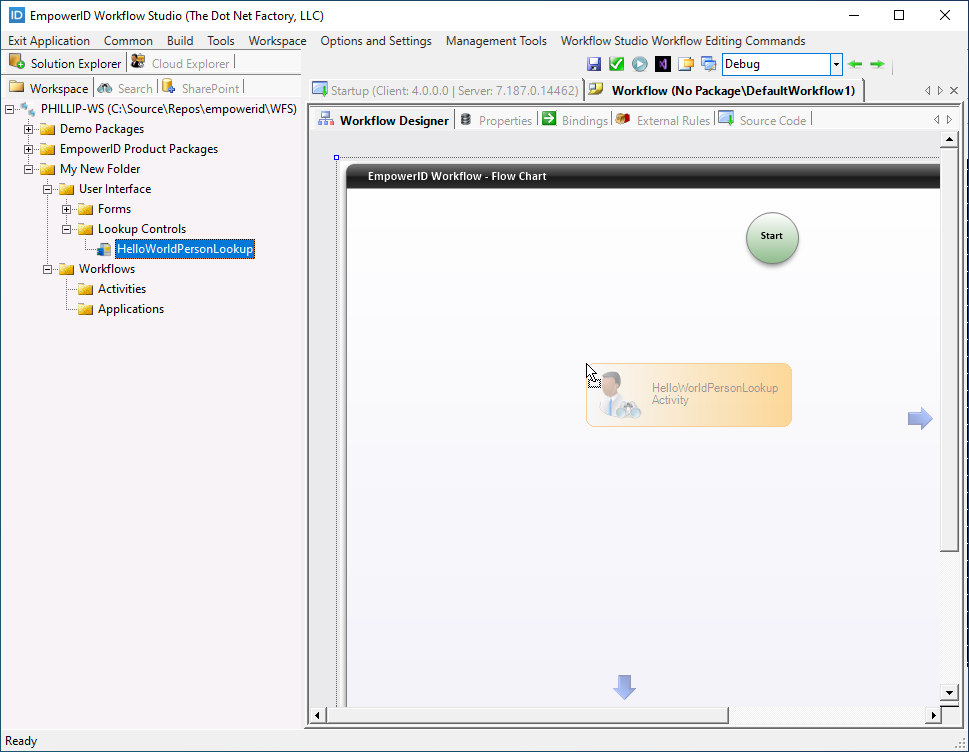
- Click the Start activity to activate its drawing points and then draw a line connecting the Start activity to the Lookup activity.
- Next, drag the HelloWorldEditPerson form activity onto the Workflow Designer and drop it below the Lookup activity.
- Click the Lookup activity to activate its drawing points and then draw a line connecting the Lookup activity to the form activity.

Add an Operation Activity
Now you need to add an Operation activity to the workflow. Operation activities are protected blocks of code based on the EmpowerID workflow authorization framework. They determine if the current user can execute the code against the workflow's target object.
For this tutorial, you'll use the stock Edit Person Multi-Operations Operation Activity that EmpowerID provides for protecting unauthorized changes to EmpowerID people. Learn more about Operation activities in the Concepts section.
-
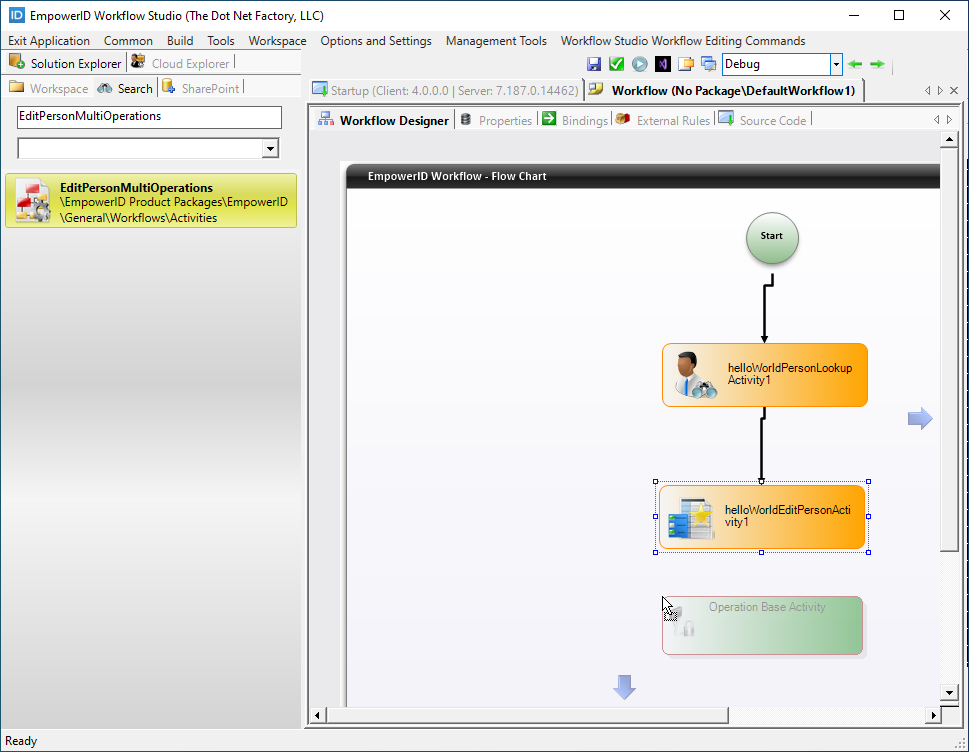
From Solution Explorer, search for EditPersonMultiOperations.
-
Drag the Operation activity from Solution Explorer onto the Workflow Designer, placing it directly below the form activity. Note that the activity shows as Operation Base Activity.
-
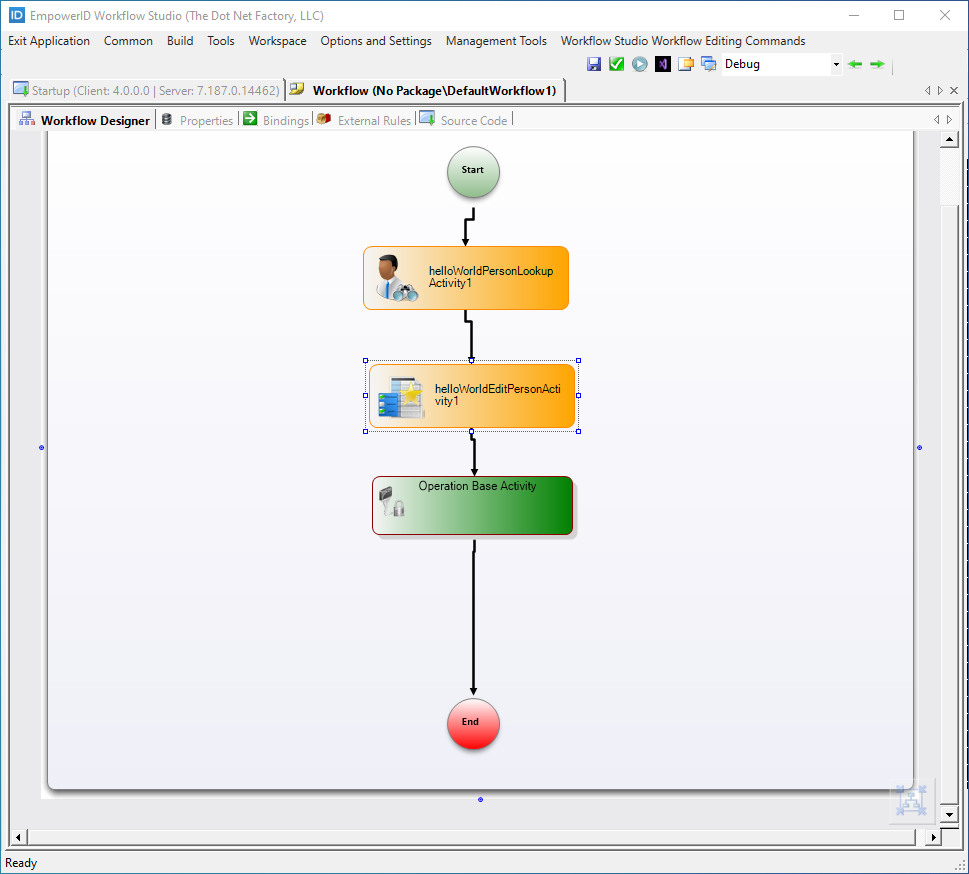
Click the form activity to activate its drawing points and then draw a line connecting the activity to the Operation Base activity.
-
Next, click the Operation Base activity to activate its drawing points and then draw a line from the activity to the End activity. This ensures that the workflow exits after the Operation activity executes.
-
To ensure that the Multi-Operation Activity executes the desired operation, enable that operation for the workflow:
- Right-click on the Multi-Operation Activity and select Enable/Disable Executing Operations from the context menu.

- In the Enable/Disable Resource Operations dialog that appears, select Edit Address from the Disabled Operations column and move it to the Enabled Operations column by clicking the Right Arrow button.

- Click Close to close the Enable/Disable Resource Operations dialog.

- Right-click on the Multi-Operation Activity and select Enable/Disable Executing Operations from the context menu.
-
Finally, to use the Multi-Operation Activity in the workflow, add a reference to the
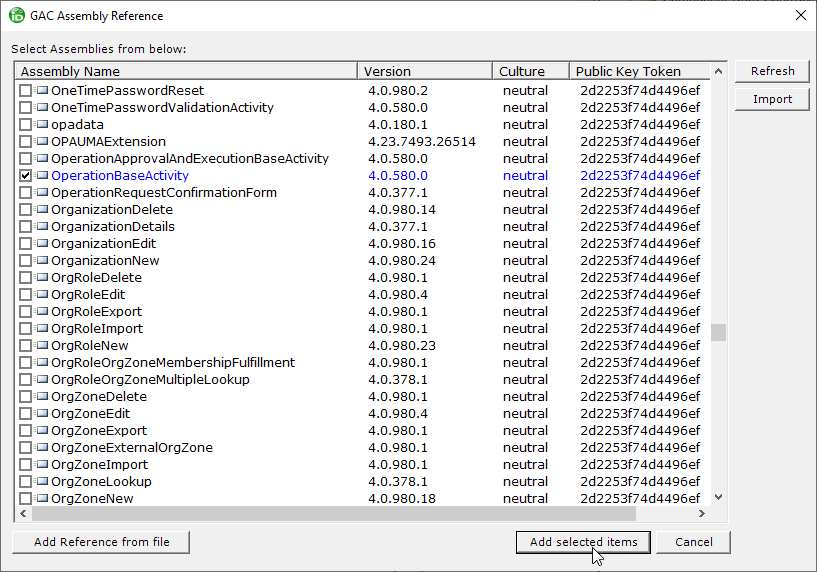
OperationBaseActivityassembly to the workflow project:- On the Workflow Studio toolbox to the right of the Workflow Designer, click the Solution tab and in the Code Tree right-click the project name and select Add Reference > Add Assembly Reference from the context menu.
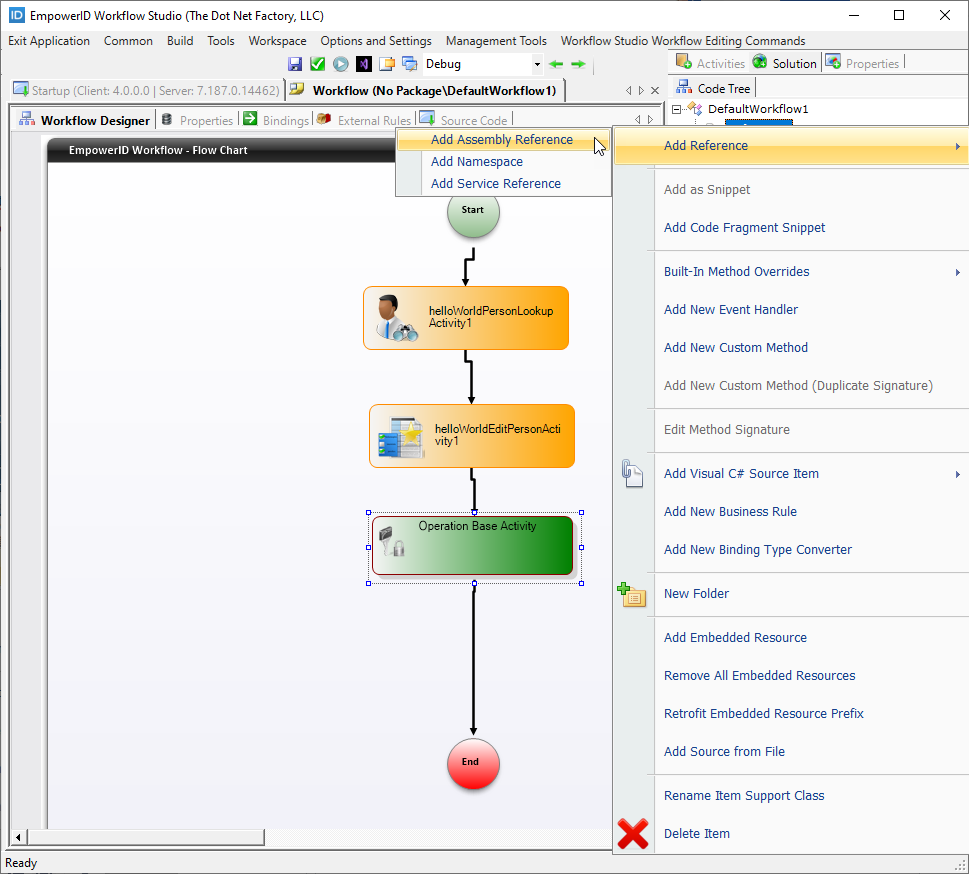
- In the GAC Assembly Reference window that appears, select the OperationBaseActivity assembly and then click the Add selected items button.
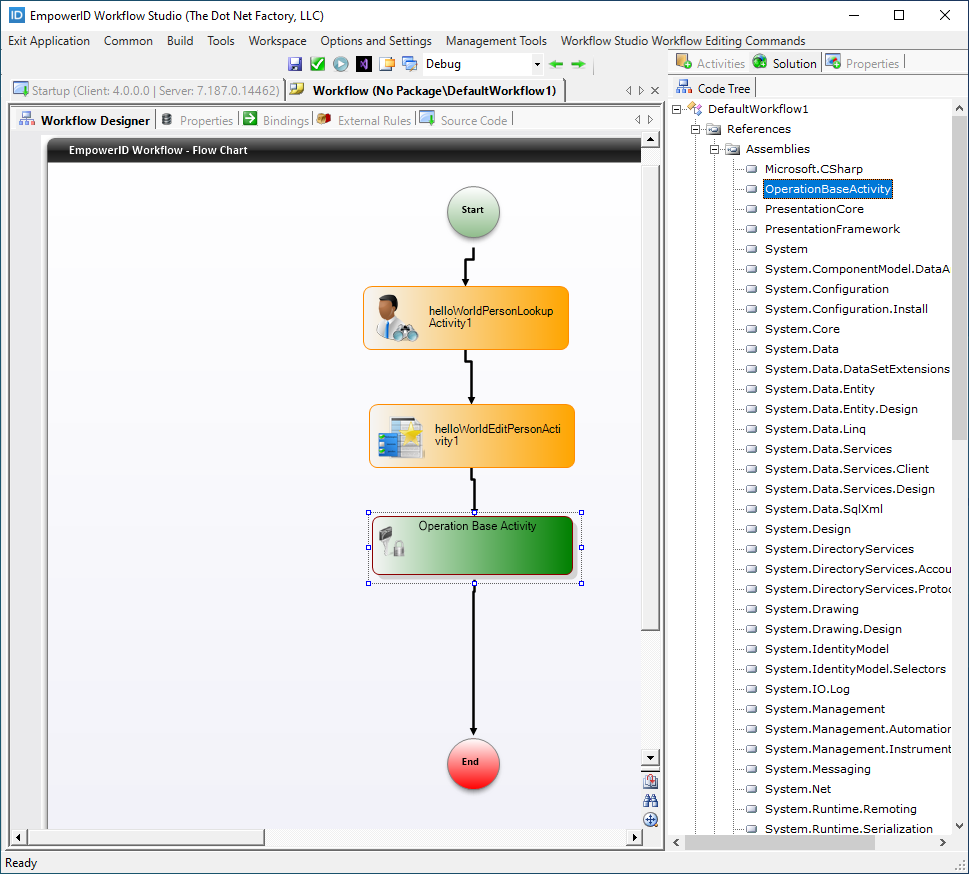
- From the Code Tree, expand the Reference > Assemblies nodes. You should see the OperationBaseActivity assembly.
- On the Workflow Studio toolbox to the right of the Workflow Designer, click the Solution tab and in the Code Tree right-click the project name and select Add Reference > Add Assembly Reference from the context menu.
Bind Workflow Properties
Next, you need to bind workflow and activity properties to each other to pass the right data values to the various components of your workflow.
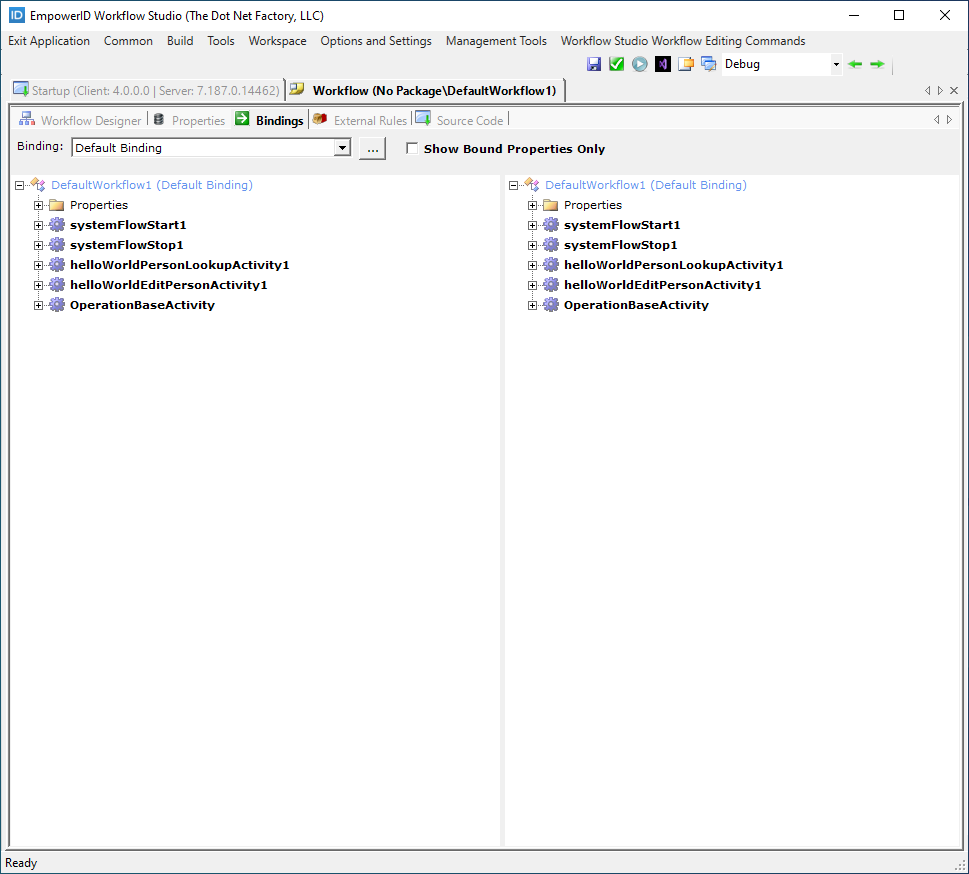
- From the Workflow Designer, click the Bindings tab.
You should see two identical columns, each containing a Workflow Properties node and nodes for each of the activities in the workflow. These nodes grant access to the properties of the workflow and its activities. The properties are categorized by type, such as Input and Output, enabling you to easily pass the output of one activity to the input of another.
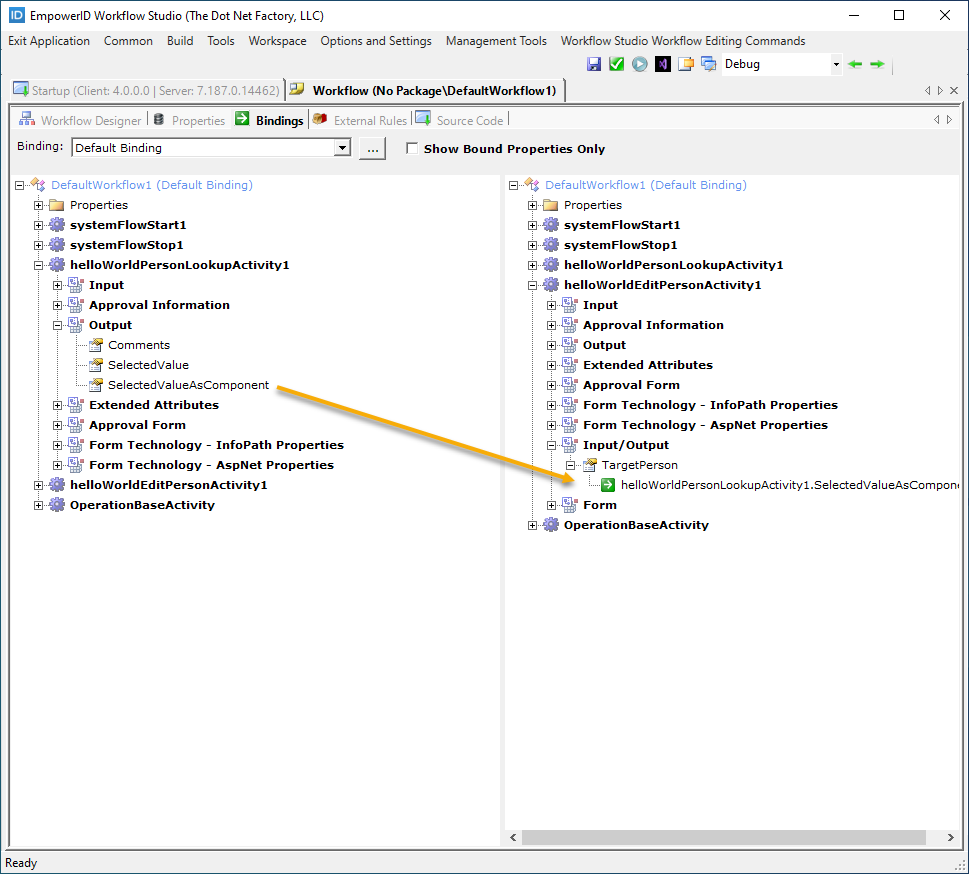
 In this tutorial, the goal is to pass the person selected in the lookup to the form and then from the form to the Operation activity. This person is the target of the workflow.
 - In the left column of the Bindings tab, expand the Lookup activity and then expand the Output node for that activity. You should see three properties: Comments, SelectedValue, and SelectedValueAsComponent. The property we need is SelectedValueAsComponent, which represents the EmpowerID Person selected in the lookup.
- In the right column of the Bindings tab, expand the Form activity and then expand the Input/Output node for that activity. You should see a TargetPerson property. As indicated by the type (Input/Output), the target person is passed to the form, where edits are made to the available attributes and then passed to the Multi-Operation activity.

- From the left column of the Bindings tab, drag the SelectedValueAsComponent property onto the TargetPerson property. This binds the person selected in the lookup to the form.
- Collapse the nodes in both columns to make the next binding easier.
- In the left column of the Bindings tab, expand the form activity and then expand the Input/Output node for that activity. You should see the TargetPerson property.
- In the right column of the Binding tab, expand the Multi-Operation activity (OperationBaseActivity in our example), and then expand the Input node. You should see a number of properties prefixed with Form_. The property we need is the Form_TargetPerson property.
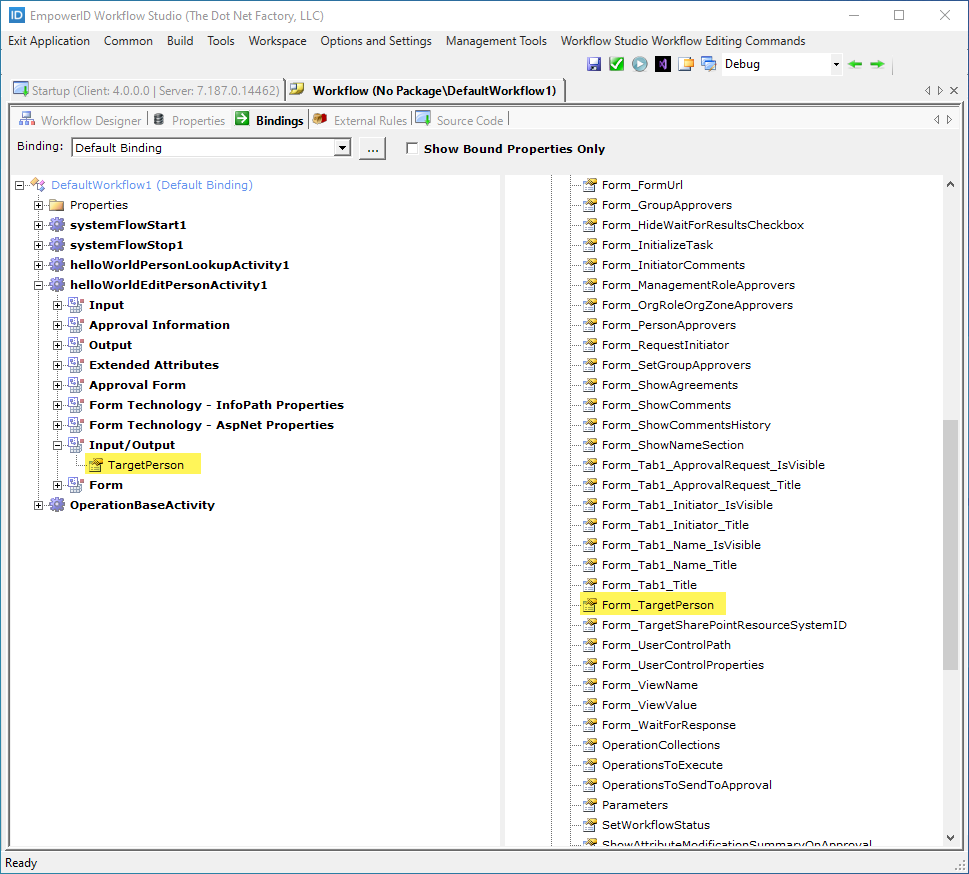
- From the left column of the Bindings tab, drag the form TargetPerson property onto the Multi-Operation activity Form_TargetPerson property.

Now that you have completed the bindings, you are ready to deploy the workflow.
Deploy and Test the Workflow
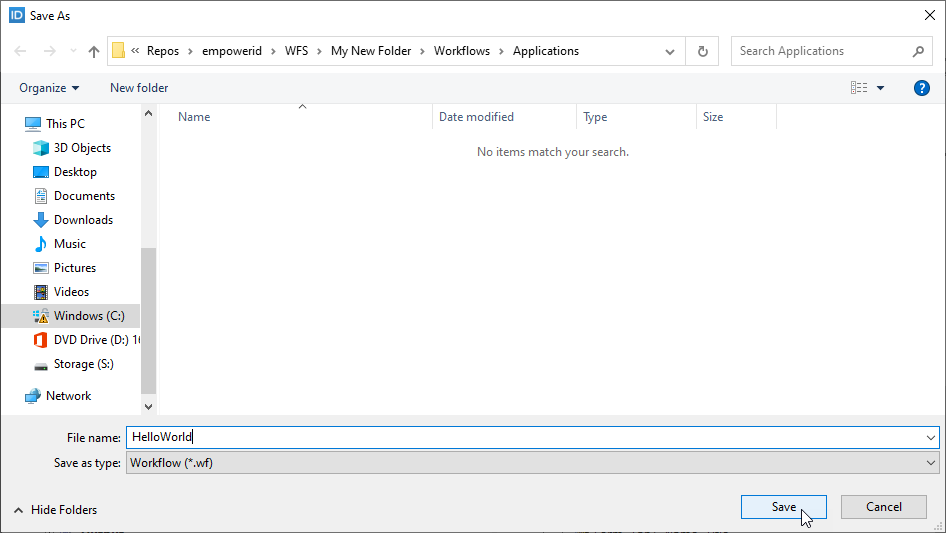
- Click the Save button above the designer and in the Save As dialog that appears, enter HelloWorld as the file name and click Save.
- Next, click the Compile and Publish button above the Workflow Designer.
- In the Workflow Publishing wizard that appears, click the Next button.
- Select the appropriate workflow server(s) and click Next.
- Click OK to close the Publishing action completed successfully! dialog.
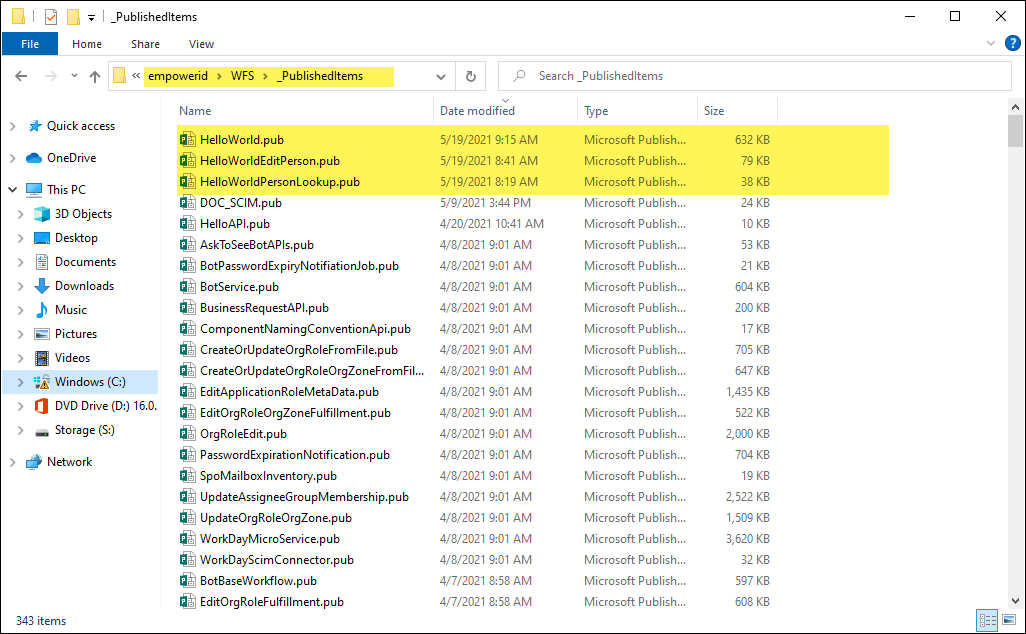
Workflow Studio adds the .pub file for the workflow to the WFS > _PublishedItems folder on your local file system. You should also see .pub files for the lookup and form you published earlier.
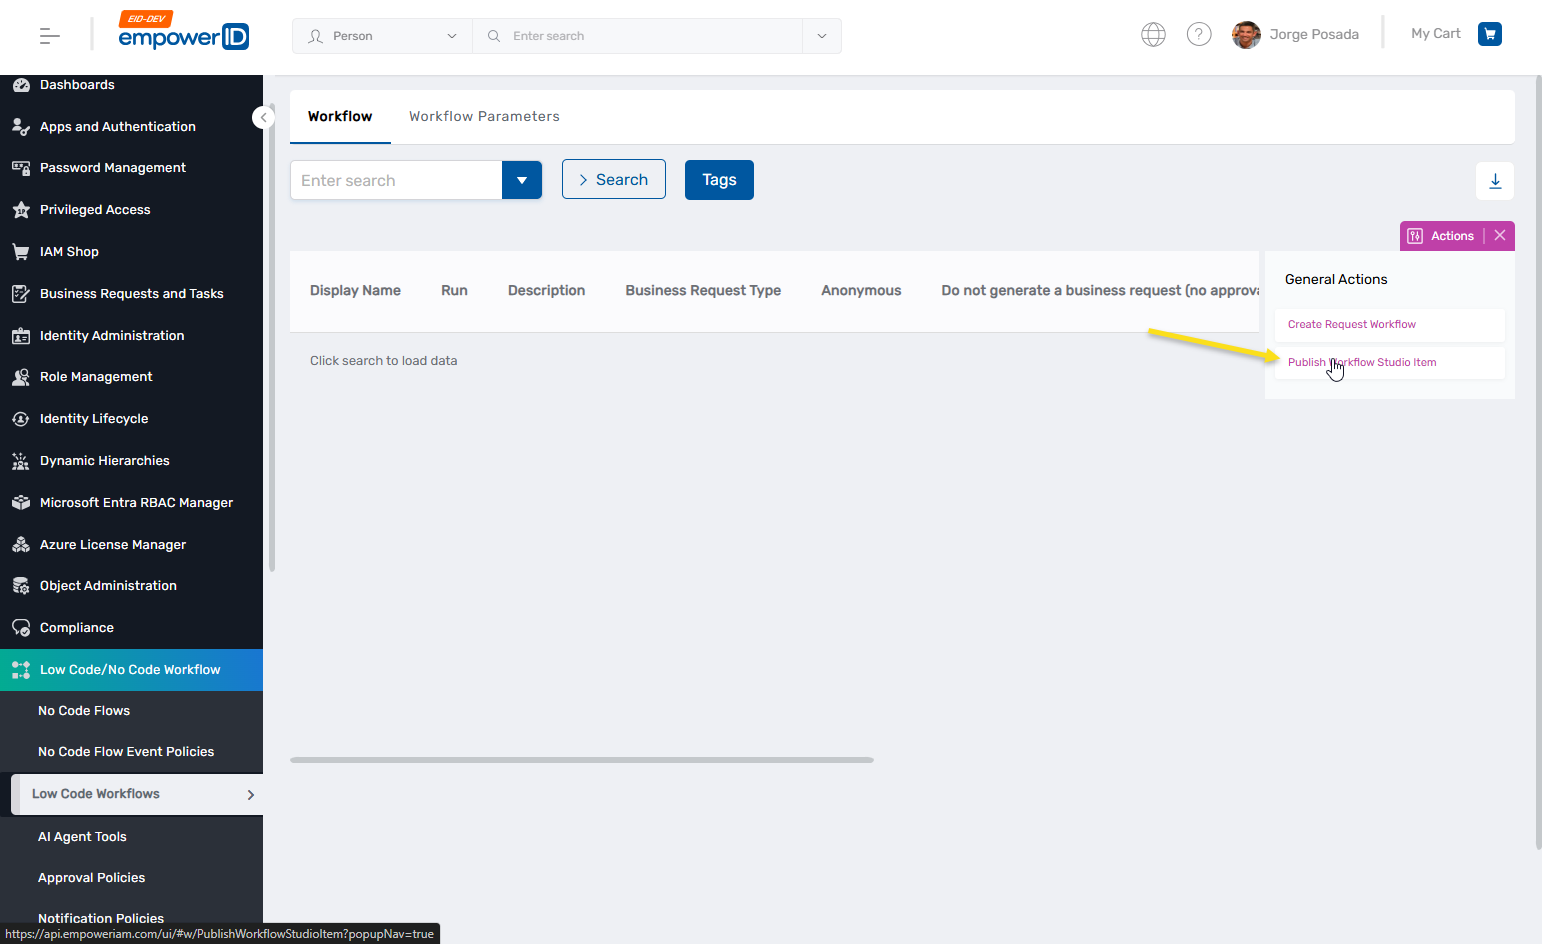
At this point, the workflow is simply published to your local file system. To make it available to users in the EmpowerID Web application, you need to run the PublishWorkflowStudioItem workflow in the Web application.
- Log in to the EmpowerID web application as a user with the appropriate access to run the PublishWorkflowStudioItem workflow.
- On the navbar, expand Low Code / No Code Workflow and click Low Code Flows.
- Click Publish Workflow Studio Item.
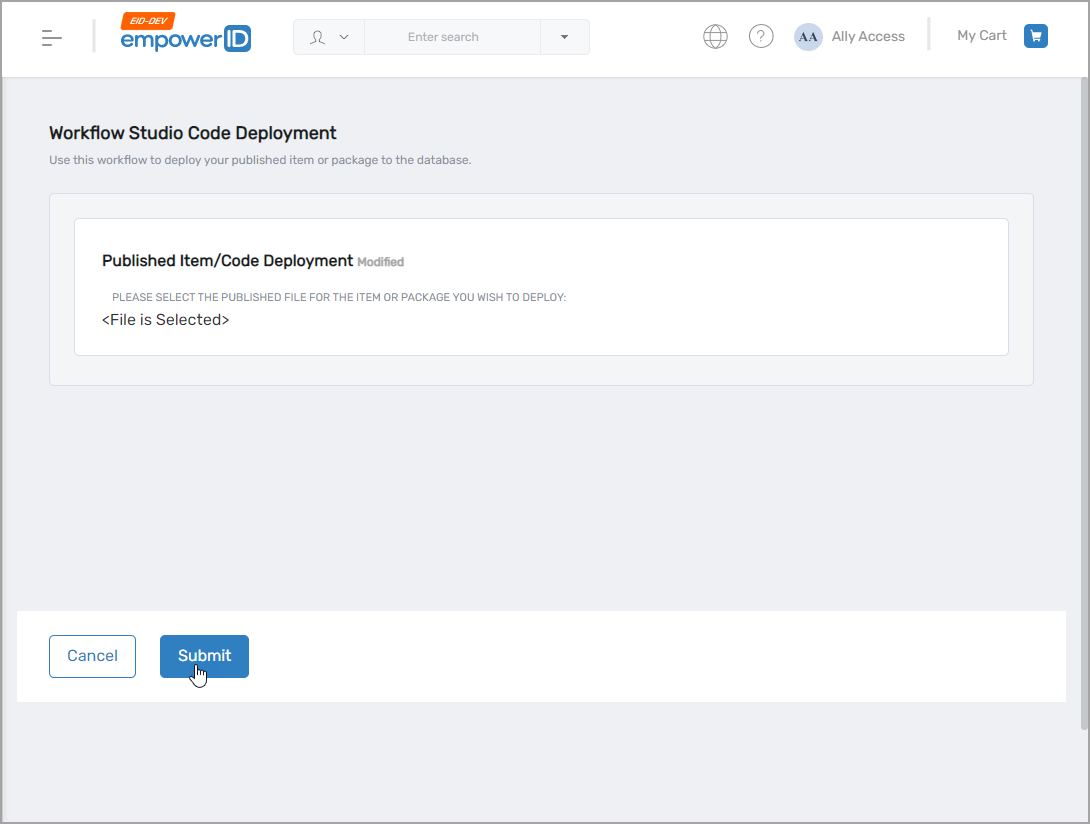
- Click Choose File, navigate to the _PublishedItems folder and select HelloWorld.pub.
- Click Submit.
- Reset IIS.
- In the address bar of your browser, append
#w/HelloWorldto the base URL for your site. The full URL should look similar tohttps://sso.empoweriam.com/ui/#w/HelloWorldwheresso.empoweriam.comis the FQDN of your EmpowerID server. EmpowerID starts the workflow. You should see the Lookup for the workflow.
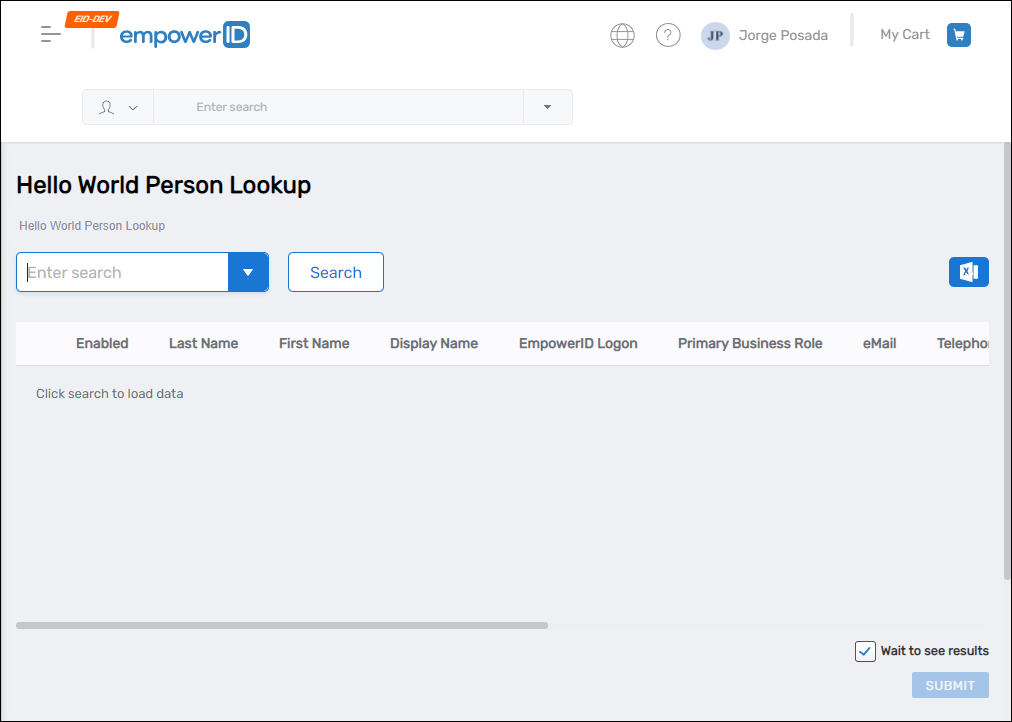
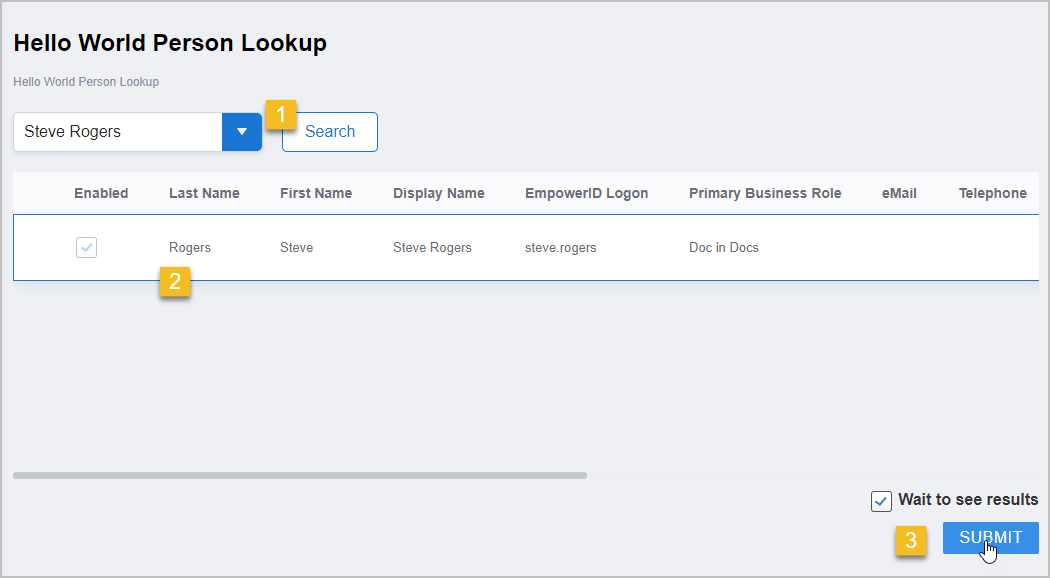
- Search for a person, click the record returned and then click Submit.
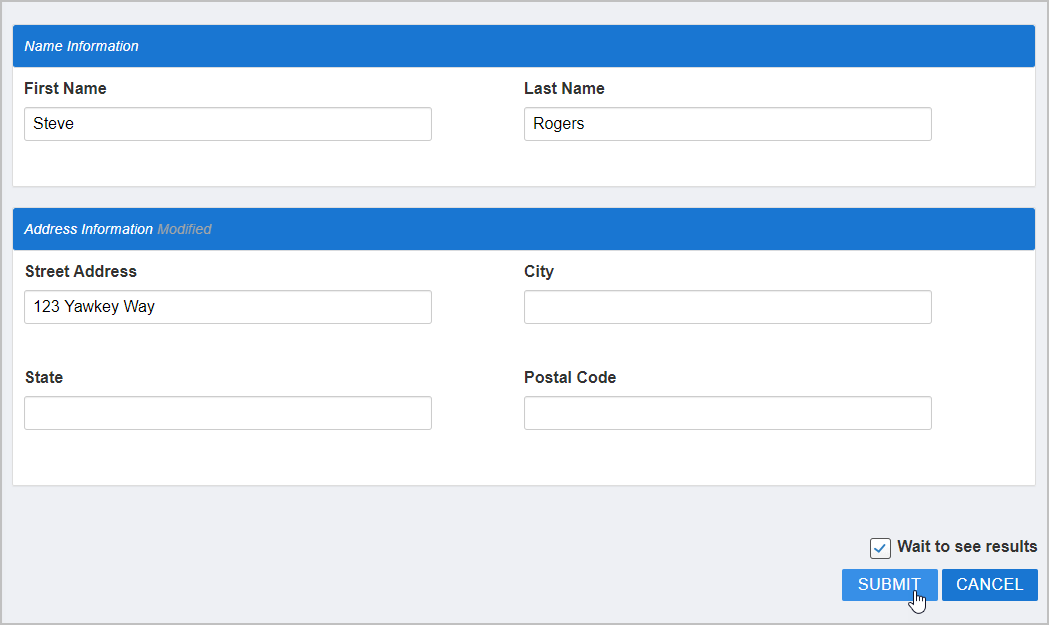
- In the Address Information section of the Update Person Form that appears, type an address in the Street Address field and click Submit.
- Finally, verify the change by searching for the person whose address you updated. You should see your change beside the Street Address label.
Summary
In this tutorial, you created a complete workflow that demonstrates the fundamental concepts of EmpowerID workflow development:
- Organizing workflow projects with folders
- Creating Lookup controls for searching objects
- Designing forms with data-bound fields
- Adding Operation activities for secure operations
- Binding properties to maintain data flow
- Publishing and deploying workflows
Next Steps
Now that you've created your first workflow, explore these topics:
- Creating Operation Workflows - Build more complex workflows with multiple operations
- Working with Forms - Advanced form design techniques
- Business Rules - Add conditional logic to your workflows
- Understanding Activities - Learn about different activity types