About the IDE
The Workflow Studio IDE is where you develop EmpowerID workflows. It comprises four main components that work together to provide a visual design environment. Through drag-and-drop operations, you can translate business processes into workflow logic without extensive coding. Code editors allow you to inject C# code when needed for more complex scenarios.
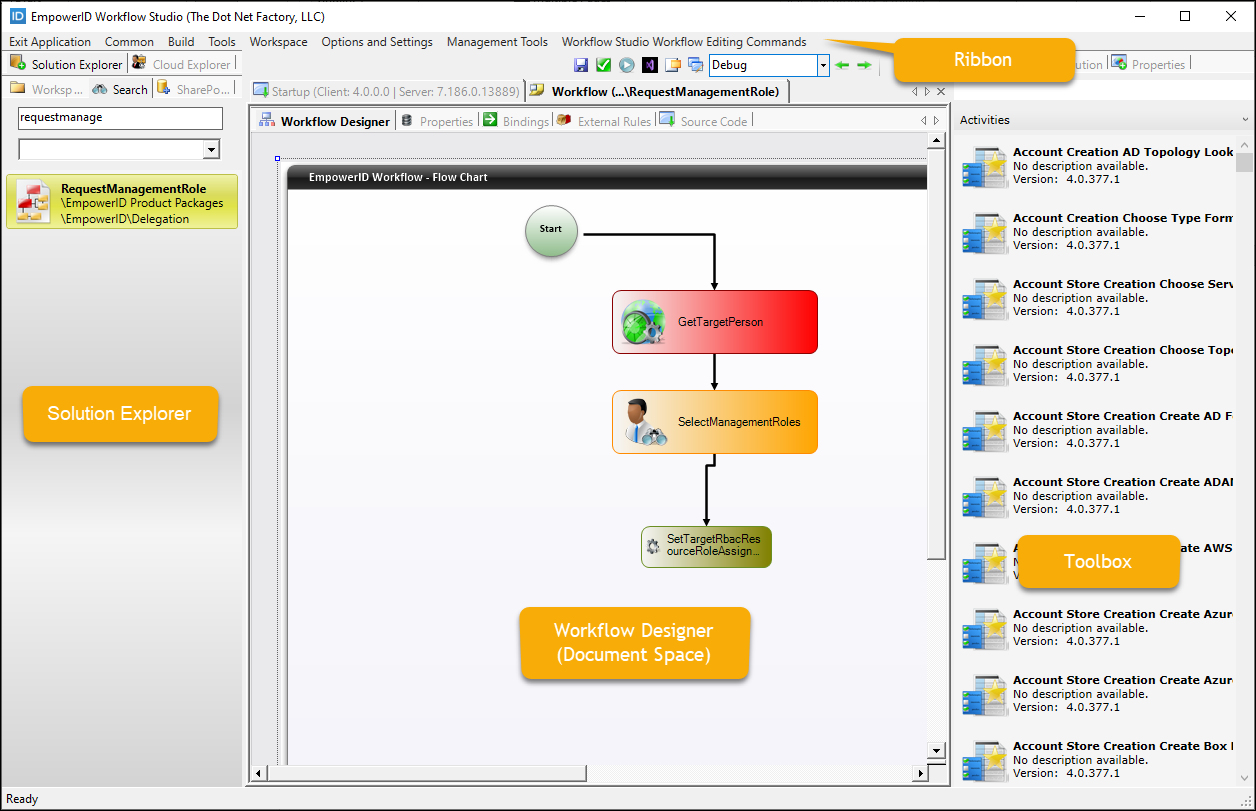 The Workflow Studio IDE with a Flow Chart workflow open in the Workflow Designer
The Workflow Studio IDE consists of four primary components:
- Toolbar – Provides access to commands and tools for workflow development
- Solution Explorer – Organizes and manages your workflow projects and objects
- Document Space – The central work area where you design workflows, activities, and forms
- Toolbox – Contains activities, properties, and other development resources
Toolbar
The Workflow Studio toolbar provides immediate access to development commands and tools. The available commands change dynamically based on what you have open in the Document Space.
Key toolbar functions:
- File operations – Save, Save As, Exit Application
- Build operations – Compile, Publish, Deployment
- Development tools – Object Browser, Refresh Toolbox, View Assemblies
- Workspace management – Access to program files, build logs, and cache folders
The toolbar adapts to show context-specific commands when you're working with workflows, activities, forms, or lookups. For example, form-specific commands like "Add Object" and "New Tab" only appear when a form is open.
For a complete list of toolbar commands and their functions, see the IDE Reference.
Solution Explorer
The Solution Explorer is your project management hub, organized into three tabs:
Workspace Tab
The Workspace tab displays all objects you develop in Workflow Studio, organized into folders on your local machine. These folders act as containers for your workflow applications, activities, user interface elements, and other objects.
Source Control folders organize different object types:
- Workflows – Workflow Applications, Activities, and Composites
- User Interface – Forms, Lookup Controls, and UI Pages
- Extensions – OAuth, SAML, STS, and UMA Extensions
- Microservices – Microservice V1, V2, V3, and SCIM Microservices
- Other – Business Rules, Class Libraries, Console Applications, APIs, Azure Functions
When you create new objects, Workflow Studio prompts you to select the appropriate folder, keeping your workspace organized.
Common workspace commands (accessed by right-clicking):
- New Workflow, New Workflow Activity, New Operation Activity
- New User Interface (forms, lookups, pages)
- Open in File Explorer
- New Folder, Add Item Folders
- Refresh, Delete Folder
Search Tab
The Search tab allows you to quickly locate objects by name and type across your entire workspace. This is especially useful when working with large projects or multiple folders.
SharePoint Tab
The SharePoint tab enables integration with SharePoint objects, allowing you to incorporate SharePoint resources into your EmpowerID workflows.
Document Space
The Document Space is the central work area where you design and edit workflows, activities, forms, and lookups. It provides specialized designers for each object type.
Workflow Designer
The Workflow Designer is where you visually create workflow applications. You add activities (shapes) to the canvas, connect them with flow lines, and apply Business Rules to control the process flow.
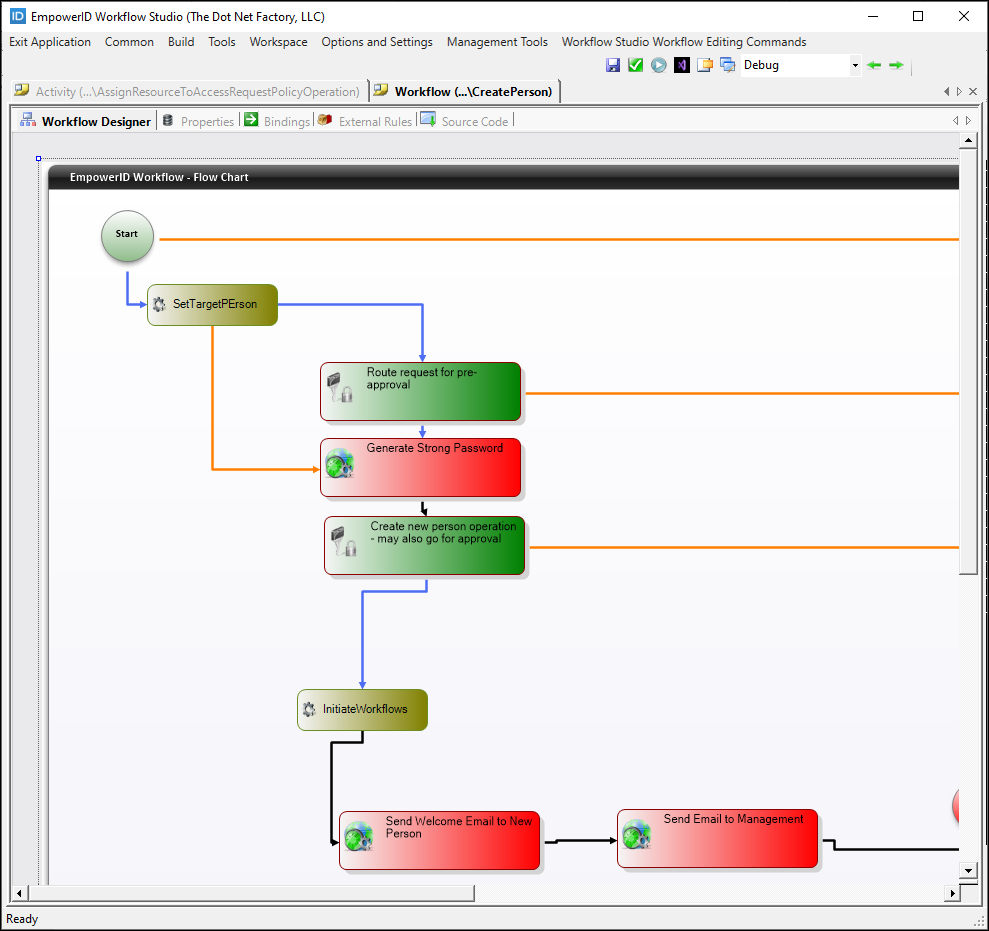 The Workflow Designer with multiple tabs for different aspects of workflow development
Key tabs in the Workflow Designer:
Designer Tab – The visual canvas where you add activities and connect them with flow lines
Properties Tab – Tree view of the workflow's properties. Right-click to add new properties that can be used for data binding
Bindings Tab – Two tree views showing workflow properties and activity properties. Drag and drop properties between trees to bind them together, maintaining data consistency throughout workflow execution
External Rules Tab – Similar to Bindings, but specifically for binding workflow properties to Smart Object properties of External Business Rule Applications
Source Code Tab – View and edit the underlying C# code of the workflow for advanced customization
Activity Designer
The Activity Designer lets you create workflow activities with the same visual approach as the Workflow Designer. It offers virtually identical tabs and functionality.
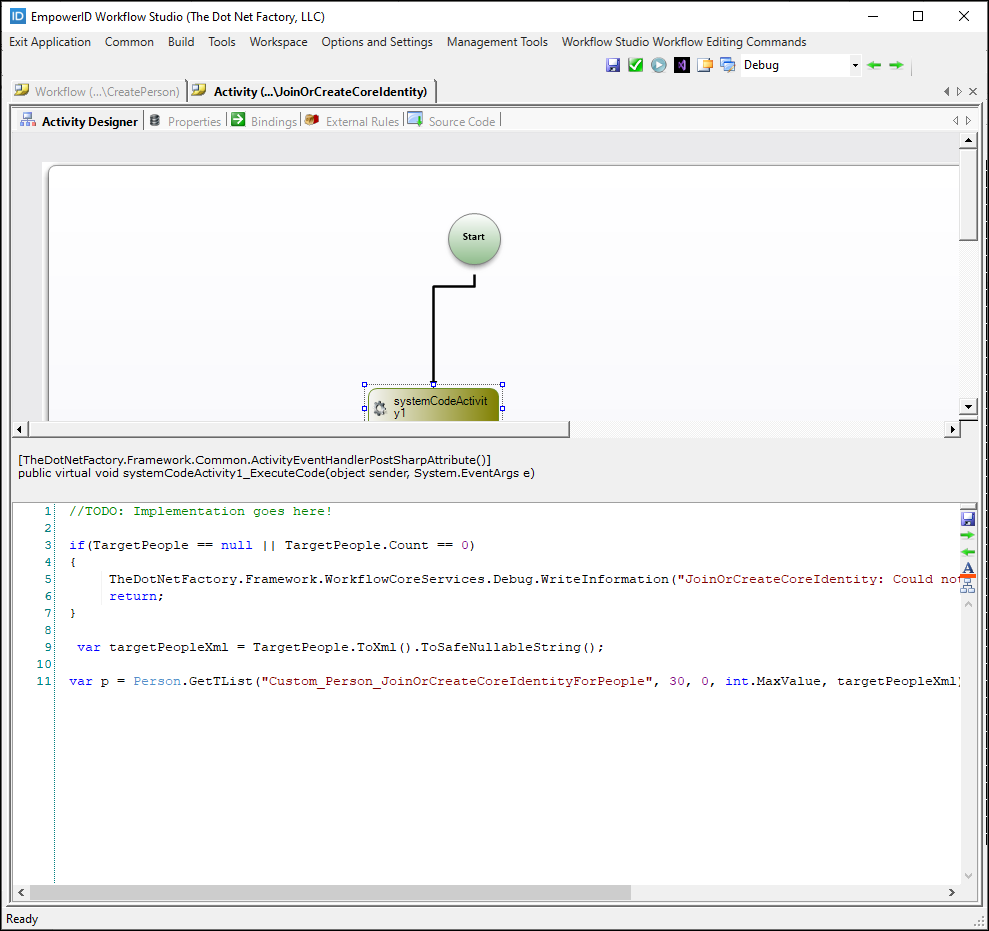 The Activity Designer with its tabs for properties, bindings, and code
Form Designer
The Form Designer enables you to create forms by dragging and dropping UI components onto the canvas. You can create forms for various data types, from simple strings to complex RBAC components like Person or Account objects.
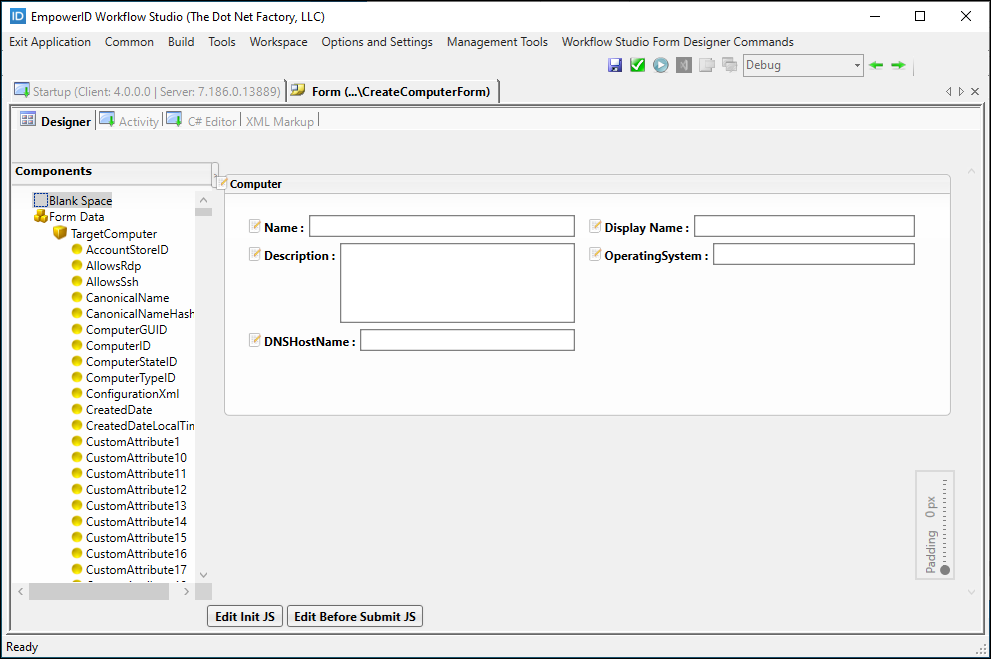 The Form Designer showing the visual form creation interface
Once published, forms become "Form activities" that can be added to workflows. The form fields become dependency properties available for data binding.
Key form capabilities:
- Add Primitives (Strings, Booleans, DateTime) and RBAC Components (Person, Account, Group)
- Create tabs and sections for organizing form content
- Add validation rules and masks for data entry
- Bind form controls to EmpowerID Identity Warehouse objects using Data Sources
Lookup Designer
The Lookup Designer creates searchable grids for selecting objects from the EmpowerID Identity Warehouse. Lookups execute stored procedures against the Identity Warehouse to return specific resource types.
For example, a Lookup calling GetAllSearch() on ManagementRoleView executes the dbo.custom_ManagementRoleView_GetAllSearch stored procedure, allowing users to search and select management roles during workflow execution.
Toolbox
The Workflow Studio Toolbox, located on the right side of the IDE, provides access to activities, project files, and properties. It consists of four tabs that adapt based on what you're working on.
Activities Tab
Displays all activities published to your Workflow Server environment. Once an activity is published, it becomes available to drag and drop onto workflows.
Search and filter – Use the search field and category dropdown to quickly find activities. Search works across all categories and checks both activity names and descriptions.
Activities must be published before appearing in the toolbox. In team environments, each developer should periodically refresh their Activity Toolbox to stay synchronized with the team's published activities.
Solution Tab
Provides access to the Code Tree, showing a hierarchical view of files associated with the currently open object. Use this tab to:
- Add assembly references and namespaces
- Create custom methods and event handlers
- Add support classes and embedded resources
- Create Business Rules and type converters
- Manage code snippets
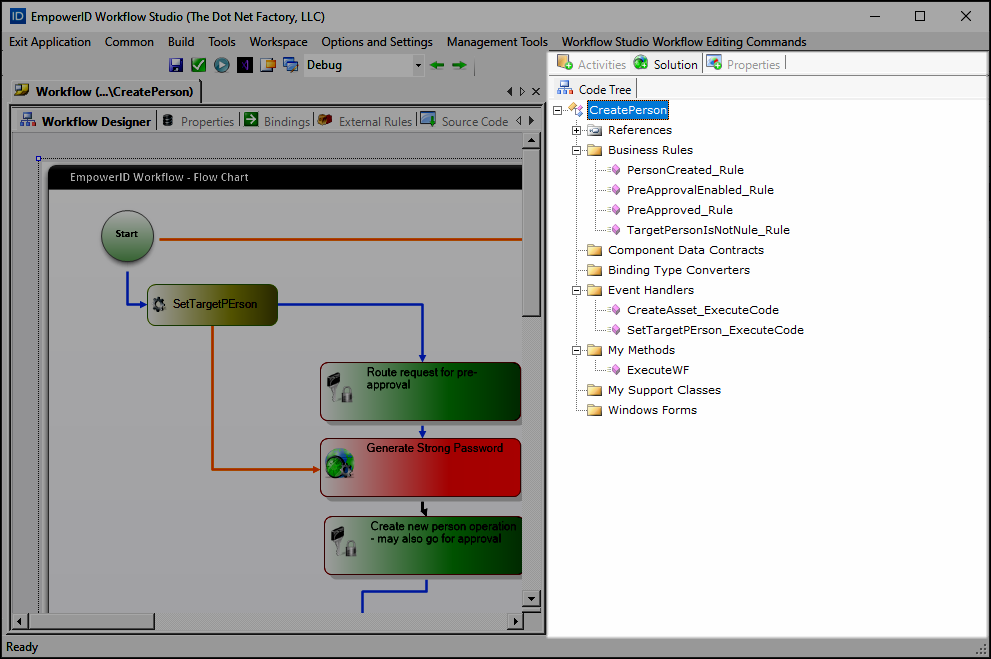 The Code Tree showing the structure of a workflow project
Right-click on nodes in the Code Tree to access relevant commands for adding code elements to your project.
Properties Tab
Displays the browsable properties of the currently selected object in the Document Space. Properties appear in a two-column grid with names on the left and values on the right.
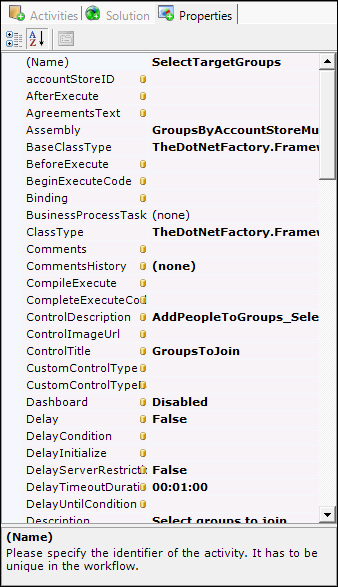 The Properties grid showing activity properties
You can modify properties directly in the grid, and changes apply immediately. The visibility of properties can be controlled using the Browsable attribute when creating dependency properties.
Workflows Tab
Provides additional workflow-specific functionality based on your current context.
Working with the IDE
Hiding panels – To maximize your design surface, you can hide the Solution Explorer and Toolbox panels using the Show/Hide Panel buttons in the toolbar.
Multiple documents – The Document Space supports multiple open documents with tabs, allowing you to work on several objects simultaneously.
Context-sensitive commands – The toolbar and context menus adapt based on what you're working on, showing only relevant commands.
Next Steps
- Create your first workflow to see the IDE in action
- Learn about workflow concepts to understand what you're building
- Review development guidelines for best practices
- See the complete IDE command reference for detailed information