Basic Development Guidelines
The guidelines provided in this document aim to assist you and your developer team in developing new components and extending existing EmpowerID functionality using Workflow Studio. These guidelines include naming conventions and tips to help you avoid known issues during development.
Please note that the information provided is intended for customers and their developer teams. The guidelines are recommendations that can lead to a well-structured design, but developers can establish their own conventions or modify the suggested ones to suit their specific needs.
General Tips
- Always create package folders within the Workflow Studio Source control. A project folder serves as a container that offers a logical organization for workflow applications and their associated components. Avoid using the stock packages folder provided by the EmpowerID product.
- When modifying a stock workflow, it is a best practice to create a copy of the workflow and then modify the copied version. Modifying stock workflows directly may result in future EmpowerID product upgrades overwriting the modified workflows. Consider following the naming conventions provided in the Naming Conventions section below.
- Not only for workflows, but it's also important to follow the same approach when extending or altering any stock components. Create a copy, save it with a suitable name according to the Naming Conventions, and then make your modifications.
- Customizing and extending EmpowerID components involves inheriting and referencing stock libraries, such as classes and interfaces. You can find the instructions for doing so in the Extend EmpowerID section.
Naming Conventions
While developing components in Workflow Studio, you will work with various items. Following a standard naming convention helps improve readability, understanding, and maintenance of the code. This section discusses how to sensibly name Workflow Studio items such as Workflows, Forms, and Properties within those items.
Placeholders: The following placeholders are used in explaining the naming conventions:
- {CompanyInitial} – Represents the initials of your company, e.g., CI for the imaginary company Circle International.
- {Verb} – Represents an action to perform, e.g., Create, Edit.
- {TargetResourceType} – Represents the resource the action is being performed on, e.g., Person, Mailbox.
- {TargetResourceTypeAbbrevation} – Represents an abbreviation for an EmpowerID object, e.g., MR for Management Roles, BRL for Business Role Locations.
Workflow
The table below outlines the naming conventions for workflows and activities, providing pattern examples and guidance for specific use cases.
| Component | Pattern | Example | Description |
|---|---|---|---|
| Workflow | {CompanyInitial}{Verb}{TargetResourceType} | CICreateMailbox, CIEditMailbox, CIDeletePerson, CIUpdatePerson | When naming a workflow, begin with the company initials, followed by the verb, and then the target resource type. In the case of the CICreateMailbox workflow example, "CI" represents the company initials, "Create" denotes the action being performed, and "Mailbox" signifies the target resource type. |
| {CompanyInitial}{Verb}{TargetResourceType} | CIUpdatePerson | For workflows that perform multiple actions on a single resource type, such as add and remove, begin the name with the company initials, followed by a verb that encompasses both actions, like "update," and then the target resource type. In the example of the CIUpdatePerson workflow, "CI" represents the company initials, "update" signifies the combined actions, and "Person" is the target resource type. | |
| {CompanyInitial}{Verb}{TargetResourceTypeAbbrevation} | CIDeleteMRMembership | Microsoft Windows has a file path character limit of 255-260 characters. Using abbreviations in workflow names can help overcome this limitation and improve code readability. For example, "MR" can represent Management Roles, and "BRL" stands for Business Roles and Locations. | |
| {CompanyInitial}{Verb}{TargetResourceType1}{TargetResourceType2} | CIAddAccountToGroup, CIRemoveAccountFromGroup | To name a workflow that performs actions on multiple objects, start with the company initials, followed by the verb and names of both target resource types. In the case of the CIAddAccountToGroup workflow example, "CI" represents the company initials, "Add" is the action performed, and "AccountToGroup" indicates that the action is being done on both Account and Group resource types. | |
| Workflow Activity | {CompanyInitial}{Verb}{TargetResourceType}Activity {CompanyInitial}{Verb}{TargetResourceTypeAbbrevation} | CIResetPasswordActivity CIUpdateMRActivity | To name an activity, begin with the company initials, followed by the verb, target resource type, and the word "Activity" to indicate it's a workflow activity. For example, in CIResetPasswordActivity, "CI" represents the company initials, "Reset" is the action performed, and "Password" is the target resource type. When the activity performs multiple actions, you can use a verb like "update" to reflect the various actions being carried out. |
Form and Controls
The table below presents the naming conventions for forms, as well as their associated controls, such as data sources and lookups.
| Component | Pattern | Example | Description |
|---|---|---|---|
| Form | {CompanyInitial}{Verb}{TargetResourceType}Form | CIEditPersonAddressform | To name a Form, begin with the company initials, followed by the verb and target resource type, and conclude with the word "Form." For example, in the Form CIEditPersonAddressForm, "CI" represents the company initials, "Edit" is the verb, and "PersonAddress" is the target resource type. |
| Form > Data Source | {ObjectName}Datasource | CountryDatasource | To name a Data Source, begin with a descriptive name that effectively represents the data source, followed by the word "DataSource". For example, a DataSource named "CountryDataSource" is self-explanatory, indicating that the data source provides a list of countries. |
| Form > Lookup |
|
| To name a lookup, begin with a meaningful object name and append the word "Lookup" at the end. For example, a lookup called "DisabledPersonLookup" has the word "Lookup" indicating the control, and it binds to persons who are disabled for login. You can use single or multiple words to indicate if it is a single or multiple dropdown. Additionally, you can use abbreviations like "MR" and "BRL" to keep the name concise and work around the Microsoft Windows file path character limitation. |
| Form > Form Data | Target{ResourceType} |
| To name the data object for a form, always begin with the word "Target" followed by the resource type. For example, if the data object of a form is a person, you would use "TargetPerson." |
Class Libraries & Connectors
The table below presents the naming conventions for connectors and class libraries.
| Component | Pattern | Example |
|---|---|---|
| Class Library Project | {CompanyInitial}Connector | CIHRConnector |
| Custom Connector | {ObjectName}Connector | CustomConnector |
Class Library Project: To name a class library, use a descriptive name to represent the class library, followed by the word "Connector" at the end. For CIHRConnector, CI stands for the company initials, and HRConnector indicates the connector used to connect to an HR system. Note that a custom connector would also be developed inside a class.
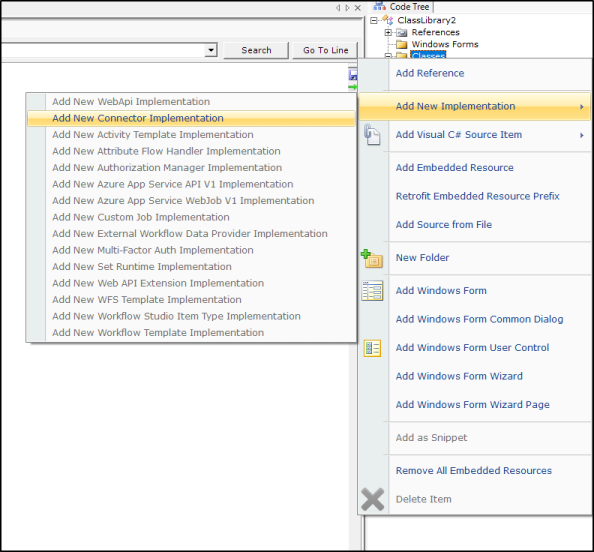
Custom Connector: To name a Custom Connector, use a descriptive name to represent the connector and append the word "Connector" at the end. A connector would be a class within the class library. For example, in CustomConnector, "Custom" describes the type of connector, with the word "Connector" following it.
You can create a custom connector by adding a new implementation of the connector in Workflow Studio as shown in the image below:
Folder Structure
In Workflow Studio, the workflow applications and other objects you develop are classified as solution items and placed in folders you create on your local development machine. These folders act as containers for holding and organizing the items you are developing and are represented as nodes in the Source Control tree. Whenever you create a new workflow, activity, user interface element, or other objects, Workflow Studio prompts you for the folder in which the object should be placed, placing it within a Source Control folder underneath the selected folder.
Source Control folders exist for each item type that can be created in Workflow Studio:
| Source Control Folder | Folder Purpose |
|---|---|
| Adaptive Auth Rules | Organizing Adaptive Auth Rules created in Workflow Studio |
| Alert Receivers | Organizing Alert Receivers created in Workflow Studio |
| APIs | Organizing APIs created in Workflow Studio |
| Azure Functions V1 | Organizing Azure Functions V1 apps |
| Azure Functions V3 | Organizing Azure Functions V3 apps |
| Azure Functions V5 | Organizing Azure Functions V5 apps |
| Azure WebJobs v3 | Organizing Azure Web Job V3 apps |
| Business Rules | Organizing Business Rule apps |
| Class Libraries | Organizing Class Library apps |
| Console Applications | Organizing Console Apps |
| Microservice V3 | Organizing Microservice V3 apps created in Workflow Studio |
| Microservice V5 | Organizing Microservice V5 apps created in Workflow Studio |
| Microservices v6 | Organizing Microservice V6 apps created in Workflow Studio |
| OAuth Extensions | Organizing OAuth Extensions created in Workflow Studio |
| SAML Extensions | Organizing SAML Extensions created in Workflow Studio |
| SCIM Microservices V2 | Organizing SCIM Microservices V2 apps created in Workflow Studio |
| SCIM Microservices V5 | Organizing SCIM Microservices V5 apps created in Workflow Studio |
| STS Extensions | Organizing STS Extensions created in Workflow Studio |
| UMA Extensions | Organizing UMA Extensions created in Workflow Studio |
| User Interface > Forms | Organizing Forms created in Workflow Studio |
| User Interface > Lookup Controls | Organizing Lookup Controls created in Workflow Studio |
| User Interface > UI Pages | Organizing UI Pages created in Workflow Studio |
| User Interface > Adaptive Cards | Organizing Adaptive Cards created in Workflow Studio |
| Workflows > Activities | Organizing Workflow Activities created in Workflow Studio |
| Workflows > Applications | Organizing Workflow Applications created in Workflow Studio |
| Workflows > Composites | Organizing Composite Workflows created in Workflow Studio |
| Workflow Rules | Organizing Workflow Rules created in Workflow Studio |
Tracing
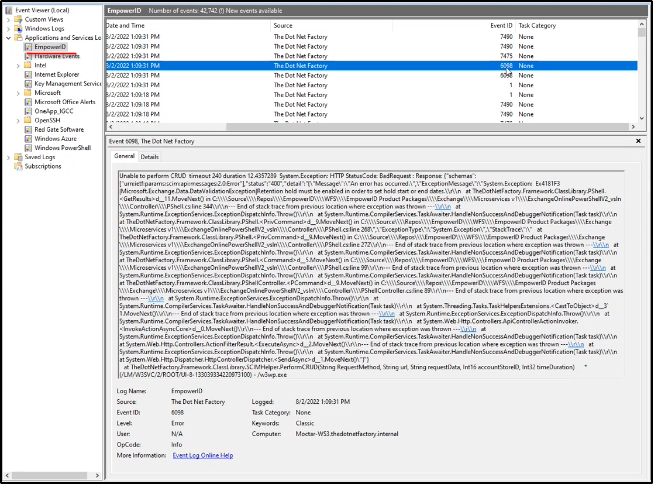
Developers can construct a tracing system utilizing the TdnfTrace class provided by EmpowerID. Implementing the TdnfTrace class allows for logging information into the Windows event log. The TdnfTrace logger records information within the Event Viewer under the path: Application and Services Logs → EmpowerID.
Developers can customize the logging information to suit their requirements and gain a better understanding of errors. Here's an example of implementing TdnfTrace in an exception handler:
if (ex.Message.Contains("Timeout"))
    TdnfTrace.Current.TraceData(TraceEventType.Warning, 9900,
        "Rbac refreshing resource role review compiled operation took too long refreshing but will resume: "
        + Environment.NewLine + ex.ToString());
else
    TdnfTrace.Current.TraceData(TraceEventType.Error, 10000,
        "Rbac refreshing resource role review compiled operation: "
        + Environment.NewLine + ex.ToString());