Using the Data Migration Utility
The Data Migration Utility is a PowerShell-based command-line tool that copies complex configuration information from one EmpowerID environment to another. For example, you can use this tool to transfer a Management Role and its delegations from a development environment to QA and production environments.
Overview
The Data Migration Utility uses a workflow-based approach to safely migrate configuration data:
- Select Mode - Extract configuration data from the source environment into a SyncJob file
- Refresh Mode (optional) - Update the SyncJob file with changes made since extraction
- Forecast Mode - Preview what will be written to the target environment
- Write Mode - Apply the configuration to the target environment
The utility uses SyncConfig files provided by EmpowerID that define which components and related data to migrate. Different SyncConfig files are used for different purposes, such as migrating Management Roles, Business Roles and Locations, Password Policies, or Location hierarchies.
- SyncConfig files provided by EmpowerID for the specific components you want to migrate
- Source EmpowerID environment with existing configurations
- Target EmpowerID environment with a clean EmpowerID installation
- Source and target systems must be the same EmpowerID version
- Administrative access to both source and target servers
- Windows PowerShell launched in elevated mode
Installation location
The Data Migration Utility is located in the EmpowerID installation folder:
C:\Program Files\TheDotNetFactory\EmpowerID\Programs\DataMigrationUtility.CommandLine.exe
Load the Data Migration Utility module
-
Log on to the source EmpowerID application server and open PowerShell in elevated mode (Run as Administrator).
-
Import the DataMigration.dll module:
Import-Module "C:\Program Files\TheDotNetFactory\EmpowerID\Programs\DataMigration.dll" -
Verify the module loaded successfully by running:
Get-HelpYou should see the Data Migration Utility cmdlets listed:

Migration workflow
The following sections describe each mode in the migration workflow. The modes should generally be used in sequence, though Refresh Mode is optional.
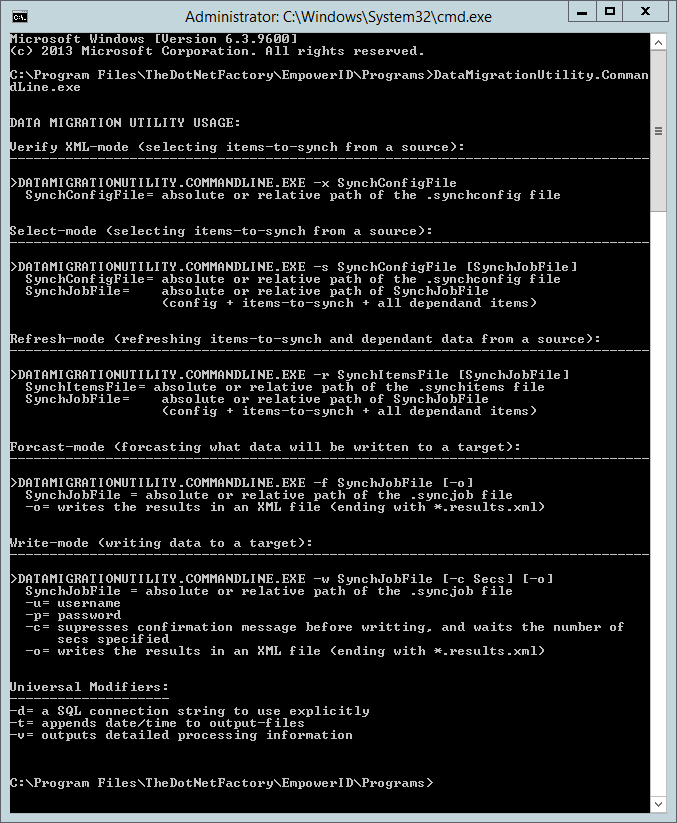
Select Mode - Extract source data
Select Mode extracts configuration information from the source environment using one or more SyncConfig files. The output is a SyncJob file containing the extracted data and configuration information.
Command syntax:
DataMigrationUtility.CommandLine.exe -s [SyncConfigFile] [SyncJobFile]
Example:
DataMigrationUtility.CommandLine.exe -s ManagementRoleSync.xml MgmtRole_Export.xml
After running the command, you will be prompted:
Enter a SELECT statement (ending in a semi-colon) that returns a single result-set with one or more items to synch (or 'done' to continue):
Enter the SQL SELECT statement to specify which items to extract. The statement should return the specific configurations you want to migrate (for example, a specific Management Role by name or ID). End your statement with a semicolon and press Enter.
Type done and press Enter when finished entering SELECT statements. The utility will then extract the specified data from the source environment.
Refresh Mode - Update SyncJob file (optional)
Refresh Mode updates an existing SyncJob file with changes made to either the SyncConfig files or the source environment since the original extraction. Use this mode when time has passed since creating the SyncJob file and the source data has changed.
Command syntax:
DataMigrationUtility.CommandLine.exe -r [SyncConfigFile] [SyncJobFile]
Example:
DataMigrationUtility.CommandLine.exe -r ManagementRoleSync.xml MgmtRole_Export.xml
Forecast Mode - Preview target changes
Forecast Mode provides a preview of what will be written to the target database without making any changes. The results are written to an XML file for review. This allows you to verify the migration scope before applying changes.
Command syntax:
DataMigrationUtility.CommandLine.exe -f [SyncJobFile] -o
Example:
DataMigrationUtility.CommandLine.exe -f MgmtRole_Export.xml -o
The -o option writes the forecast results to an XML file with a *.results.xml suffix.
Write Mode - Apply to target environment
Write Mode imports the SyncJob file data into the target environment. This mode makes actual changes to the target database.
- Stop all EmpowerID services and processes on the target server
- Create a full backup of the target database
- Review the Forecast Mode results to verify the migration scope
Command syntax:
DataMigrationUtility.CommandLine.exe -w [SyncJobFile] -o
Example:
DataMigrationUtility.CommandLine.exe -w MgmtRole_Export.xml -o -u MyUsername -p MyPassword
After executing the command, you will receive messages about updated or inserted data:

The results are also written to log files in the utility directory.
Command options
Write Mode options
| Option | Description |
|---|---|
-u | Username for authentication |
-p | Password for authentication |
-c | Suppresses confirmation message before writing and waits for the specified number of seconds |
-o | Writes the results to an XML file ending with *.results.xml |
Universal options
The following options apply to all modes:
| Option | Description |
|---|---|
-d | SQL connection string to use explicitly |
-t | Appends date/time to output files |
-v | Outputs detailed processing information |