OIDC Forms Auth Module
The EmpowerID OIDC Forms Auth Module enables legacy .NET web applications to utilize Azure authentication. This module deploys a few pages alongside your application to pre-process requests, user claims transformation, and identity generation, which happens before your application receives and processes the HTTP request.
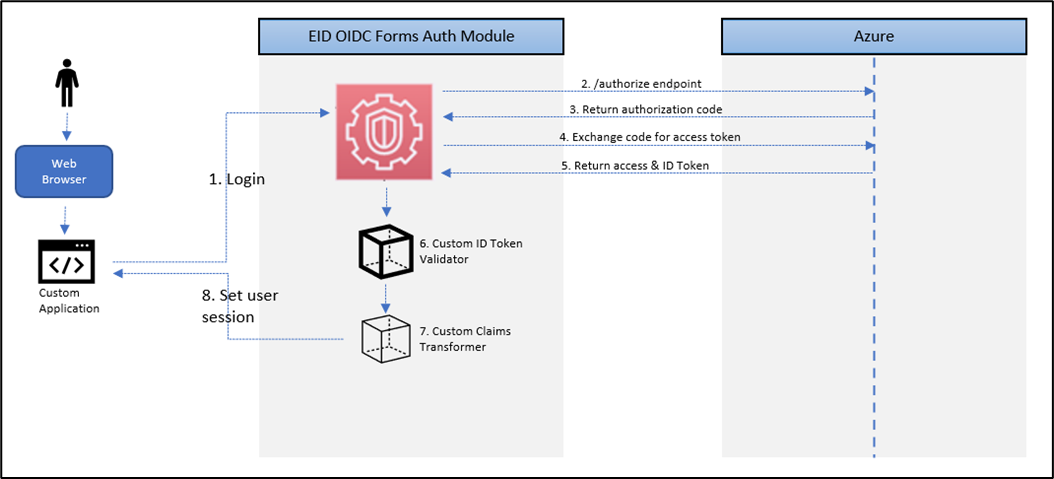
The typical process flow involving the OIDC Forms Auth Module:
- A user attempts to log in to the application
- The OIDC module (authorize.aspx) redirects to the user agent Azure authorization endpoint
- Upon successful authentication, Azure returns the authorization_code and ID token
- The OIDC module (redeemcode.aspx) exchanges the authorization code for an access token
- Upon successful code validation, Azure returns the access token
- The OIDC module invokes the custom ID token validator configured for the application
- The OIDC module invokes the custom claims transformer for the application
- The OIDC module sets the HttpContext.User to the claims principal
Step 1: Configure Azure App Registration
-
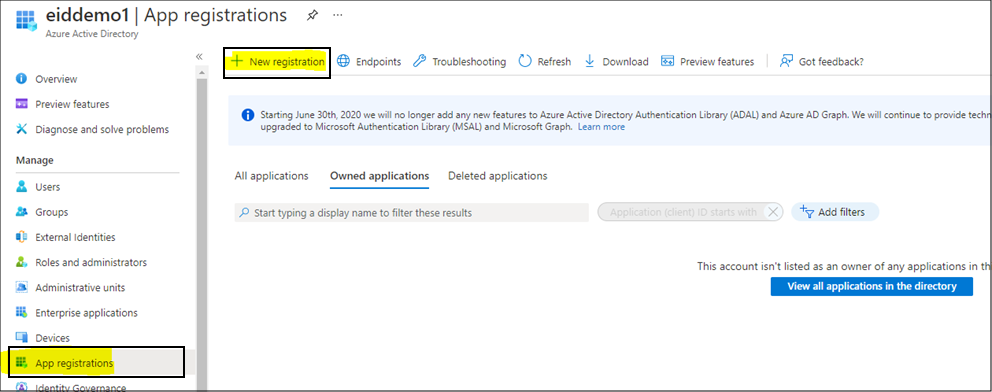
Login to Azure Portal using an admin account.
-
Navigate to Azure Active Directory > App Registrations > New registration.
-
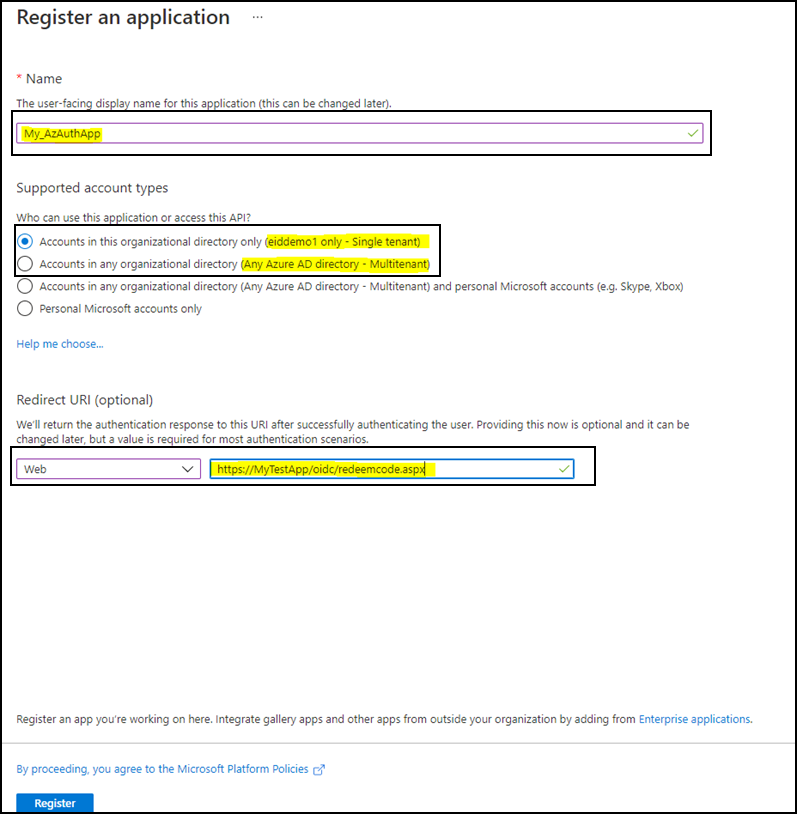
Provide the details asked to create the registration and click Register. Select Single Tenant or Multitenant based on the use case. Select Web and provide a redirect URI in your app to receive an authentication response after successfully authenticating the user.
-
Navigate to the Overview section, then copy and save the Application (client) ID and Directory (tenant) ID values. These values will be used in the "Deploy the OIDC Auth Module" section.

-
Navigate to Certificates & Secrets and create a client secret. Copy the generated secret and save it. This value will be used in the "Deploy the OIDC Auth Module" section.

Step 2: Deploy the OIDC Auth Module
-
Add the following app setting keys with values in the Web.config file of the web application for which you wish to enable Azure OIDC Auth.
Value Description AZURE_APP_CLIENT_ID Client ID of the app registration AZURE_APP_CLIENT_SECRET Client Secret of the app registration TENANT_ID Tenant ID of the Azure tenant AZURE_APP_AUTHORITY Global Azure AD authentication endpoint
If single-tenant app:https://login.microsoftonline.com/<TENANT_ID>/v2.0/
If multi-tenant app:https://login.microsoftonline.com/common/v2.0/HOSTED_WEB_APP_DOMAIN The domain name of the hosted web application <appSettings>
<add key="ida:ClientId" value="<AZURE_APP_CLIENT_ID>"/>
<add key="ida:ClientSecret" value="<AZURE_APP_CLIENT_SECRET>"/>
<add key="ida:Authority" value="<AZURE_APP_AUTHORITY>"/>
<add key="ida:RedirectUri" value="https://<HOSTED_WEB_APP_DOMAIN>/oidc/redeemcode.aspx"/>
<add key="ida:PostLogoutRedirectUri" value="https://<HOSTED_WEB_APP_DOMAIN>"/>
<add key="ida:CacheTimeoutInMinutes" value="30"/>
</appSettings> -
Copy the "oidc" folder from the EmpowerID AuthNAuthO Toolkit and drop it in the WebForms application.
Files Description authorize.aspx Generates Azure login URL and redirects the user agent to the authorization endpoint redeemcode.aspx Exchanges the received authorization_code for an access token, creates the IPrincipal, and attaches the principal to the current HTTP session logout.aspx Logs users out of Azure and kills the current HTTP session -
Update the Login action to redirect to the
oidc/authorize.aspxpage.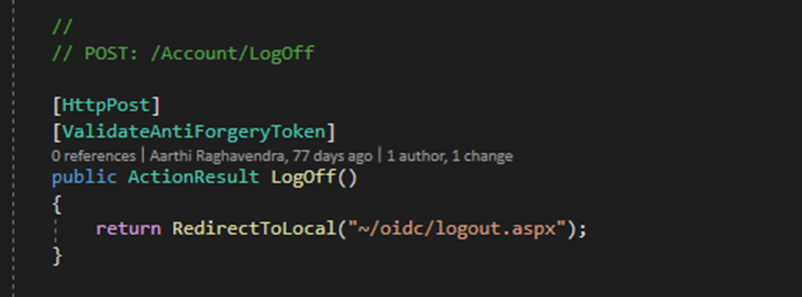
-
Update the Logout action to the
oidc/logout.aspxpage.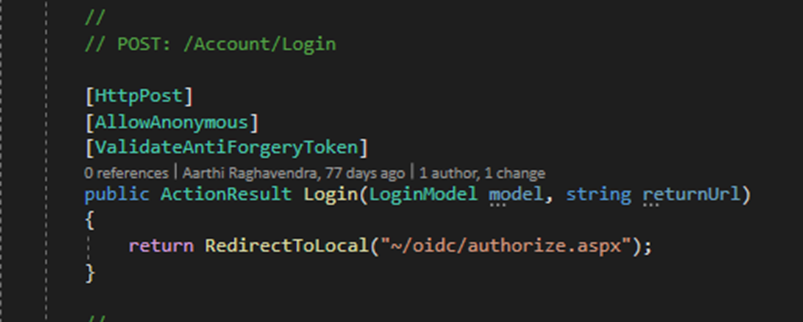
Step 3: Implement Custom Identity Token Validator
-
Create a Class Library project and reference the OIDC Auth Module assembly,
EmpowerID.OidcAuth.V47.dll. -
Add a class (i.e.,
MyCustomTokenValidator) that derives from theIIdentityTokenValidatorinterface and implement theValidateTokenmethod to set new claims and the Claims Principal on theIdentityTokenResponsemodel.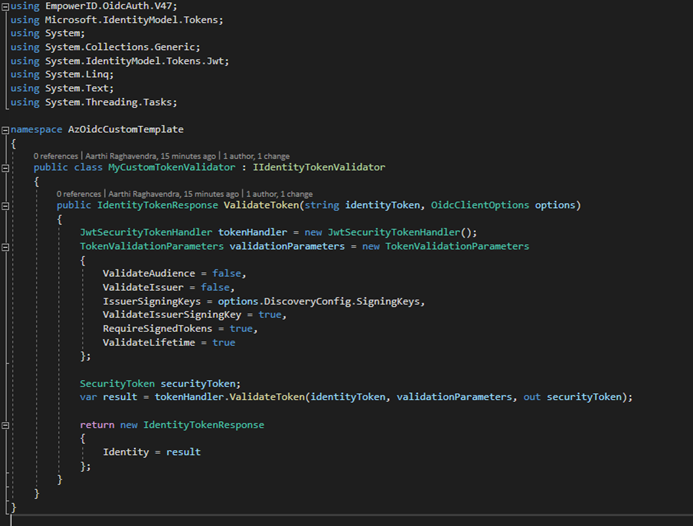
-
Add the
ida:IdentityTokenValidatorapp setting key in the Web.config file of the web application. The value of this setting is the assembly fully qualified name of the type that implements theIIdentityTokenValidatorinterface in theEmpowerID.OidcAuth.V47.dllassembly.<appSettings>
<add key="ida:IdentityTokenValidator" value="{namespace}.{class name}, {assembly name}"/>
</appSettings>
Step 4: Implement Custom Claims Transformer
-
Create a Class Library project and reference the OIDC Auth Module assembly,
EmpowerID.OidcAuth.V47.dll. -
Add a class (i.e.,
MyCustomClaimsTransformer) that derives from theIClaimsTransformerinterface and implement theTransformClaimsmethod to set new claims or transform existing claims.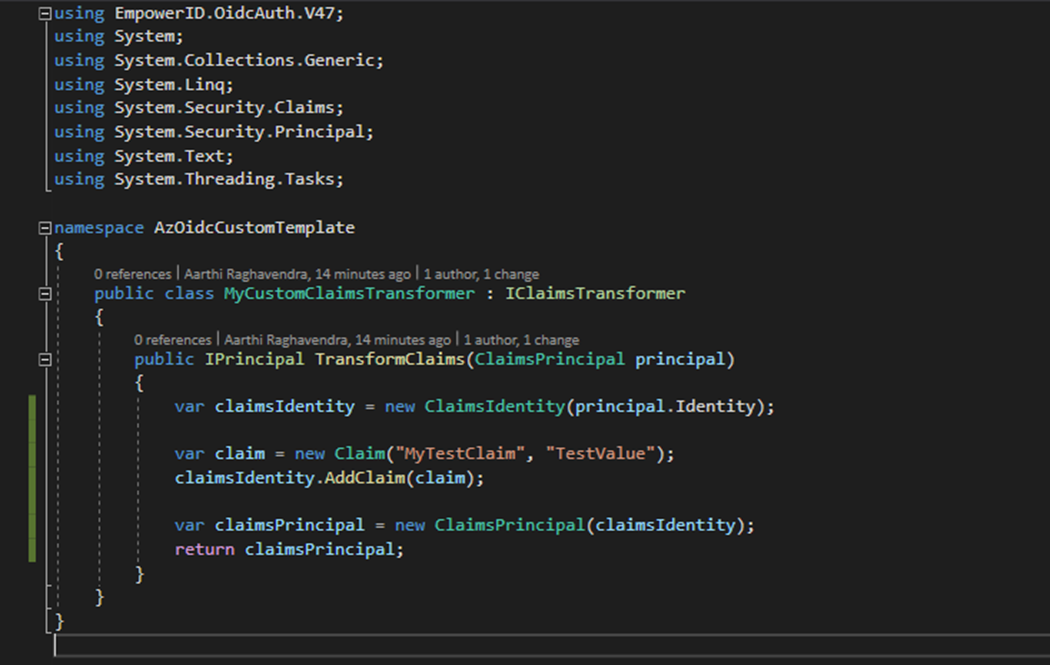
-
Add the
ida:ClaimsTransformerapp setting key in the Web.config file of the web application. The value of this setting is the assembly fully qualified name of the type that implements theIClaimsTransformerinterface in theEmpowerID.OidcAuth.V47.dllassembly.<appSettings>
<add key="ida:ClaimsTransformer" value="{namespace}.{class name}, {assembly name}"/>
</appSettings>