Azure Authentication using OWIN with ASP.NET
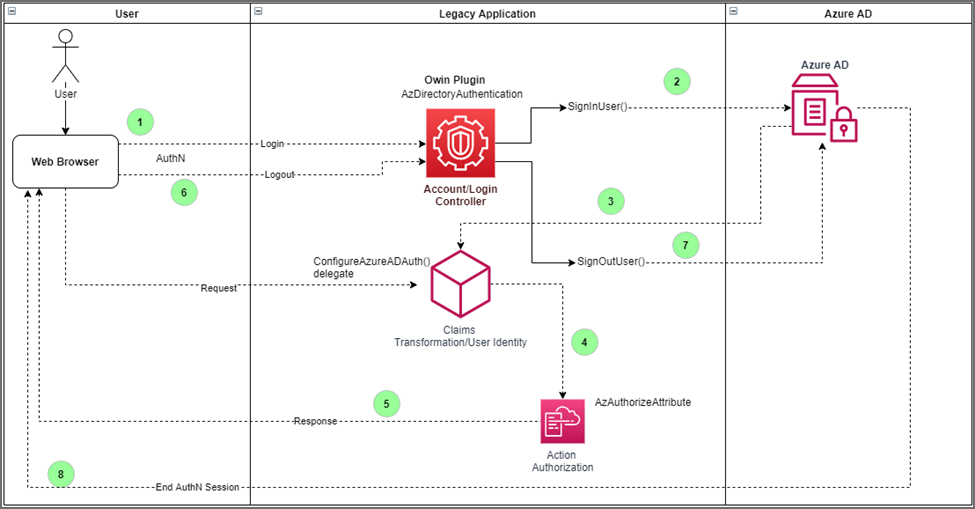
The EmpowerID Owin Plugin for Azure is an in-process Open Web Interface for .NET (OWIN) component for enabling Azure AD authentication in legacy MVC-based .NET web applications. This Plugin for Azure is a set of classes in the EmpowerID.OwinPlugIn.V47.dll assembly that you reference and use to modernize your legacy MVC web application with Azure AD authentication and authorization.
Step 1: Configure the Owin Plugin
Assembly information of Easy Auth HTTP Module
- Class: AzDirectoryAuthentication
- Assembly: EmpowerID.OwinPlugIn.V47.dll
- Platform: .NET Framework 4.7.2
-
Add the
EmpowerID.OwinPlugIn.V47.dllassembly reference to your MVC project and add the assembly levelOwinStartupAttributeto the main web application project.[assembly: OwinStartupAttribute(typeof(MyAppOwin.Startup))] -
In the
Startup.Configuration()method use theAzDirectoryAuthentication.ConfigureAzureADAuth()method to configure the Azure AD authentication for the application. You may need to use theAntiForgeryConfig.UniqueClaimTypeIdentifierto identify the claim type for the user identity claim.public void Configuration(IAppBuilder app) {
AntiForgeryConfig.UniqueClaimTypeIdentifier = "http://schemas.xmlsoap.org/ws/2005/05/identity/claims/nameidentifier";
AzDirectoryAuthentication.ConfigureAzureADAuth(app, Startup.Config, null,
delegate(Microsoft.Owin.IOwinContext context, IPrincipal principal) {
// Claims transformation code goes here
return new AuthenticationTicket((ClaimsIdentity) principal.Identity, new AuthenticationProperties());
});
} -
In the
Startupclass, you can create a static property to return theAuthenticationConfigpassed to theAzDirectoryAuthentication.ConfigureAzureADAuth()method. An instance of theAuthenticationConfigclass provides the configuration settings for the target Azure AD.These are some important settings to configure:
- ClientId: The Client ID or Application ID of the registered application in Azure AD.
- ClientSecret: A client secret generated in the registered application in Azure AD.
- Authority: The global Azure AD authentication endpoint.
- RedirectUri: The default landing URL of the application.
public static AuthenticationConfig Config
{
    get
    {
        return new AuthenticationConfig
        {
            ClientId = ConfigurationManager.AppSettings["ida:ClientId"],
            ClientSecret = ConfigurationManager.AppSettings["ida:ClientSecret"],
            RedirectUri = ConfigurationManager.AppSettings["ida:RedirectUri"],
            Authority = ConfigurationManager.AppSettings["ida:Authority"],
            BasicScope = "openid profile offline_access",
        };
    }
}
A sample of the configuration in the web.config is shown below.
<appSettings>
    <add key="ida:ClientId" value="ka05f2e5-e52d-446d-l49e-9ac1e9d492hf" />
    <add key="ida:ClientSecret" value="Zju7Q~AFH2OulZ4Pnb_VVJQwnjfS-Tk1YGhvV" />
    <add key="ida:Authority" value="https://login.microsoftonline.com/common/v2.0" />
    <add key="ida:RedirectUri" value="https://localhost:44327/" />
</appSettings>
Step 2: Implement the Custom Claims Transformer
-
You implement claims transformation with the Owin Plugin using the delegate passed to the
AzDirectoryAuthentication.ConfigureAzureADAuth()method. The delegate must return an instance ofAuthenticationTicketwith the current identity.delegate(Microsoft.Owin.IOwinContext context, IPrincipal principal) {
// Claims transformation code goes here
return new AuthenticationTicket((ClaimsIdentity) principal.Identity, new AuthenticationProperties());
}; -
Inside the delegate, you can add and remove Claims from the identity attached to the ClaimsPrincipal. Samples of adding, finding, and removing claims are provided below.
var claim = new Claim("preferred_username", "michael@hotmail.com");
((ClaimsIdentity)principal.Identity).AddClaim(claim);
System.Security.Claims.Claim claim = System.Security.Claims.ClaimsPrincipal.Current.FindFirst("preferred_username");
((ClaimsIdentity)principal.Identity).RemoveClaim(claim);
Step 3: Implement the Login and Logout Actions
-
Add a using statement to include
EmpowerID.OwinPlugIn.V47DLL in the controller with login and logout actions for your application.using EmpowerID.OwinPlugIn.V47; -
The
MsalAppBuilderclass contains extensions for theSignInUser()andSignOutUser(), which you can call in the controller for the login and logout actions. An example of the method implementation is shown below.[AllowAnonymous]
public async Task Login() {
await this.SignInUser();
}
[HttpPost]
[ValidateAntiForgeryToken]
public async Task<ActionResult> LogOff() {
await this.SignOutUser(Startup.Config);
return RedirectToAction("Index", "Home");
}
Step 4: How to Implement Role-based Authorization
-
The
[Authorize]attribute allows you to implement role-based authorization in your application. By default, Azure AD user App Roles assignments are included in the default set of claims issued by Azure AD. These App Roles can be used with the[Authorize]attribute.[Authorize]
public class AccountController: Controller {
public AccountController() {}
} -
To protect an action with roles, add the
[AzAuthorize]attribute and specify the roles the action demands. You can redirect to the route by specifying the controller and action you wish to redirect if and when authorization fails.[AzAuthorize(Roles = "Task.Write", ErrorAction = "NotAuthorized", ErrorController = "Account")]
public ActionResult Register() {
return View();
} -
If you wish to allow the application to throw an error with the Forbidden HTTP status code, set the
EnableForbiddenattribute parameter totrue.[AzAuthorize(Roles = "Task.Read,Task.Write", EnableForbidden = true)]
public ActionResult Register() {
return View();
}
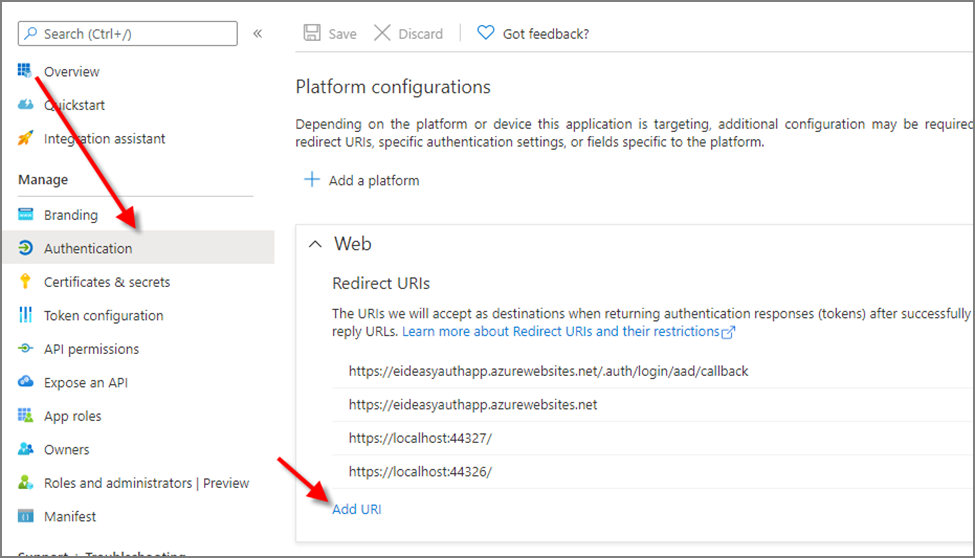
Configuring the Redirect URI in Azure
Add the Redirect URL to your application to the registered application in Azure.