JSON Signing and Encryption Tutorial
This tutorial demonstrates how to use JSON signing and encryption in EmpowerID.
What You'll Learn
In this tutorial, you will:
- Create a Web API application in Workflow Studio
- Generate a signing certificate using the EmpowerID Certificate Manager
- Create a client application to consume signed API requests
- Add code to encrypt API requests in Workflow Studio
- Create a client application to consume encrypted API requests
- Configure OAuth Provider Applications with signing certificates
Prerequisites
This tutorial assumes you are familiar with Workflow Studio, Visual Studio, C# programming, and OAuth concepts. You should have access to an EmpowerID environment and Visual Studio 2013 or above.
Create Web API Application in Workflow Studio
-
In Workflow Studio, create a new Class Library item named TestJWSApi and enable Web Api Implementation. To enable Web API implementation, go to the Properties tab and from the Property Grid, select Supports. From the list of Supported Types, select WebApi and click OK.
-
Switch to the Solution tab and from the Code Tree tab, right-click on the TestJWSApi item and from the context menu, select Add New WebApi Implementation.
-
In the Code Tree, expand the Classes folder. You should see that Workflow Studio generated the following four classes:
- SignedRequests.cs
- SignedRequestController.cs
- SignedRequestsInputModel.cs
- SignedRequestsRoutes.cs
-
From the Code Tree, double-click on SignedRequestsController.cs to open the file in the C# code editor.
-
Modify the SignedRequestsController class so that it appears as shown in the below code.
infoPlease note the use of
this.Json()instead ofthis.JsonWS().public class SignedRequestsController : ApiControllerBase
{
private SignedRequests _implInstance;
public SignedRequestsController()
{
_implInstance = new SignedRequests();
}
[JsonWebSignature]
[HttpPost]
public IHttpActionResult GetUserJWS(SignedRequestsInputModel model)
{
var results = _implInstance.GetUser(model);
return this.Json((object)results);
}
} -
Compile and Publish the TestJWSApi Class library item.
Create Signing Certificate
-
Locate and run the EmpowerID Certificate Manager, CertificateManager.exe, from the EmpowerID programs folder.
-
Click the Generate tab, select X509 Certificate, provide a Password and an Output Folder path.
-
Select the Import to EmpowerID Certificate Store and Import to Local Certificate Store options and then click Generate to generate a SHA256 self-signed certificate.
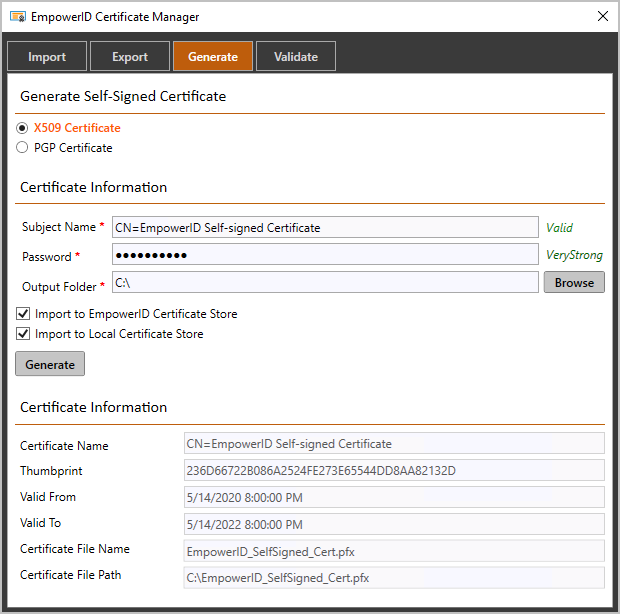 The newly generated private key certificate, EmpowerID_SelfSigned_Cert.pfx, will be added to the Output Folder you specified as well to the EmpowerID database and the Local Certificate Store under Personal Certificates.
 -
From the EmpowerID Web UI, create an OAuth Provider Application named TestOAuth. On the JSON Web Token tab, assign a Signing Certificate to the OAuth provider application. The Public Key of this certificate will be used to verify Signed JSON Requests to this application.
noteThe ClientID, ApiKey, and Client Secret of the TestOAuth OAuth Provider Application will be used later in this walkthrough.
Create Client Application for Signed Requests
-
Open Visual Studio 2013 or above and create a new Console Application project named TestSignedApiRequests.
-
Locate the following assemblies in the EmpowerID programs folder and add them to the project as references:
- TheDotNetFactory.Framework.SAML.dll
- Newtonsoft.Json.dll
- Microsoft.Practices.EnterpriseLibrary.Data.dll
- Microsoft.Practices.EnterpriseLibrary.Common.dll
- Microsoft.Practices.EnterpriseLibrary.Caching.dll
- Microsoft.IdentityModel.dll
-
Add a new class named SignedRequestsInputModel to the TestSignedApiRequests project and modify it so that it matches the code below:
using System;
using System.Collections.Generic;
using System.Linq;
using System.Text;
using System.Threading.Tasks;

namespace TestSignedApiRequests
{
    [Serializable]
    public class SignedRequestsInputModel
    {
        public int PersonId { get; set; }
    }
} -
In Visual Studio, open the Program.cs file in the code editor and add the below namespaces to it:
using TheDotNetFactory.Framework;
using System.Net;
using System.Security.Cryptography.X509Certificates;
using TheDotNetFactory.Framework.SAML.Api;
using TheDotNetFactory.Framework.SSOIdentity;
using Jose; -
In the body of the Main() method, declare the below variables:
-
tokenUrl – The URL to the EmpowerID Web Server in your environment
-
apiKey – The ApiKey from the TestOAuth OAuth Provider Application you created earlier
-
clientId – The ClientID from the TestOAuth OAuth Provider Application you created earlier
-
clientSecret – The ClientSecret from the TestOAuth OAuth Provider Application you created earlier
-
userName – The user requesting access token for the TestOAuth OAuth Provider Application you created earlier
-
password – The password of the user requesting access token for the TestOAuth OAuth Provider Application you created earlier
//Replace with values for your environment
string tokenUrl = "https://sso.empoweriam.com";
string apiKey = "1daa135a-a9de-4a1f-a31f-2e8747c7e0f2";
string clientId = "f9cc6222-2d1c-4802-938a-c6c35aaa38f8";
string clientSecret = "9b474344-2f36-41c1-b7ed-0fddb692edea";
string userName = "aapprover";
string password = "p@$$w0rd";
-
-
Add the code below to retrieve the certificate created in the previous section. The private key of this certificate is required to sign the JSON data in the REST api request. The public key of this certificate is associated with the TestOAuth OAuth Provider Application.
X509Certificate2 signing = CertificateUtility.GetCertificate(StoreName.My, StoreLocation.LocalMachine, "0D7CA16D88E58E28D543883F0F39D97BE775F0E9"); -
Add the below code to create a request for an access token to make calls to the API application you created earlier:
WebApiContext webApiContext = new WebApiContext(tokenUrl, userName, password, apiKey, clientId, clientSecret); -
Add the following code fragment to complete the code in the body of the Main() method:
using (WebClient webClient = webApiContext.CreateWebCreate())
{
    SignedRequestsInputModel input = new SignedRequestsInputModel { PersonId = 1 };
    string json = WebApi.ToJson<SignedRequestsInputModel>(input);
    string data = JWS.Sign(json, signing);
    byte[] str = System.Text.Encoding.UTF8.GetBytes(data);
    string actionUrl = "https://sso.empoweriam.com/api/services/v1/SignedRequests/GetUserJWS";
    byte[] results = webClient.UploadData(actionUrl, "POST", str);
    string output = System.Text.Encoding.UTF8.GetString(results);
    Console.WriteLine(output);
} -
Compile and run the TestSignedApiRequests console application. The output should state "User1".
Add Encryption Code in Workflow Studio
-
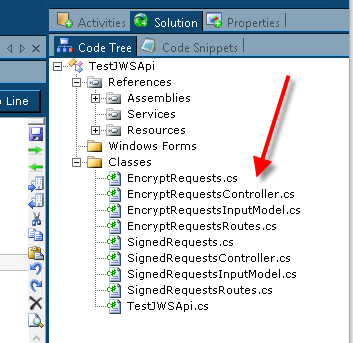
In Workflow Studio, open the Class Library item TestJWSApi created earlier. From the Code Tree tab, use the context menu to add a New WebApi Implementation named EncryptRequests.
The Code Tree should appear as shown below.
-
From the Code Tree, double-click EncryptRequestsController.cs to open the file in the C# code editor.
-
Modify the EncryptRequestsController class so that it appears as shown below:
public class EncryptRequestsController : ApiControllerBase
{
    private EncryptRequests _implInstance;
    public EncryptRequestsController()
    {
        _implInstance = new EncryptRequests();
    }

    [JsonWebEncryption(JweAlgorithm.A256KW, JweEncryption.A128CBC_HS256)]
    [HttpPost]
    public IHttpActionResult GetUserJWE(EncryptRequestsInputModel model)
    {
        var results = _implInstance.GetUser(model);
        return this.Json((object)results);
    }

    public override byte[] GetJWEDecryptionKey(System.Web.Http.Controllers.HttpActionContext actionContext)
    {
        return new byte[32]
        { 0x20, 0x20, 0x20, 0x20, 0x20, 0x20, 0x20, 0x20, 0x20, 0x20, 0x20, 0x20, 0x20, 0x20, 0x20, 0x20,
        0x20, 0x20, 0x20, 0x20, 0x20, 0x20, 0x20, 0x20, 0x20, 0x20, 0x20, 0x20, 0x20, 0x20, 0x20, 0x20
        };
    }
} -
Compile and Re-publish the TestJWSApi Class Library item.
-
Recycle IIS and the EmpowerID Web Role Service as necessary to update the Web API.
noteThe encryption algorithm and the type of encryption specified in the
JsonWebEncryptionattribute is determined by the specific encryption technique of interest to you. The above code assumes a Shared Secret Key specified by theGetJWEDecryptionKey()method. It is recommended that you follow the JOSE/JWT algorithm selection guide to determine which encryption algorithm is appropriate for your specific scenario – Algorithm selection guide.
Create Client Application for Encrypted Requests
-
Open Visual Studio 2013 or above and create a new Console Application project named TestEncryptApiRequests.
-
Locate the following assemblies in the EmpowerID programs folder and add them to the project as references:
- TheDotNetFactory.Framework.SAML.dll
- Newtonsoft.Json.dll
- Microsoft.Practices.EnterpriseLibrary.Data.dll
- Microsoft.Practices.EnterpriseLibrary.Common.dll
- Microsoft.Practices.EnterpriseLibrary.Caching.dll
- Microsoft.IdentityModel.dll
-
Add a new class named EncryptRequestsInputModel.cs to the TestEncryptApiRequests project and modify it so that it matches the code below:
using System;
using System.Collections.Generic;
using System.Linq;
using System.Text;
using System.Threading.Tasks;

namespace TestEncryptApiRequests
{
    [Serializable]
    public class EncryptRequestsInputModel
    {
        public int PersonId { get; set; }
    }
} -
Open the Program.cs file in the code editor and add the below namespaces:
using TheDotNetFactory.Framework;
using System.Net;
using System.Security.Cryptography.X509Certificates;
using TheDotNetFactory.Framework.SAML.Api;
using TheDotNetFactory.Framework.SSOIdentity;
using Jose; -
In the body of the Main() method, declare the below variables:
-
tokenUrl – The URL to the EmpowerID Web Server in your environment
-
apiKey – The ApiKey from the TestOAuth OAuth Provider Application you created earlier
-
clientId – The ClientID from the TestOAuth OAuth Provider Application you created earlier
-
clientSecret – The ClientSecret from the TestOAuth OAuth Provider Application you created earlier
-
userName – The user requesting the access token for the TestOAuth OAuth Provider Application you created earlier
-
password – The password of the user requesting the access token for the TestOAuth OAuth Provider Application you created earlier
//Replace with the values for your environment
string tokenUrl = "https://sso.empoweriam.com";
string apiKey = "1daa135a-a9de-4a1f-a31f-2e8747c7e0f2";
string clientId = "f9cc6222-2d1c-4802-938a-c6c35aaa38f8";
string clientSecret = "9b474344-2f36-41c1-b7ed-0fddb692edea";
string userName = "aapprover";
string password = "p@$$w0rd";
-
-
Add the code below to request an access token for making calls to the API application created earlier:
WebApiContext webApiContext = new WebApiContext(tokenUrl, userName, password, apiKey, clientId, clientSecret); -
Add the below code to create the JSON input data to encrypt:
EncryptRequestsInputModel input = new EncryptRequestsInputModel { PersonId = 1 };
string json = WebApi.ToJson<EncryptRequestsInputModel>(input); -
Add the below code fragment to complete the code in the body of the Main() method:
// Notice that the method, JWT.Encode(), is called to encrypt the json data with a shared secret
// prior to performing the HTTP-POST request to the REST endpoint.
using (WebClient webClient = webApiContext.CreateWebCreate())
{
    byte[] encryptionKey = new byte[32]
    { 0x20, 0x20, 0x20, 0x20, 0x20, 0x20, 0x20, 0x20, 0x20, 0x20, 0x20, 0x20, 0x20, 0x20, 0x20, 0x20,
    0x20, 0x20, 0x20, 0x20, 0x20, 0x20, 0x20, 0x20, 0x20, 0x20, 0x20, 0x20, 0x20, 0x20, 0x20, 0x20
    };

    //Encrypt the JSON data with the key specified by encryptionKey
    string data = JWT.Encode(json, encryptionKey, JweAlgorithm.A256KW, JweEncryption.A128CBC_HS256);

    byte[] str = System.Text.Encoding.UTF8.GetBytes(data);
    string actionUrl = "https://sso.empoweriam.com/api/services/v1/EncryptRequests/GetUserJWE";

    //Call the GetUserJWE endpoint.
    byte[] results = webClient.UploadData(actionUrl, "POST", str);

    //Write the output
    string output = System.Text.Encoding.UTF8.GetString(results);
    Console.WriteLine(output);
} -
Compile and run the TestEncryptApiRequests console application. The output should state "User1".