Creating and Assigning Provisioning Policies
This guide provides step-by-step instructions for creating and assigning provisioning policies in EmpowerID. These procedures apply to all resource types, with resource-specific configuration details covered in the Provisioning Policy Configuration by Resource Type.
Before You Begin
Prerequisites
Before creating provisioning policies, ensure the following requirements are met:
- Account Store Connection — EmpowerID must be connected to the target system (Active Directory, Azure AD, Salesforce, etc.)
- RET Settings Enabled — RET provisioning and RET deprovisioning must be enabled on the target account store
- Required Permissions — You must have administrative rights to create and manage provisioning policies
- RBAC Structure — Business Roles, Locations, and/or Management Roles should be defined for policy assignments
Planning Your Policy
Before creating a policy, determine:
- Resource Type — What will be provisioned (AD account, Exchange mailbox, application account, etc.)
- Target Population — Which RBAC actors will receive this resource (Business Roles and Locations, Management Roles, etc.)
- Lifecycle Actions — How resources should be handled during claim, transform, and revoke events
- Approval Requirements — Whether provisioning/deprovisioning should require manual approval
- Priority — How this policy ranks against other policies for the same resource type
Creating a Provisioning Policy
Step 1: Navigate to Provisioning Policies
- In the EmpowerID navbar, expand Identity Lifecycle.
- Click Provisioning Policies (RETs).
- On the Policies page, click the Add button at the top of the grid.
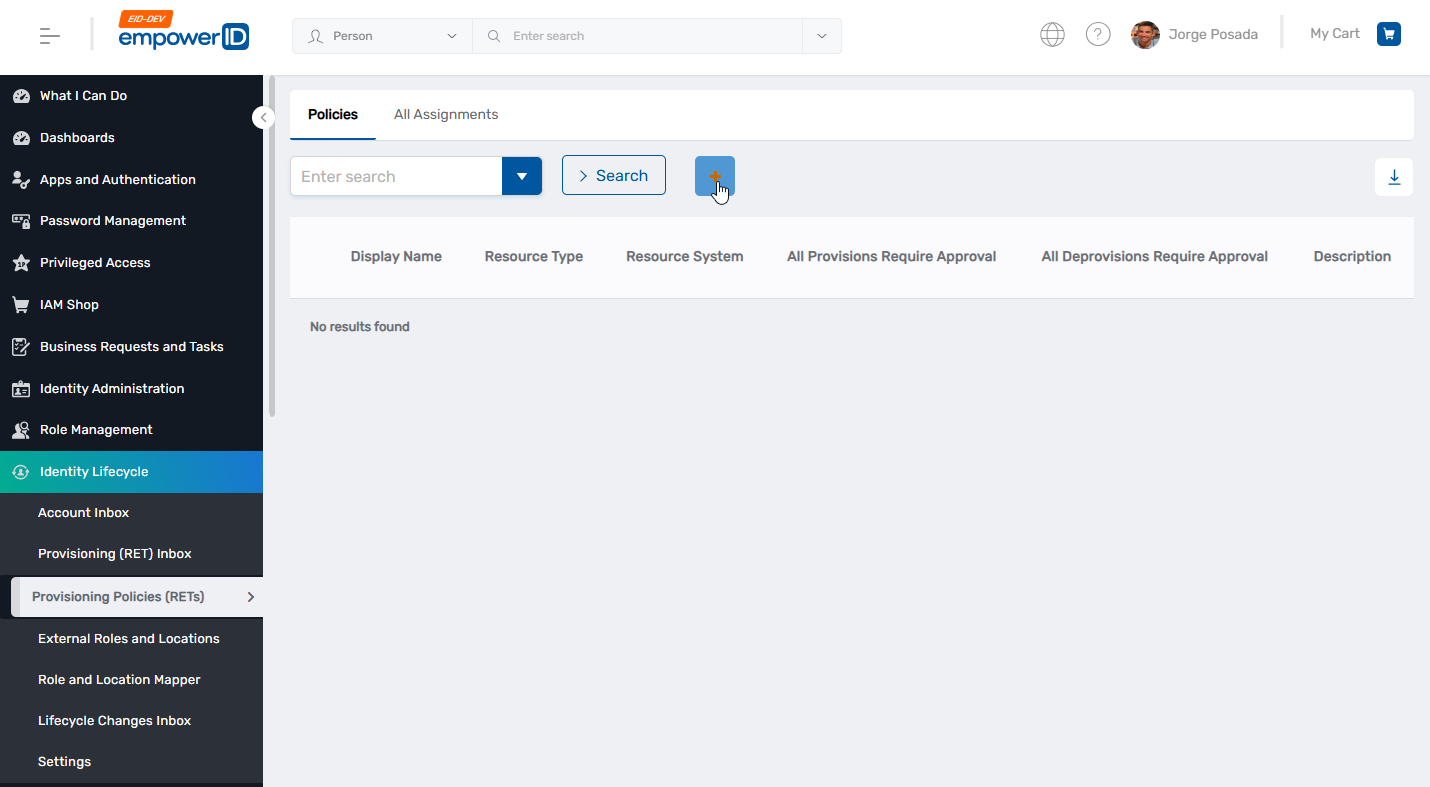 Figure 1: Navigate to Identity Lifecycle → Provisioning Policies and click the Add button
Step 2: Choose the Resource Type
Under Choose Type, select the appropriate resource from the Object Type To Provision drop-down:
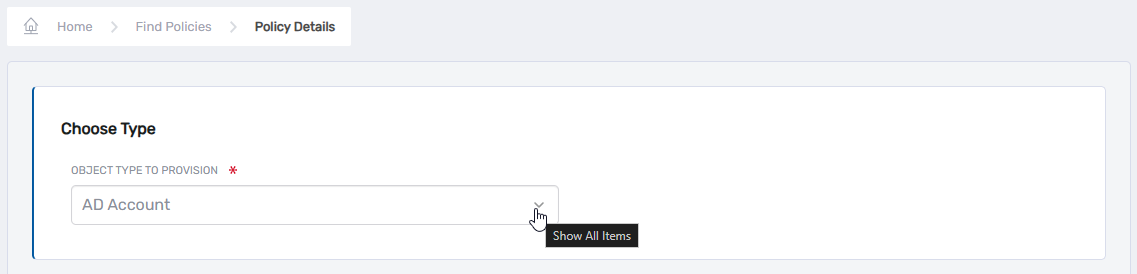 Figure 2: Select the Object Type To Provision from the dropdown
The dropdown includes numerous resource types such as:
- AD Account, Azure AD User, LDAP Account
- Exchange User Mailbox, Office365 Account, Office365 Contact
- SalesForce Account, Box Account, WebEx Account
- Windows Home Folder, SharePoint User Profile
- SAP ABAP User, Universal Connector Account
- And others based on your configured systems
The configuration fields in Step 3 will vary based on the resource type selected. For detailed configuration requirements for specific resource types, see the Provisioning Policy Configuration by Resource Type..
Step 3: Configure General Settings
Complete the following fields in the General section:
Required Fields
Name
Enter a descriptive name for the policy. Use a naming convention that clearly identifies the resource type and target population.
Example: AD Account - All Employees or Exchange Mailbox - Engineering Dept
Description
Enter a detailed description of the policy's purpose and scope. This helps other administrators understand the policy's intent.
Example: Provisions Active Directory accounts for all employees in standard business roles across all locations.
Resource-Specific Fields
The remaining fields in the General section vary by resource type. Common fields include:
Directory / Resource System
Select the target system where resources will be provisioned. This field is filtered based on the Object Type selected.
Object Class
Specify the object class for the resource. For most user accounts, this will be User. LDAP systems may use inetOrgPerson.
Creation Path (if applicable)
Optionally specify where resources should be created in the target system:
- Leave blank — EmpowerID will use the default RBAC mapping between EmpowerID Locations and the account store's organizational structure
- Click "Select an External Location" — Browse the directory tree and select a specific location (OU, container, etc.)
For most implementations, leave the Creation Path blank and rely on RBAC mappings. This provides flexibility when organizational structures change and ensures consistency across policies.
For additional resource-specific fields, see the Provisioning Policy Configuration by Resource Type..
Step 4: Configure Throttling Settings
Throttling settings provide governance controls over bulk provisioning and deprovisioning operations. Configure one or more of the following options:
| Setting | Purpose | When to Use |
|---|---|---|
| All Provisions Require Approval | Every provisioning action requires manual approval before execution | Implementing new policies in production, managing highly sensitive resources, or in regulated environments |
| All Deprovisions Require Approval | Every deprovisioning action requires manual approval before execution | Preventing accidental deletion of critical accounts or during policy testing |
| Provision Batch Threshold | Numeric value for maximum provisions in a single run without approval | Normal operations with protection against accidental mass provisioning |
| Deprovision Batch Threshold | Numeric value for maximum deprovisions in a single run without approval | Normal operations with protection against accidental mass deprovisioning |
Example: If the recalculation job determines that more than 100 accounts should be deprovisioned in a single run, the batch will be suspended and flagged for manual review. Admins can then approve or reject each item individually or as a group.
If a batch exceeds the threshold, none of the items in that batch will be processed until approval is granted. Set thresholds appropriately based on your environment's normal provisioning patterns.
Step 5: Configure Lifecycle Actions
The Advanced section defines how EmpowerID handles resources throughout the identity lifecycle. You must configure actions for three lifecycle events: Claim, Transform, and Revoke.
Understanding Lifecycle Actions
| Lifecycle Event | When It Occurs | Purpose |
|---|---|---|
| Claim | EmpowerID finds an existing resource that matches policy criteria but is not RET-managed | Brings existing resources under RET management |
| Transform | A person transitions from one policy to another for the same resource type (role/location change) | Updates resources when organizational identity changes |
| Revoke | A person no longer qualifies to receive the resource from any RET policy | Removes or disables access when entitlement ends |
Claim Action Options
Select the action to take when claiming existing resources:
| Action | What Happens | Common Use Cases |
|---|---|---|
| Do Nothing | Resource is marked as RET-managed with no other changes | Managing existing resources without disruption |
| Move | Resource is marked as RET-managed and moved to policy-specified location | Reorganizing accounts to match current RBAC structure |
| Delete and Recreate | Resource is deleted and rebuilt to policy specifications | Existing resources don't meet policy standards (use with caution) |
| Publish Workflow Event | Custom workflow code is executed | Complex claim logic, notifications, external integrations |
Transform Action Options
Select the action to take when a person transitions between policies:
| Action | What Happens | Common Use Cases |
|---|---|---|
| Do Nothing | RETID is updated with no other changes | Resources remain in place during role transitions |
| Move | RETID is updated and resource is moved to new location | Accounts follow organizational structure changes |
| Delete and Recreate | Resource is deleted and rebuilt to new policy specifications | Resources must be completely rebuilt for new role |
| Publish Workflow Event | Custom workflow code is executed | Complex transform logic, approval workflows |
Revoke Action Options
Select the action to take when entitlement ends:
| Action | What Happens | Common Use Cases |
|---|---|---|
| Do Nothing | RETID is removed, resource becomes unmanaged | Resources persist for archival or extended access |
| Deprovision | Resource is permanently deleted | Security policies require immediate removal |
| Disable | Resource is disabled but not deleted | Accounts retained for audit or potential reactivation |
| Disable and Move | Resource is disabled and moved to specified location | Disabled accounts segregated from active accounts |
| Publish Workflow Event | Custom workflow code is executed | Deprovisioning notifications, data archival, ticketing |
For most implementations:
- Claim Action: Do Nothing (manage existing resources without disruption)
- Transform Action: Move (keep resources aligned with organizational structure)
- Revoke Action: Disable and Move (preserve accounts for audit while blocking access)
Step 6: Configure Workflow Events (If Applicable)
If you selected "Publish Workflow Event" for any lifecycle action, specify the event registration name in the corresponding field:
- Claim Action Workflow Event
- Transform Action Workflow Event
- Revoke Action Workflow Event
The event name must match a predefined EmpowerID event registration. All workflows subscribed to that event will be triggered with the resource passed as an input parameter.
Step 7: Configure Creation Location (Advanced)
Creation Location Path Resolver Assembly and Creation Location Path Resolver Type allow you to use a custom assembly to dynamically determine where resources should be created based on complex business logic.
Leave these fields blank unless you have developed a custom resolver assembly in Workflow Studio.
For most implementations, rely on standard RBAC mappings between EmpowerID Locations and target system organizational units rather than custom resolvers.
Step 8: Save the Policy
Click Save to create the policy.
After EmpowerID creates the policy, you will be directed to the Policy Details page. At this point, the policy exists but is not active—it must be assigned to one or more RBAC actors before it will take effect.
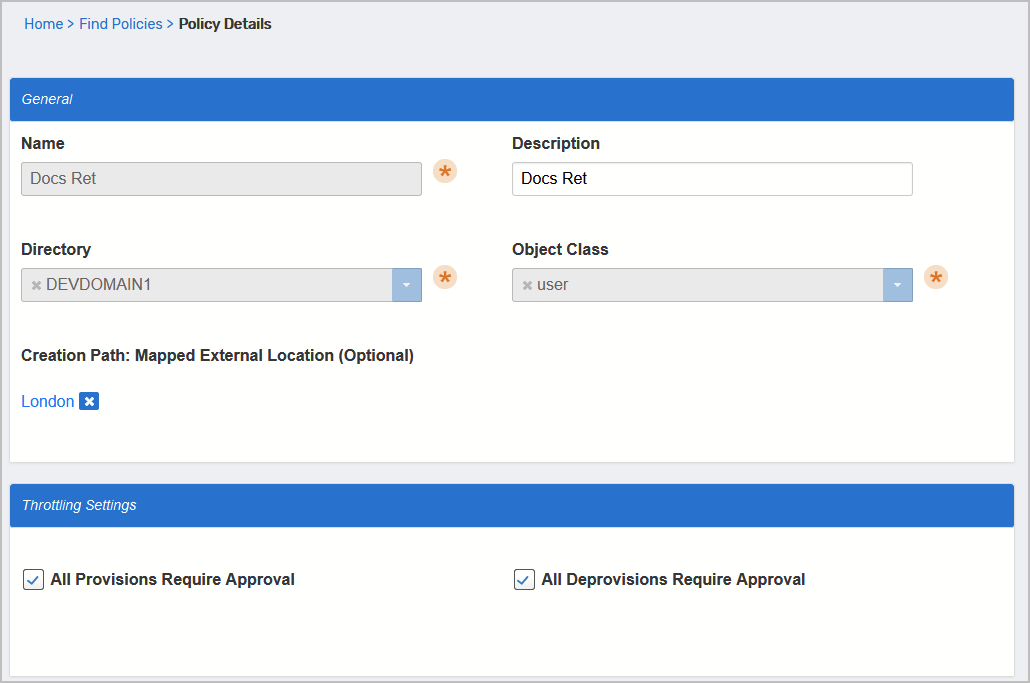 Figure 3: Completed Policy Details page showing the newly created provisioning policy
Assigning a Provisioning Policy
Provisioning policies do not take effect until they are assigned to RBAC actors. Assignments determine which people receive the resources specified by the policy.
Method 1: Assign from Policy Details Page
Step 1: Navigate to the Policy
- From the Policy Details page (after creating the policy), note the policy name.
- Click the Find Policies breadcrumb at the top of the page.
- Search for your policy and click the Display Name link.
This opens the View page for the policy, where you can manage all aspects of the policy including assignments.
Step 2: Expand the Assignees Accordion
On the View page, click the Assignees accordion to expand it.
This section displays all current assignments and allows you to add new ones. The accordion is organized by assignee type:
- Business Roles and Locations — All people in the selected Business Role and Location combinations receive the resource
- Management Roles — All people in the selected Management Roles receive the resource
- Management Role Definitions — All Management Roles that are children of the selected Management Role Definition receive the resource (provides inheritance)
- Query-Based Collections (SetGroup) — All people in the selected collection receive the resource
- Groups — All people in the selected groups receive the resource
- People — Specific individuals receive the resource (use sparingly for true birthright scenarios)
Step 3: Add an Assignment
- Click the Add button above the assignee type to which you are making the assignment.
- In the Add Entry pane that appears, search for and select the appropriate assignee.
- Enter a number in the Priority field to specify the priority for this assignment.
- Lower numbers = higher priority (e.g., 10 takes precedence over 100)
- The lower the number, the higher the priority
- This value is used to determine the priority of the RET if the user qualifies for the same RET via another assignment
- Click Save to add the assignment.
- Repeat for additional assignments as needed.
Step 4: Save the Policy
After adding all assignments, click the Save button on the main form to commit all changes.