Set Up Privileged Session Management
Privileged Session Manager (PSM) is an application cluster used to access, record, and monitor privileged sessions. It can be hosted as a Docker Swarm on local or cloud service locations. It launches when users with Login Session Access to a managed computer check out the credentials for that computer. You can configure PSM to record session activity, allowing Access Managers and other administrators to view what users do on the computer during a session.
This topic walks you through the process of setting up PSM. To completely set up PSM, you need to do the following:
- Install Docker and Docker-Compose on a Linux server. The Linux server is the PSM server.
- Create an OAuth application for PSM in EmpowerID.
- Configure EmpowerID System Settings for PSM.
- Generate a X509 certificate for the PSM OAuth application and upload it to the local machine and EmpowerID certificate stores.
- Create a service account (EmpowerID Person) for PSM and map the certificate to that service account.
- Use OpenSSL to extract the private and public key from the certificate.
- Create Docker secrets on the PSM server.
- Copy the psm.yml file you receive from EmpowerID to the root directory of the Linux server.
- Initiate Docker swarm mode on the Linux server.
- Pull the PSM Docker images from Dockerhub.
- Deploy the stack.
To comply with European Union GDPR (General Data Protection Regulation) that was implemented on May 25, 2018, you must do one of two things:
- Turn off live monitoring and session recording. (See Creating Privileged Session Policies.)
- Clearly alert the user that their session will be recorded, how it will be recorded, and that they can opt out of such monitoring by not continuing to the session.
To set up PSM, you must have a good understanding of containerization technologies and their advantages, the Docker Command Line and Docker Container Management System. If you are not familiar with Docker, the following resources may be helpful:
What is Docker?
What is Docker Hub?
What is Docker swarm?
In addition to understanding Docker, you must have access to the below PSM Docker images:
- empowerid/psm_app:0.1.0
- empowerid/psm_daemon:0.1.0
- empowerid/psm_uploader:0.1.0
OpenSSL
OpenSSL is needed to extract the KEY from the certificate you will generate and map the Service Account used for PSM. If you do not have OpenSSL installed, you can do so by following the instructions provided here:
PSM Server Installation Instructions
PSM Server requires a Linux instance (Amazon AMI/Ubuntu preferred). Follow the below instructions to install Docker and Docker-Compose on the server.
Ubuntu Installation
Run the following commands one after the other:
sudo apt-get remove docker docker-engine docker.io containerd runc

curl -fsSL https://download.docker.com/linux/ubuntu/gpg | sudo apt-get add -

sudo apt-get update

sudo apt-get install -y docker-ce

sudo systemctl status docker
Amazon AMI Installation
If you are running Linux on Amazon AMI, please follow the instructions provided by Amazon at the following link: Amazon ECS Docker Installation Guide
EmpowerID Server Setup Instructions
In order to implement PSM for your environment, there are a number of tasks you must complete on your EmpowerID server. These include:
- Creating an OAuth Application for PSM
- Configuring EmpowerID System Settings for PSM
- Generating a self-signed X509 certificate for PSM
- Creating a PSM service account (EmpowerID Person)
- Mapping the PSM certificate to PSM service account
Step 1 – Create an OAuth Application for PSM
-
On the navbar, expand Apps and Authentication and click Applications.
-
From the Actions pane, click Create OAuth Application.
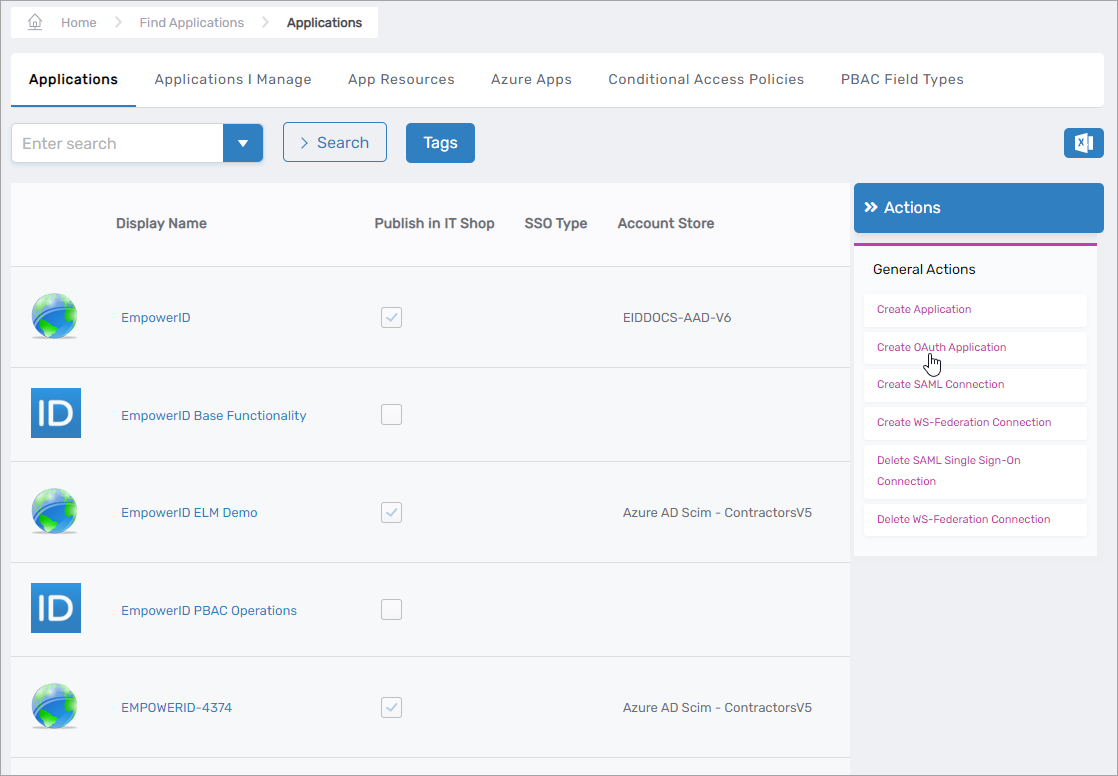 This opens the OAuth Provider Application Details form.
-
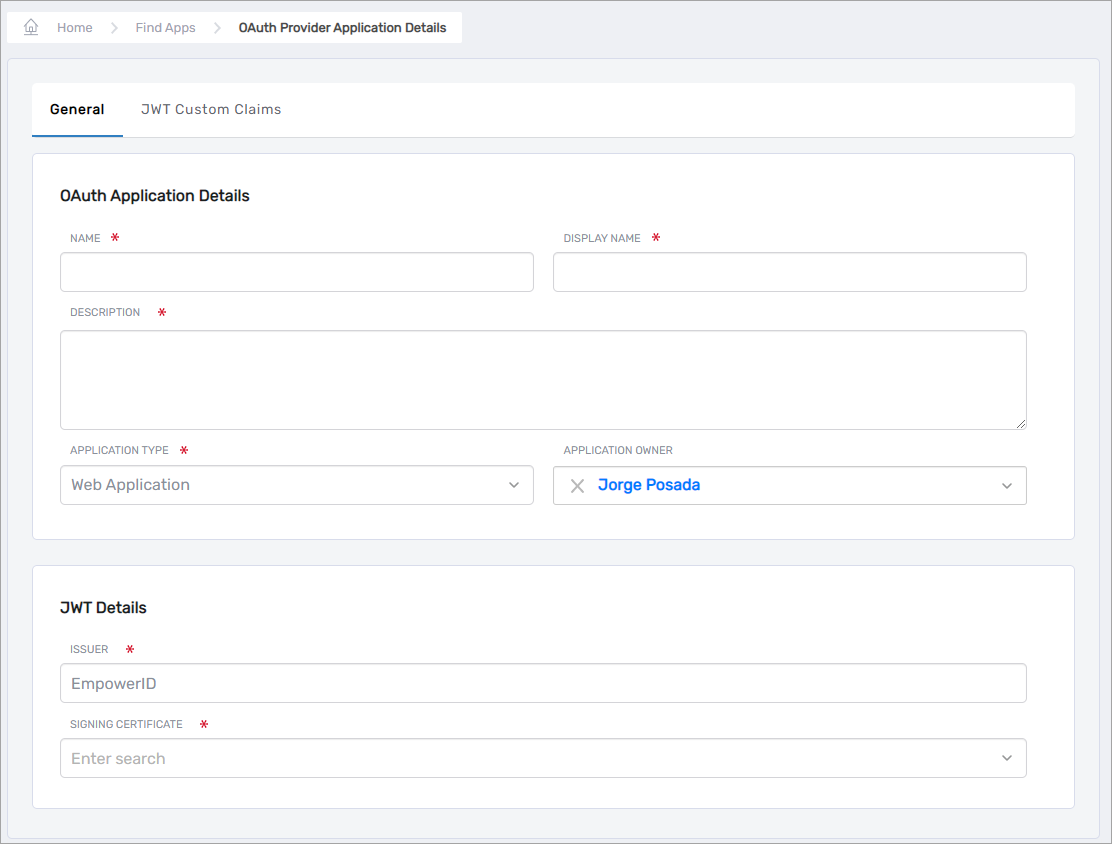
In the OAuth Application Details section of the form, do the following:
- Fill in the Name, Display Name and Description fields with values that reflect the purpose of the application.
- Select Web Application from the Application Type drop-down.
- Search for and select an owner for the application from the Application Owner drop-down. By default, the creator of the application is selected as the owner.
-
In the JWT Details section of the form, do the following:
- Leave the Issuer as EmpowerID
- Select the certificate used to sign assertions in your environment from the Signing Certificate drop-down.
-
Click Save.
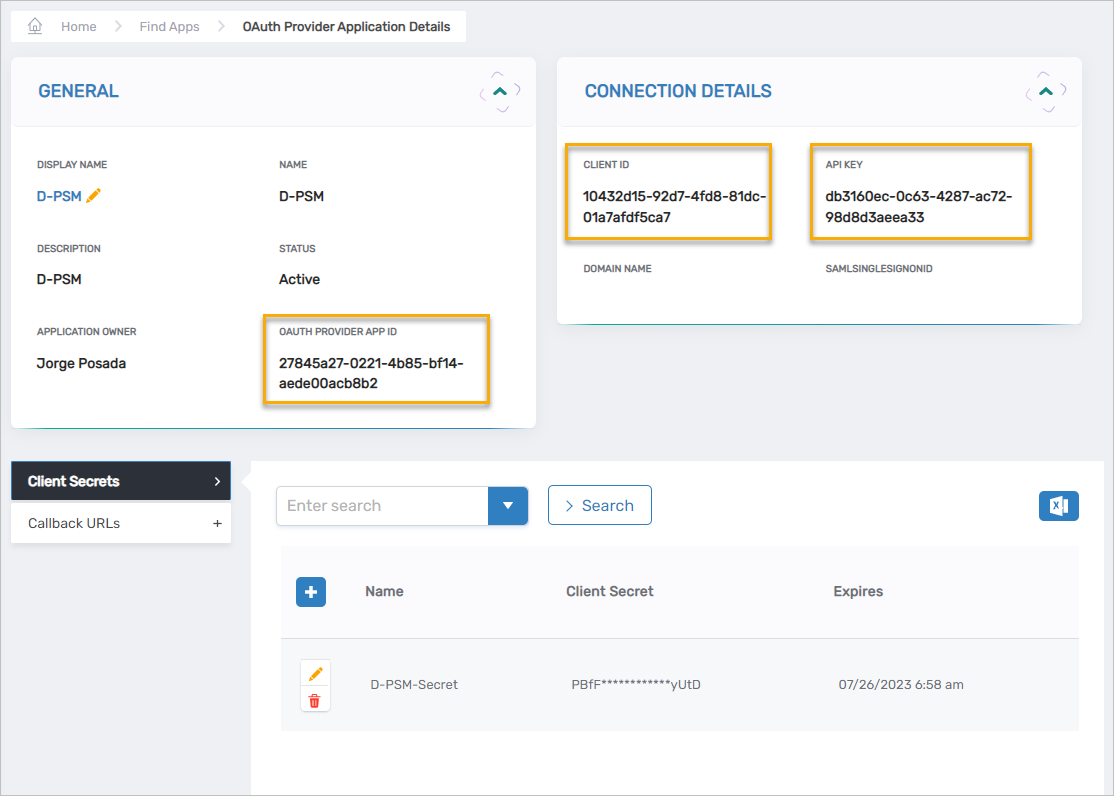
After EmpowerID creates the OAuth Provider application, your browser should be directed to the View One page for it.
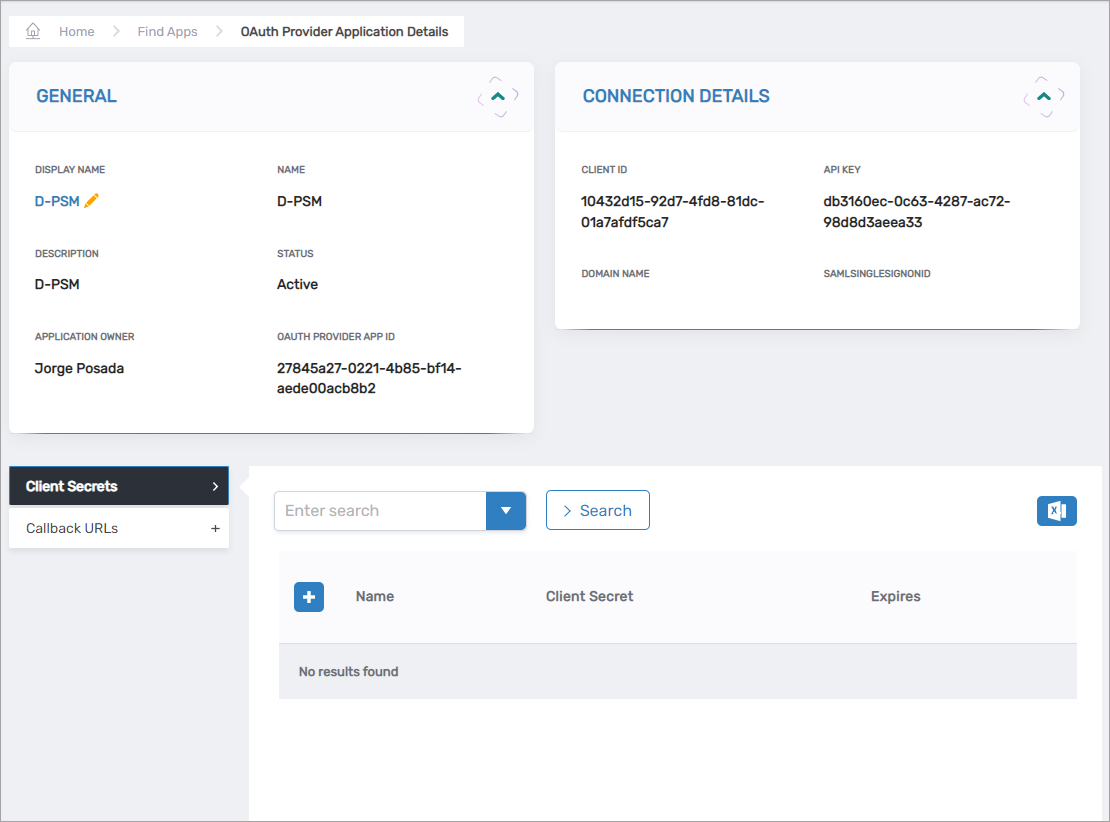
Step 2 – Add the Callback URLs to the app
- On the View One page for the application, expand the Callback URLs accordion and click the Add button.
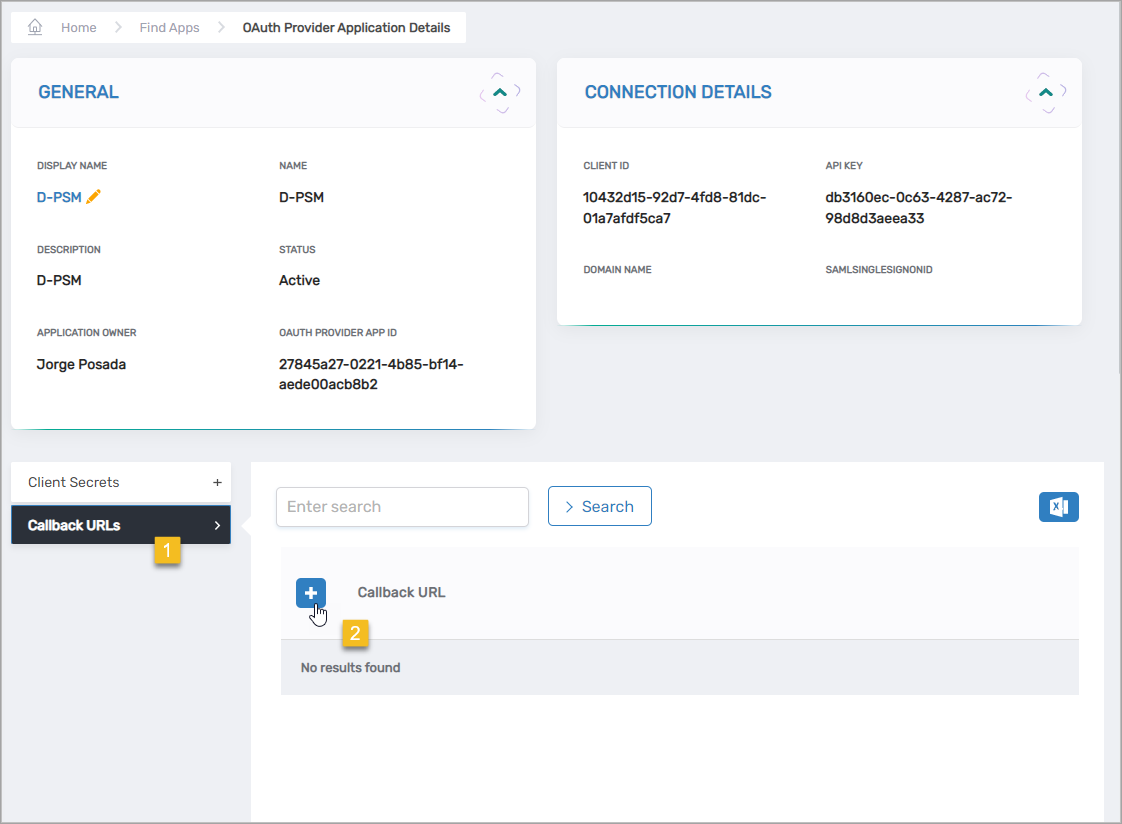
- Enter the FQDN of your EmpowerID server in the Callback URL field, formatted as
https://yourserver/ui, and then click Save. - Click the Add button again and add a second callback URL, formatted as
https://yourserver/WebIdPForms/OAuth/v2.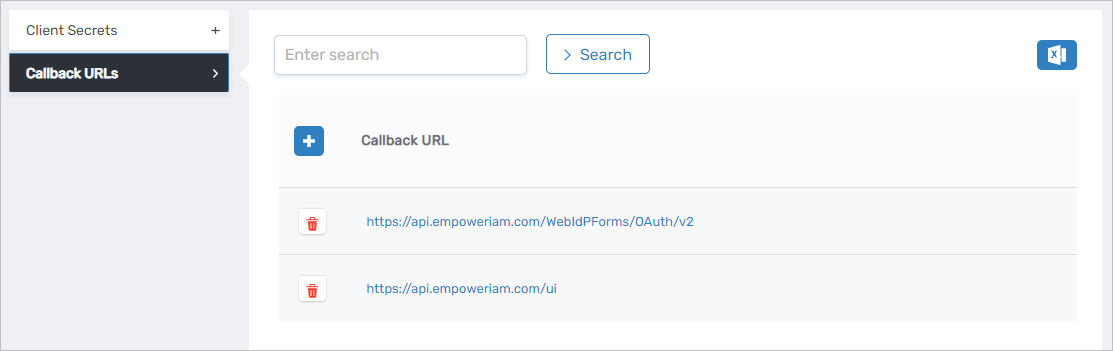
Step 3 – Add a client secret to the app
-
On the View One page for the application, expand the Client Secrets accordion and click the Add button.

-
In the General dialog that appears, do the following:
- Name – Name of the secret
- Expires – Select one of the below options:
- 1 year
- 2 years
- Never
- Client Secret – Copy and save this value as you will use it when creating Docker secrets later in this article.
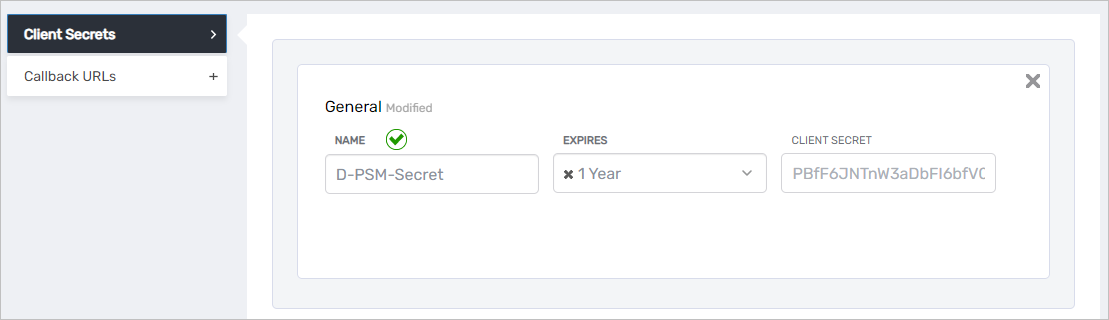
⚠️Security NoticeBe sure to save the Client Secret value before closing the dialog as you will not be able to retrieve it afterward.
-
Save the secret.
-
On the View One page for the application, copy the values for the Client ID, API Key and OAuthProviderApplicationID. You will use these when creating Docker secrets later in this topic.
Step 4 – Configure EmpowerID System Settings for PSM
-
On the navbar, expand Infrastructure Admin > EmpowerID Servers and Settings and select EmpowerID System Settings.
-
On the EmpowerID System Settings page, search for psm.
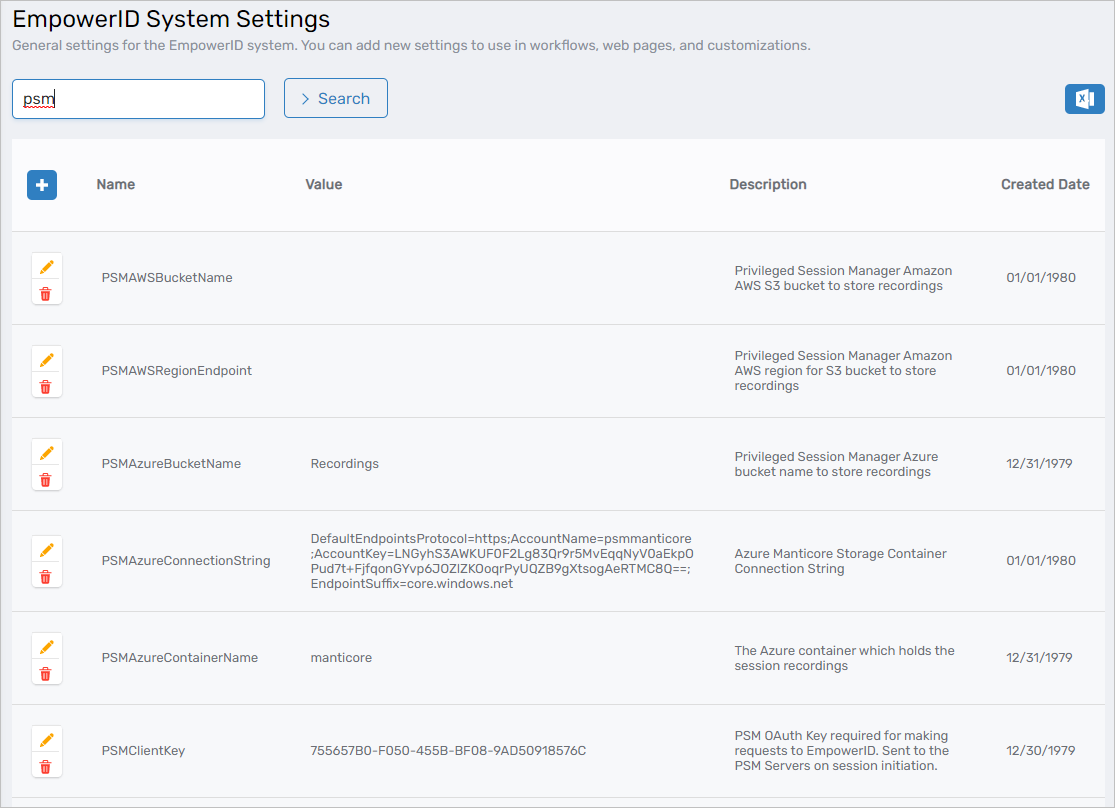
-
For each setting relevant to your implementation of PSM, click the Edit button and specify the value for your environment as referenced in the below table.
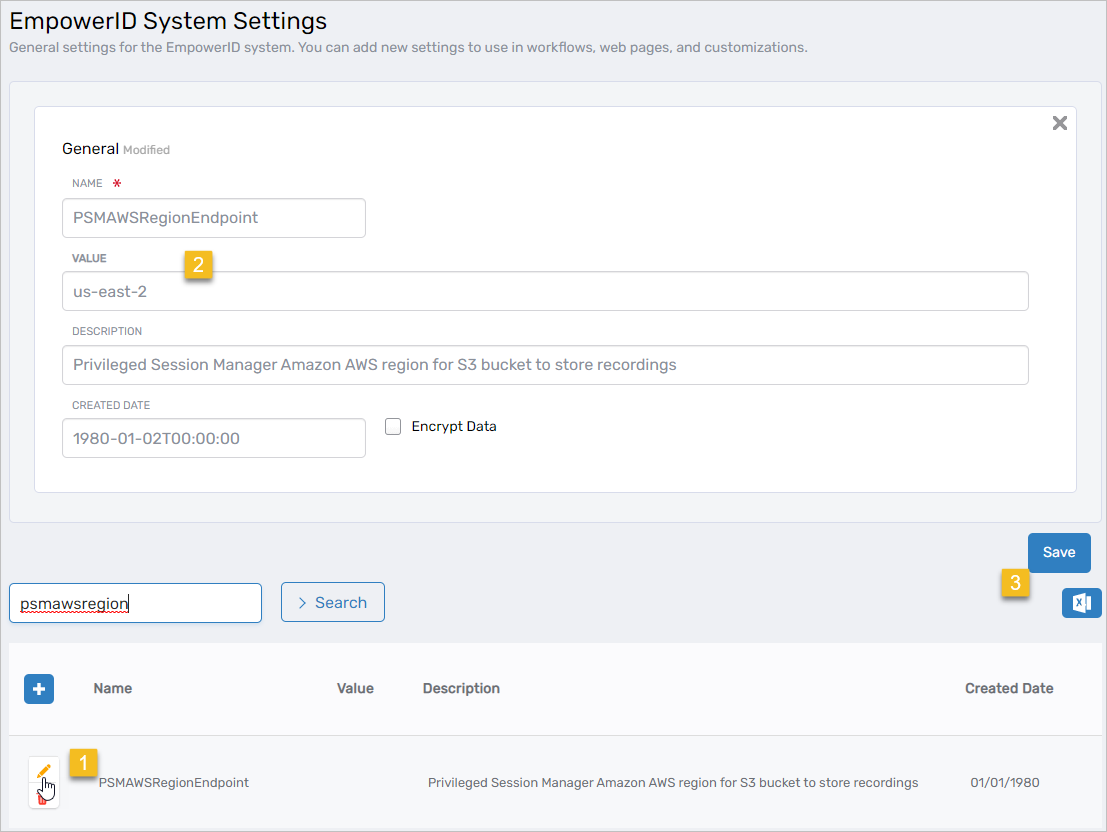
PSM Setting Required Purpose PSMAWSBucketName Optional Specifies the Amazon AWS S3 bucket to store recordings. Leave the value empty if you are not using AWS. PSMAWSRegionEndpoint Optional Specifies the Amazon AWS region for the S3 bucket for recordings. Leave the value empty if you are not using AWS. PSMAzureBucketName Optional Specifies the Azure bucket to store recordings. Leave the value empty if you are not using Azure. PSMEnabled Required Specifies whether the PSM RDP proxy is enabled in the EmpowerID user interface.
If set to false, users who request and receive approval to access a computer cannot initiate a PSM session from the My Resources view of the IT Shop.PSMStorageMode Required Specifies where to store session recordings. Valid values are: AWS, Azure, or UNC. PSMUNCStorageLocation Optional Specifies the UNC path to a network folder for storage of recordings when PSMStorageMode is set to UNC. PSMAzureConnectionString Required Specifies the UNC path to a network folder for storage of recordings when PSMStorageMode is set to UNC. PSMAzureContainerName Required The Azure container that holds the session recordings. PSMOAuthConsumerGUID Required Used to look up the OAuth Consumer credentials to use for AWS storage. PSMOAuthApplicationGUID Required Privileged Session Manager RDP Client OAuth Application GUID
Step 5 – Generate a self-signed certificate for PSM
-
On the navbar, expand Apps and Autentication > SSO Connections and select SSO Components.
-
Select the Certificates tab and then click the Add button in the grid header.
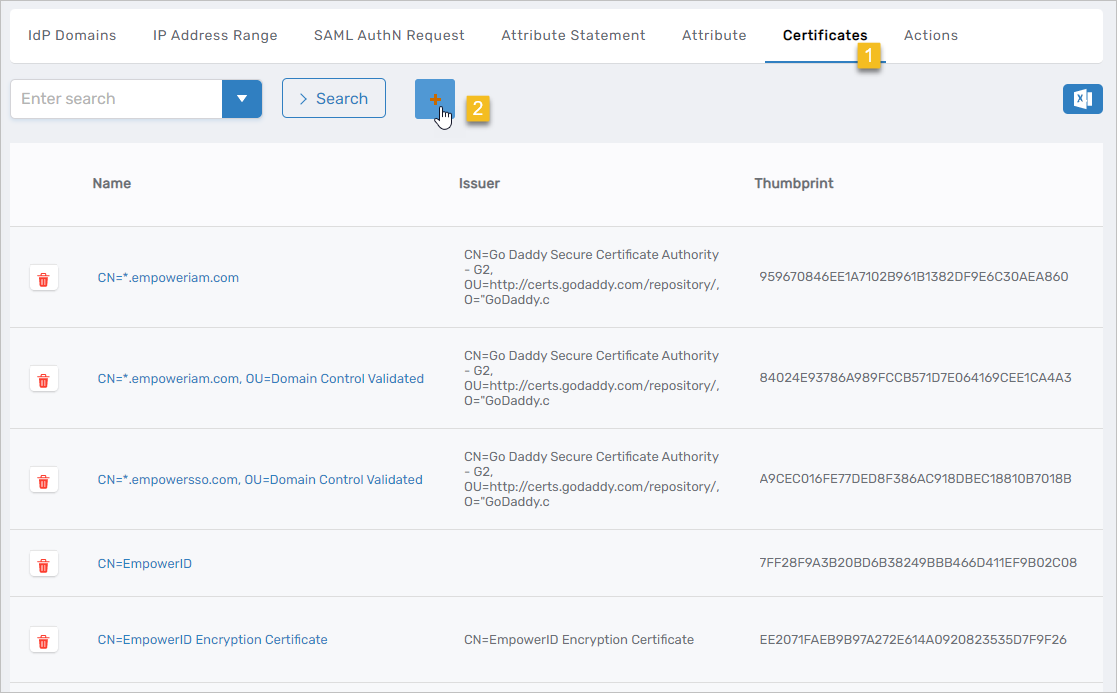
-
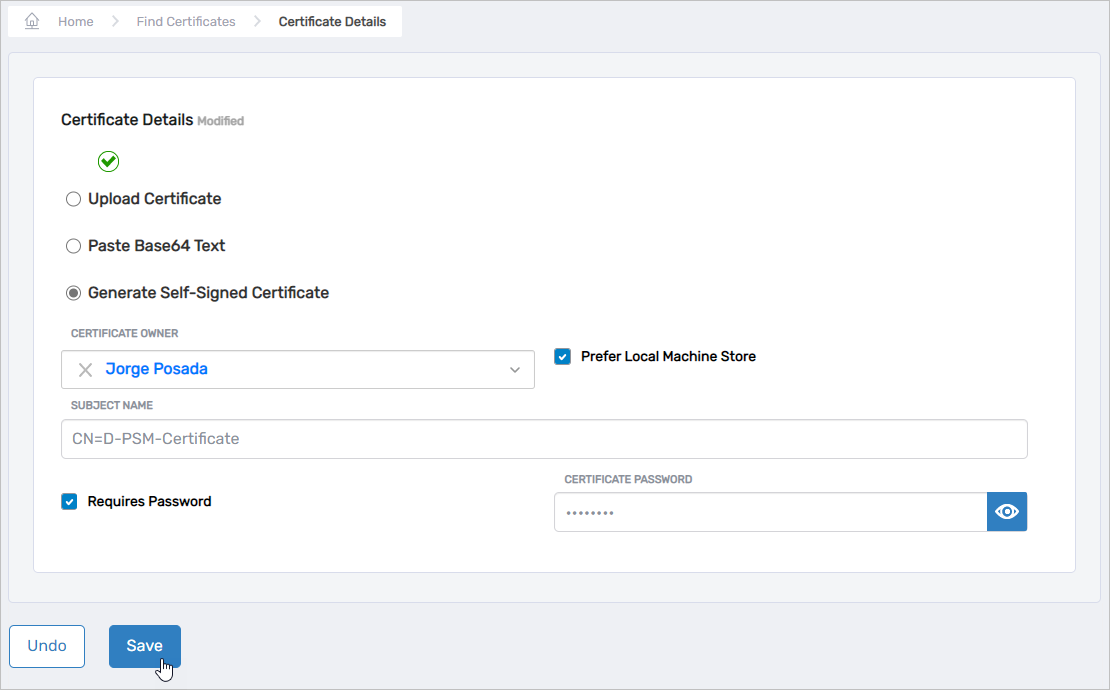
Select Generate Self-Signed Certificate and enter the following information:
- Certificate Owner – Search for and select an EmpowerID Person
- Prefer Local Machine Store – Select this option
- Subject Name – Enter something suitable to the purpose of the certificate, such as CN=PSM_Certificate
- Requires Password – Select this option
- Certificate Password – Enter a password for the certificate
-
Click Save to create the certificate.
Step 6 – Create the PSM Service Account
-
On the navbar, expand Identity Administration and click People.
-
Click the Create Person Simple Mode action link.
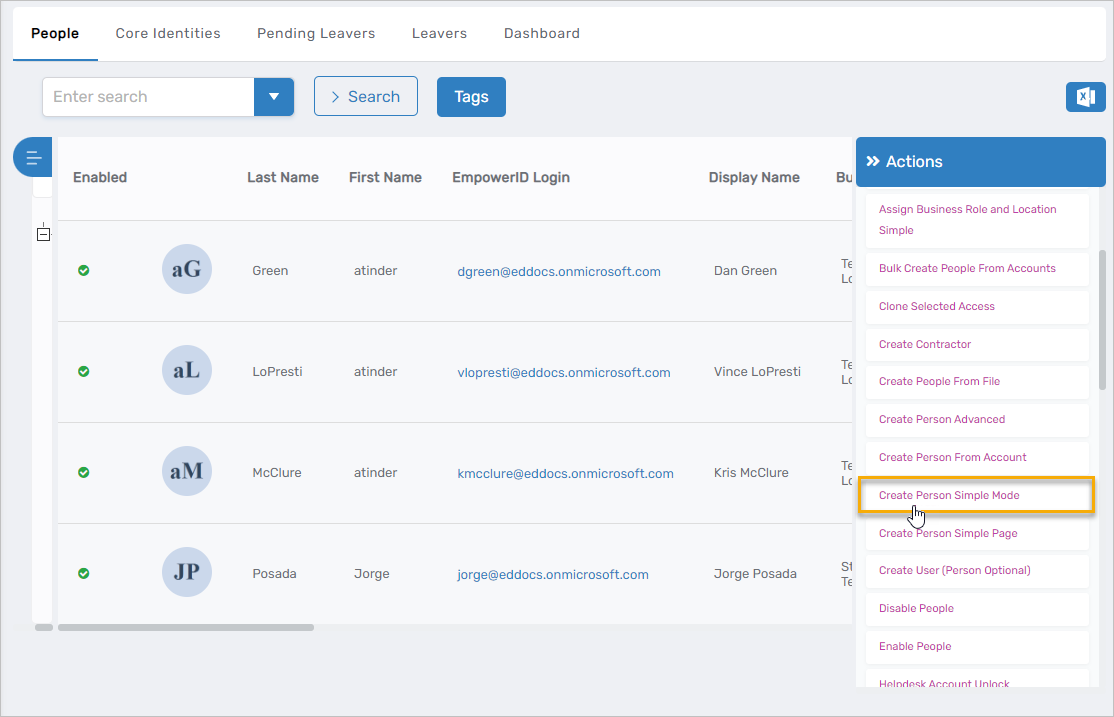
-
In the Create Person Request form that appears, do the following:
- Enter a First Name and Last Name for the Person account. As a best practice, the name should reflect the purpose of the Person account.
- Click the Select a Role and Location link.
- Search for and select the desired Business Role from the Business Role tree.
- Click the Location - link and then search for and select the desired location from the Location tree.
- Click Select to select the Business Role and Location.
- Click Save to save the new Person account.
After EmpowerID creates the Person object, your browser should be directed the View Page for the person.
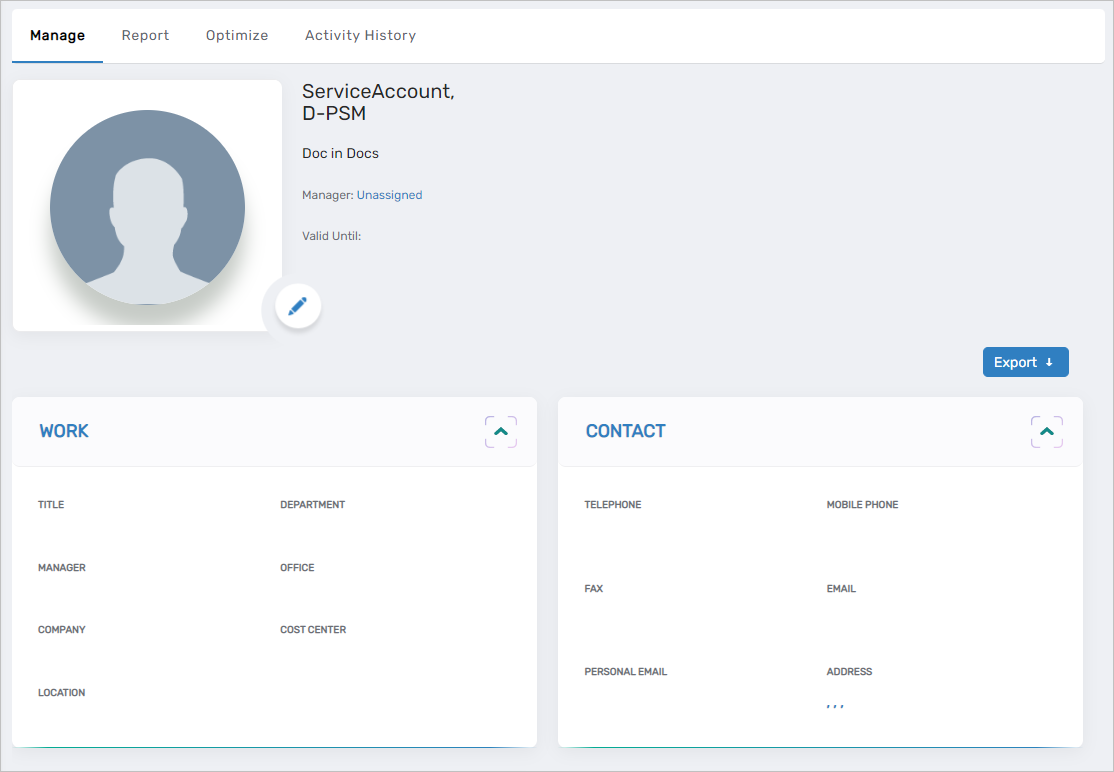
Next, map the PSM certificate to the Person as outlined below.
Step 7 – Map the PSM Certificate
- On the View page for the Person you just created, expand the Roles, Accounts, and Login Security accordion.
- Click the Edit link in the Mapped Login Certificates pane.
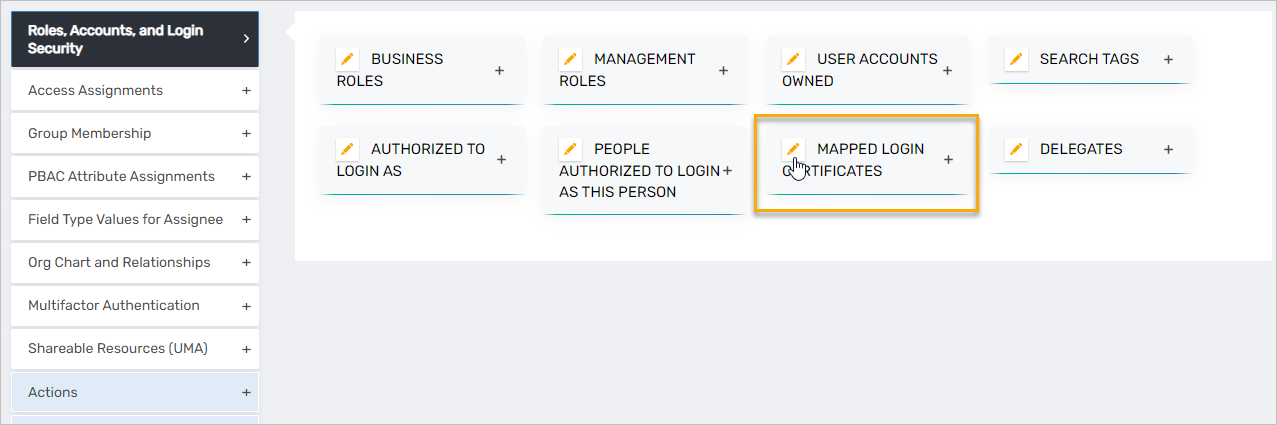
- Search for and select the PSM certificate you generated earlier and then click Save.
Extract the Key from the PFX File
-
To extract the private key, run the below OpenSSL command:
openssl pkcs12 -in <filename>.pfx -nocerts -nodes -out key.pem -
To extract the certificate (public key), run the OpenSSL command:
openssl pkcs12 -in <filename>.pfx -nokeys -out cert.pem
Create Docker Secrets and Keys on the PSM Server
You will need to create the following secrets and keys:
| Secrets | Description |
|---|---|
| PSM_EID_OAUTH_CLIENT_SECRET | The OAuth Client Secret of the OAuth application used to authenticate the PSM Uploader application |
| PSM_EID_OAUTH_CLIENT_ID | The OAuth Client ID of the OAuth application used to authenticate the PSM Uploader application |
| PSM_EID_OAUTH_API_KEY | The OAuth API Key of the OAuth application used to authenticate the PSM Uploader application |
| PSM_EID_SRV_ACCT_CERT_THMB | The Thumbprint of the certificate attached to the service user(Uploader Service account) for PSM in EmpowerID |
| PSM_EID_OAUTH_JWT_PFX | The Pfx of the certificate attached to the service user(Uploader Service account) for PSM in EmpowerID |
| PSM_EID_OAUTH_JWT_KEY | The JWT Key used to sign the payload with (Uploader) |
| PSM_EID_OAUTH_JWT_KEY_PASSPHRASE | Passphrase to the JWT Key used to sign the request payload with (Uploader) |
| PSM_SSL_PUB_CERT | PSM Application server SSL certificate (Public Cert) |
| PSM_SSL_PRIV_PEM | PSM Application server SSL certificate (Private Key) |
| PSM_SSL_PRIV_PEM_PW | PSM Application server SSL Private Key password |
| PSM_DAEMON_SERVER_CRYPTKEY | PSM Application – Daemon communication Cryptkey (needs to be the same as the PSM_GUAC_SERVER_CRYPTKEY) |
| PSM_GUAC_SERVER_CRYPTKEY | PSM Application – Daemon communication Cryptkey (needs to be the same as the PSM_ DAEMON_SERVER_CRYPTKEY) |
| PSM_AWS_ACCESS_KEY_ID | AWS Access Key ID for S3 recording storage |
| PSM_AWS_ACCESS_KEY_SECRET | AWS Access Key Secret for S3 recording storage |
| PSM_AZURE_STORAGE_ACCOUNT | Azure Storage account name for recording storage |
| PSM_AZURE_STORAGE_ACCESS_KEY | Azure Storage account access key for recording storage |
| PSM_AZURE_CONTAINER_NAME | Azure container name where recordings are stored |
| REMOTE_UNC_USERNAME | Remote UNC location (Shared Folder) Credential Username (For local UNC storage of session recordings) |
| REMOTE_UNC_DOMAIN | Remote UNC location (Shared Folder) Credential Domain |
| REMOTE_UNC_PASSWORD | Remote UNC location (Shared Folder) Credential Password |
| Keys | Default Value | Description |
|---|---|---|
| PSM_UPLOADER_SERVICE_URL | https://uploader.{your eid dns name}.co | The URL to the uploader service |
| PSM_EID_OAUTH_GRANT_TYPE | urn:ietf:params:oauth:granttype:jwtbearer | The OAuth Grant Type used to authenticate the uploader with EID. Do not change the value |
| PSM_EID_OAUTH_CALLBACK_URL | https/ | The EmpowerID Server URL |
| PSM_UPLOAD_TYPE | AZURE | The cloud storage service option (AZURE/AWS) |
| PSM_EID_SERVER_AUTHENTICATION_URL | https://{dns_of_your_empowerid_server}/oauth/v2/token | Temporary local storage for recordings on the Application Server |
| PSM_STORAGE_SHARE_LOCATION | /recording | |
| OAUTH_AUTHENTICATION_SERVICE_URL | https://{dns_of_your_empowerid_server}/oauth/v2/userinfo | |
| FAILURE_RETRIES_INTERVAL | 5000 | Retry interval for a failed session recording upload (milliseconds) |
| FAILURE_RETRIES_COUNT | 5 | Number of retries for a failed session recording upload |
| PSM_DAEMON_SERVER_PORT | 4822 | Daemon port |
| REMOTE_UNC_SHARE_LOCATION | {IP}\recording | Shared folder location for remote UNC Storage |
| REMOTE_UNC_PORT | 445 | Remote UNC port number to the shared folder location |
| PSM_UNC_SHARE_LOCATION | /recording | Temporary local storage on the Uploader service container |
| PSM_AZURE_CONTAINER_NAME | Azure Storage container name | |
| PSM_AWS_REGION | AWS region | |
| PSM_AWS_BUCKET_NAME | AWS storage bucket name |
How to Create a Docker Secret
The below examples demonstrate how to create Docker secrets for each of the types used by PSM:
docker secret create PSM_EID_OAUTH_JWT_KEY /home/ec2-user/PSM_OAuth_Certificate_PublickeyCertificate.pem
printf p@$$w0rd | docker secret create PSM_EID_OAUTH_JWT_KEY_PASSPHRASE -
docker secret create PSM_SSL_PUB_CERT /home/ec2-user/pub.pem
docker secret create PSM_SSL_PRIV_PEM /home/ec2-user/pri.pem
printf manticore | docker secret create PSM_AZURE_CONTAINER_NAME -
printf p@$$w0rd | docker secret create PSM_SSL_PRIV_PEM_PW -
printf 6EFvpDfwiqpVv4YJVVwjY4ks4dNyPKDy | docker secret create PSM_DAEMON_SERVER_CRYPTKEY -
printf 6EFvpDfwiqpVv4YJVVwjY4ks4dNyPKDy | docker secret create PSM_GUAC_SERVER_CRYPTKEY -
printf AKIAIWR4JVLRY5BIBOKA | docker secret create PSM_AWS_ACCESS_KEY_ID -
printf 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 | docker secret create PSM_AWS_ACCESS_KEY_SECRET -
printf psmmanticore | docker secret create PSM_AZURE_STORAGE_ACCOUNT -
printf LNGyhS3AWKUF0F2Lg83Qr9r5MvEqqNyV0aEkpOPud7t+FjfqonGYvp6JOZlZKOoqrPyUQZB9gXtsogAeRTMC8Q== | docker secret create PSM_AZURE_STORAGE_ACCESS_KEY -
printf username | docker secret create REMOTE_UNC_USERNAME -
printf domain | docker secret create REMOTE_UNC_DOMAIN -
printf passwprd | docker secret create REMOTE_UNC_PASSWORD -
Edit the Docker Stack YAML File
- Copy the psm.yml file you received from EmpowerID to the root directory of the Linux server.
- Edit the values as needed for your implementation.
- Save the psm.yml file.
Deploy the Docker Stack
- Initiate swarm mode by running
docker swarm init. - Pull the PSM Docker images from Docker Hub using the account EmpowerID support provisioned for you.
- Run the following command to deploy the stack:
docker stack deploy --with-registry-auth -c psm.yml psm - Verify the Docker containers are running by using the command
docker ps.